AI Nudify TUTORIAL THREAD - /b/ (#936693827) [Archived: 518 hours ago]

AssetsWiz
7/6/2025, 1:41:07 AM No.936693827
Tutorial Header
Tutorial Header
md5: e0389fcf58453f3efcc805574cfd081b🔍
THIS IS NOT A NUDIFY THREAD! DO NOT POST REQUESTS IN THIS THREAD!
This thread is a tutorial, from start to finish on how to install stable diffusion with ComfyUI and then use it for inpainting to make nudify images.
I will be explaining settings, processes, nodes, workflows, checkpoints and basically everything else you need to get started.
AssetsWiz
7/6/2025, 1:42:26 AM No.936693871
Tutorial 1
Tutorial 1
md5: 315ed62c3ea37fb21e7108b8de442726🔍
So you want to get started with AI? Not a problem. Most PCs should be able to handle this, it just takes a bit to get set up, and that's what I'm here to explain.
A quick disclaimer, my screenshots are all from Linux but I'll be posting the instructions for both Linux and Windows so if it looks a little different don't get discouraged.
The very first thing you're going to need to do is open up a command terminal.
On windows hit the windows key and type "cmd" then select comand prompt from the results. On Linux you just click the icon
Replies: >>936693891
AssetsWiz
7/6/2025, 1:42:51 AM No.936693891
Tutorial 2
Tutorial 2
md5: 0c627c287f542704493aa74b97f4f822🔍
>>936693871
Now we need to clone the repo to your machine.
If you have a specific folder you want to save all this to you'll have to navigate to that folder first.
Let's say you want to put everything in a folder called AI that you store in the root of your C drive. Then you just create an empty folder and use the command:
cd ai

I put mine in the root directory for now to make this tutorial easier.
Once you're in the folder where you want to put everything you need to download the repo to that folder. Use the command:
git clone https://github.com/comfyanonymous/ComfyUI.git
Replies: >>936693906
AssetsWiz
7/6/2025, 1:43:13 AM No.936693906
Tutorial 3
Tutorial 3
md5: 335e60a30d45f9fb4639c4423d29e03f🔍
>>936693891
now you simply need to use the command:
cd comfyui

This will make your active directory the folder that everything is stored in. You're going to need to remember this location because you're going to need to go to this folder any time you want to start up your AI.
So if, as I mentioned earlier, you wanted to store it in a folder called AI, you would first need to run cd ai then cd comfyui, or you should be able to run cd ai/comfyui
Replies: >>936693916
AssetsWiz
7/6/2025, 1:43:29 AM No.936693916
>>936693906
OK, I'm going to skip some of the screenshots for the command terminal stuff.
Next you run:
python -m venv venv

This creates a virtual environment (a temporary computer that exists inside of your computer).
Now the commands get different from Linux and Windows. Windows Command:
venv\Scripts\activate.bat

Linux Command:
source venv/bin/activate

This actually starts up the virtual environment and is a command you'll need to run any time you want to start up your AI
Replies: >>936693925
AssetsWiz
7/6/2025, 1:43:47 AM No.936693925
>>936693916
Now we need to install some tools that the AI needs in order to run.
Windows or Linux command:
pip install torch torchvision torchaudio --extra-index-url https://download.pytorch.org/whl/cu121

After that finishes running you then need to run this command:
pip install -r requirements.txt

After those finish you're basically set up and ready to go, at least if all you wanted was to generate images based on text. Inpainting (the thing we do when nudifying) takes a little more setup, but don't worry, we're mostly done with the command terminal
Replies: >>936693946
AssetsWiz
7/6/2025, 1:44:34 AM No.936693946
Tutorial 4
Tutorial 4
md5: b68636a294299aad9dc6159dfedb330d🔍
>>936693925
Alright, this is the last screenshot of the command terminal stuff but it's an important one. Any time you want to start up your AI you're going to need to run a few commands.
You need to get to the directory comfyUI is stored at, you need to start the virtual environment, and you need to actually run the program within the virtual environment.

On Windows it'll look like:
cd comfyui
venv\Scripts\activate.bat
python main.py

On Linux it'll look like:
cd comfyui
source venv/bin/activate
python main.py

Once it finishes running just open your web browser and go to the address that it gave you in the command terminal (since we're running this locally instead of setting up a web server it should start with http://127.0.0.1:)
Replies: >>936693973
AssetsWiz
7/6/2025, 1:45:14 AM No.936693973
Tutorial 5
Tutorial 5
md5: c312f6bfa013498e36e7155021ed3e68🔍
>>936693946
OK, so we're actually done with the technical part of the setup. Now we just need to make the workflow and download a model.
When you go to interface for your AI you're going to see a premade tutorial workflow already set up for you. If you want to test it out just enter a prompt and hit queue and it'll generate an image based on the prompt.
The default model isn't great, and this workflow doesn't do anything but generate an image based on a prompt, but if you want to make sure you've set everything up hit the button and try it out
Replies: >>936693992
AssetsWiz
7/6/2025, 1:45:52 AM No.936693992
Tutorial 6
Tutorial 6
md5: 518b54697c0d52b393c7d51a875fd9fa🔍
>>936693973
Before we get to the inpainting though, I'm going to show you *why* we go through all this trouble. Suppose you just want to load an image in, give it a prompt, and then let the AI do it's thing. Skipping over how to set this up (for now) this is a basic image to image workflow that will allow you to do just that: Load an image, apply a prompt, hit run and watch the magic. So let's try just that.
Replies: >>936694001
AssetsWiz
7/6/2025, 1:46:11 AM No.936694001
Tutorial 7
Tutorial 7
md5: 7c8beaa4e4c1308e0b614f5299867736🔍
>>936693992
Oh... What the fuck happened? Well a lot of things were wrong with this approach, but in essence, the ai doesn't really know what it's looking at. So if you just say nude it will arbitrarily decide what is supposed to be nude on that picture and then make something similar. There's also a setting called denoise which controls how much the ai changes of the original picture. I set the denoise at .50 so that it would still be somewhat recognizable while making visible changes. If I had set it closer to 1.0 then it would have replaced almost the entire image. So If you want it to make a significant change like removing clothes, you need your denoise set higher, but that also warps the picture more. So we need extra instructions for the ai to know what to change and where before it can make anything even close to what we want. Also it took a solid 2 and a half minutes for my computer to generate it. Not bad for an old laptop, sure, but still frustrating to have to wait so long to see if it worked. We'll fix all of that though, just follow along.
Replies: >>936694045
AssetsWiz
7/6/2025, 1:47:25 AM No.936694045
Tutorial 8
Tutorial 8
md5: cd3a4eef7f2b8d6f48a5342b38728119🔍
>>936694001
Now... instead of using the default I'm going to show you how to build a new workflow. (if you want to skip some of the fancier stuff I do then you can just get the template inpainting workflow but clicking "Workflows>Browse Templates", then you can skip the next couple of steps)

This is a basic starter inpainting workflow, I'll go over each group and what it does, but feel free to use this as a reference for setting yours up
Replies: >>936694074
AssetsWiz
7/6/2025, 1:48:06 AM No.936694074
Tutorial 9
Tutorial 9
md5: 0dc9bdabc9084ce7fc0ebde66a87a734🔍
>>936694045
First up we have the Checkpoint/VAE group, this is essentially the start and finish of the processing your image. Since nothing really changes on these I group them off to the side on their own.
The Load Checkpoint node loads in the model that you'll be using and the VAE Decode node takes the processed static from the image and turns it into the finished image.
Replies: >>936694089
AssetsWiz
7/6/2025, 1:48:32 AM No.936694089
Tutorial 10
Tutorial 10
md5: e0735d7b31ab2c39db64ca75efc95ffa🔍
>>936694074
Next up we have the load image/mask group. This is essential for inpainting.
The Load Image node brings the image you want to work on into the ai.
The Feather Mask blurs the edges of the area you want to work on so that your edits blend into the finished image smoother.
The VAE encode breaks the image into static for the AI figure out how it's constructed in the first place. This specific version also tells it to grow the mask which basically means that it looks at stuff slightly outside of the selected area.

Don't worry, I'll explain more about image masks in a minute
Replies: >>936694110
AssetsWiz
7/6/2025, 1:49:09 AM No.936694110
Tutorial 11
Tutorial 11
md5: d0c4f4e72e0c0c445b950d92e5b22497🔍
>>936694089
Now we have Prompts. Pretty self explanatory here. The positive prompts tell the ai what you want to add and the negative prompts tell the ai what you want to avoid.
For inpainting you almost never use negative prompts. I find some limited use out of it if I find that it's trying to draw a full body and I just want it to draw a torso, but more often than not I'll get a better result by just rewording the positive prompt.
The negative prompt is more useful when you're making a brand new image from text, but for the most part you don't want to touch it unless you're having trouble with a particular part or area (like if you've tried several times and it just keeps fucking up the hands so you put hands into the negative prompt and it should hide them behind something)
Replies: >>936694130
AssetsWiz
7/6/2025, 1:49:36 AM No.936694130
Tutorial 12
Tutorial 12
md5: d6ebd2d5047da6ea0b4c397e9abe473f🔍
>>936694110
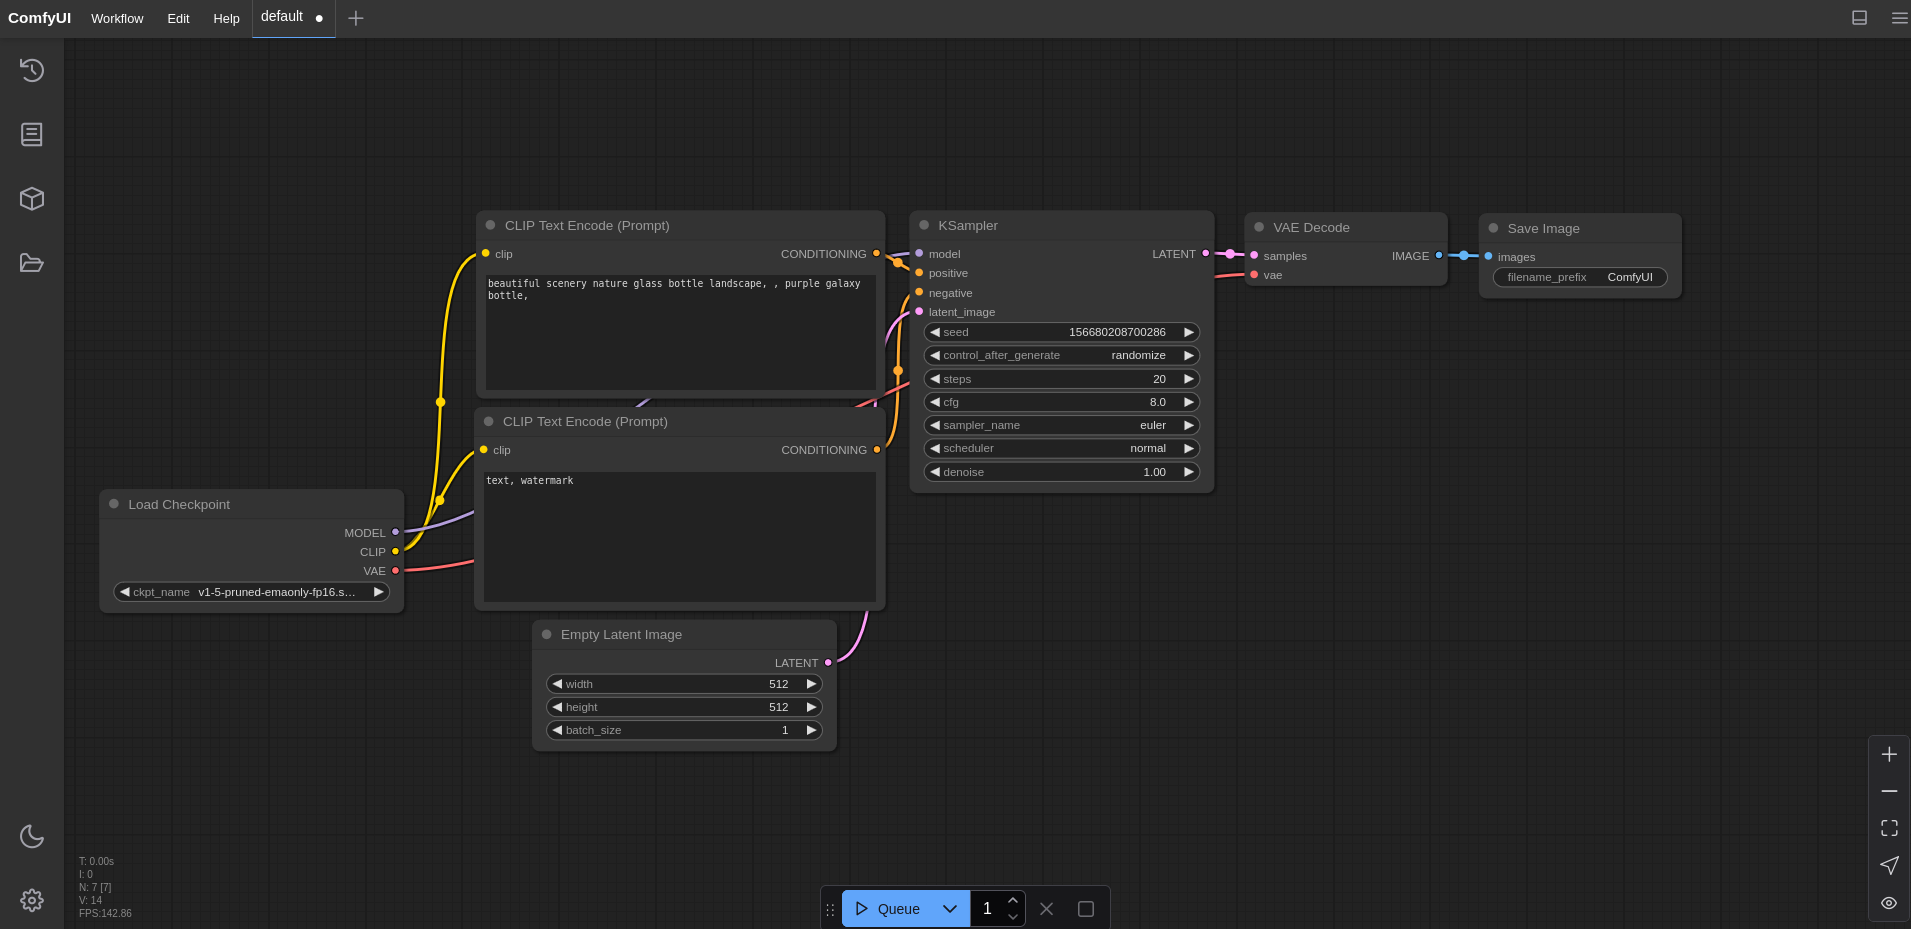
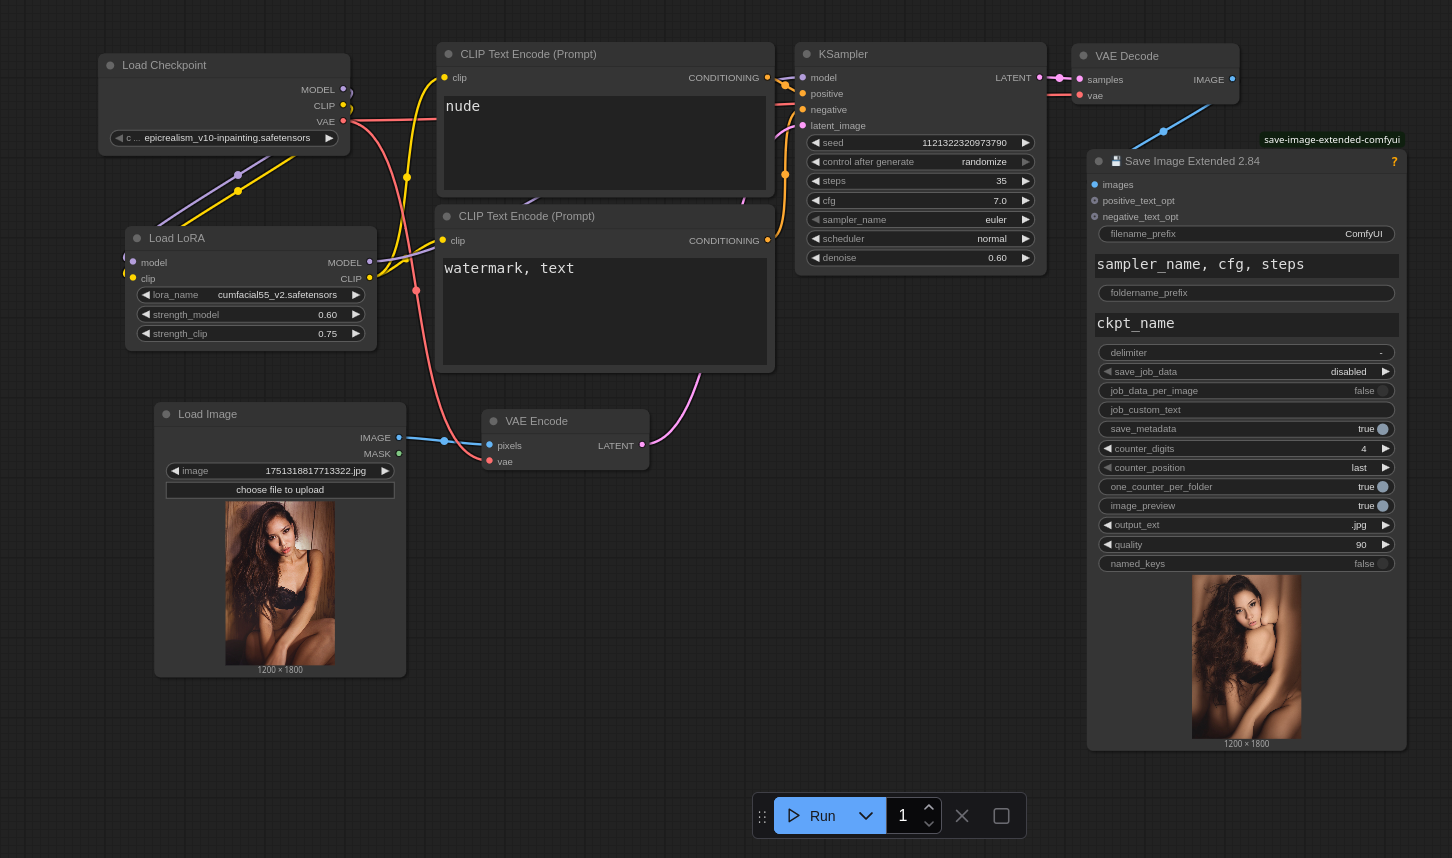
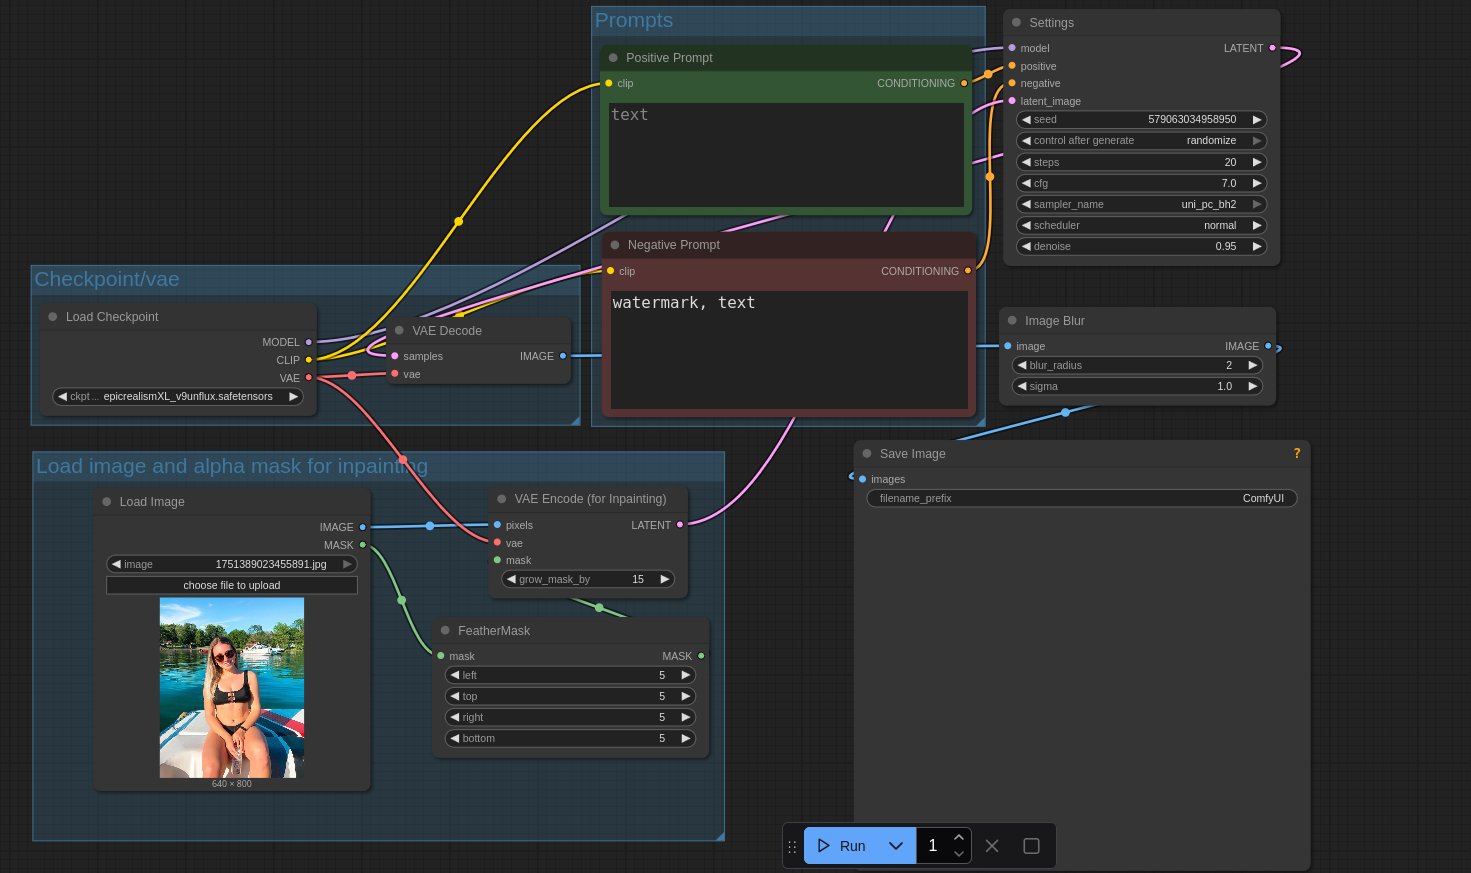
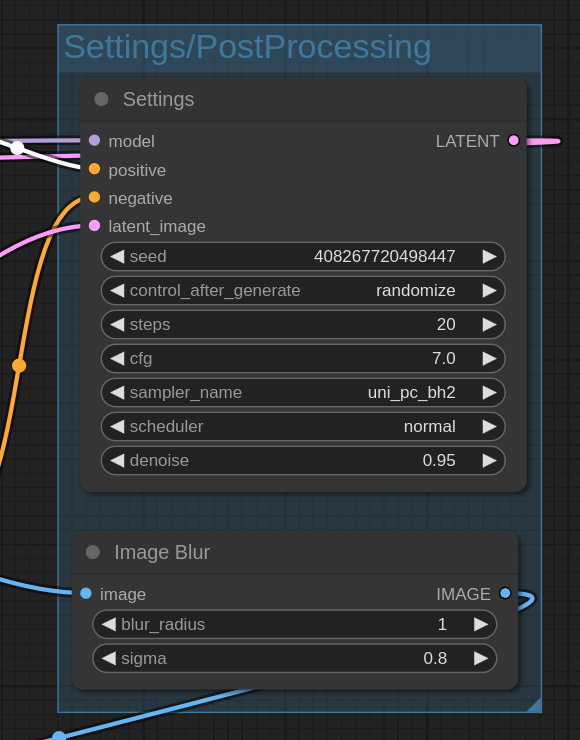
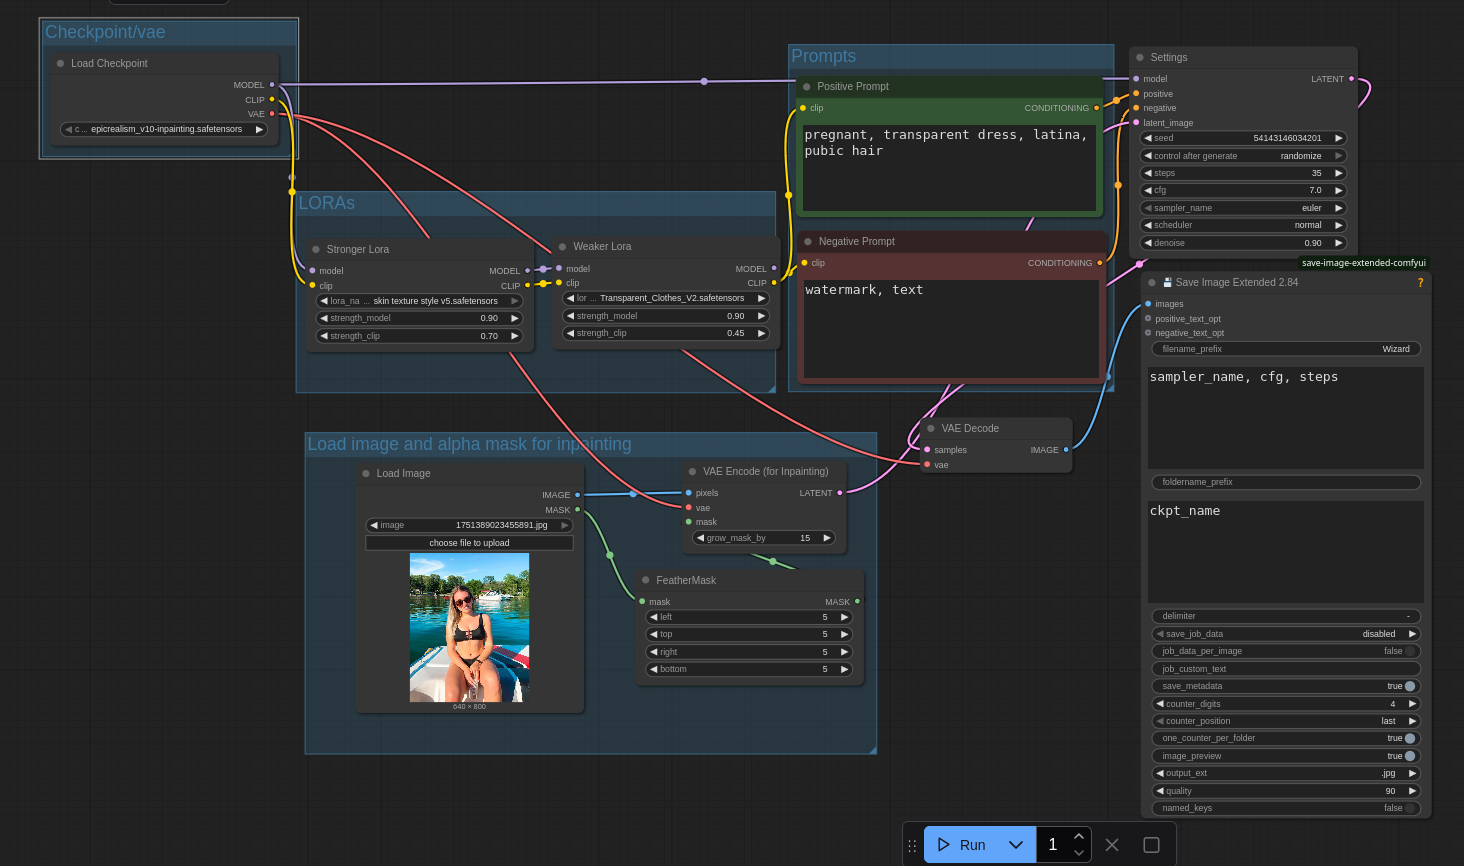
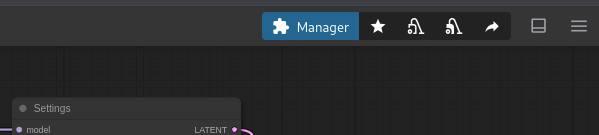
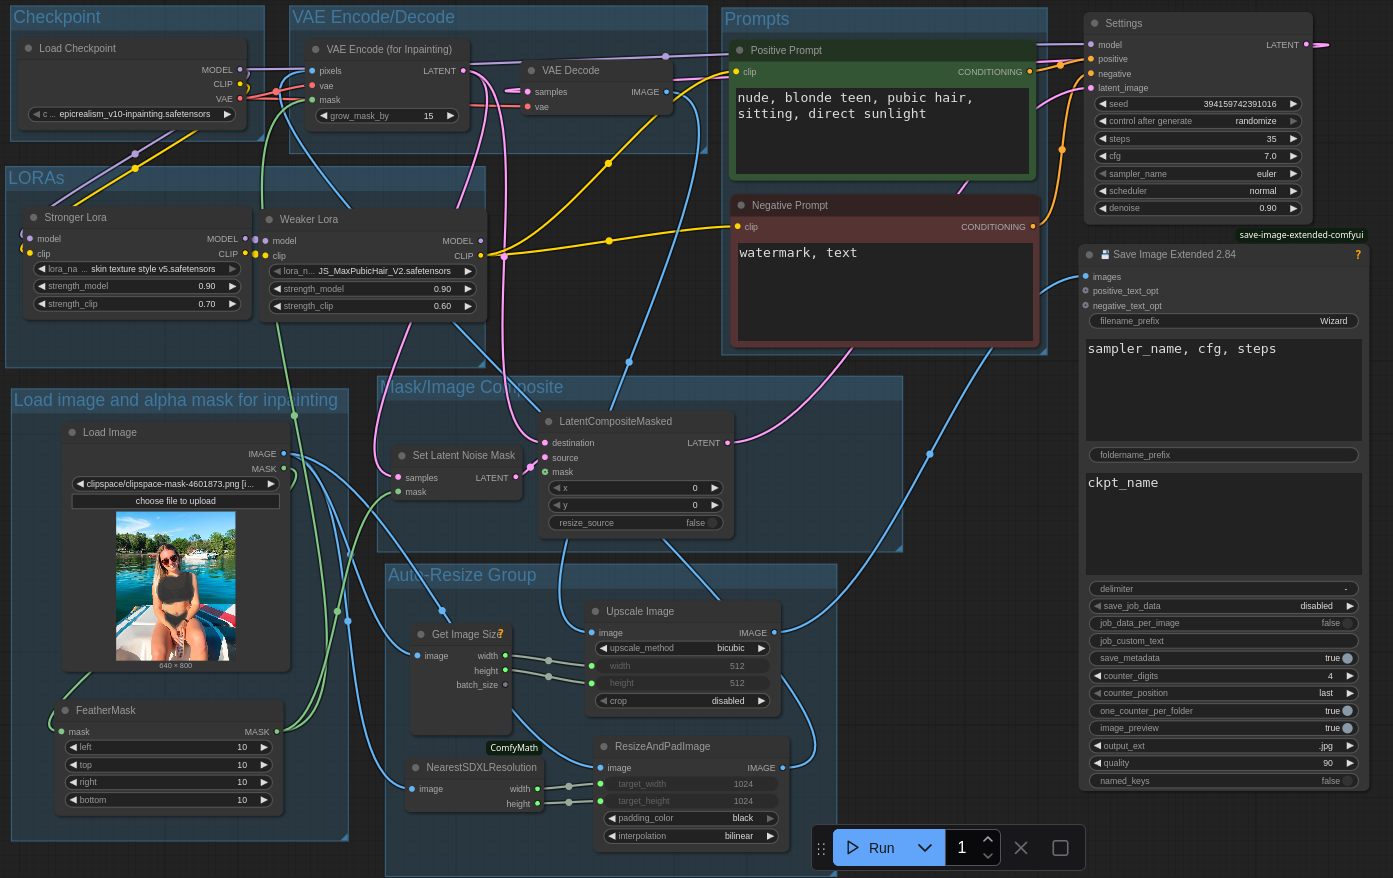
The last one I'm going to go over is the settings and post processing group.
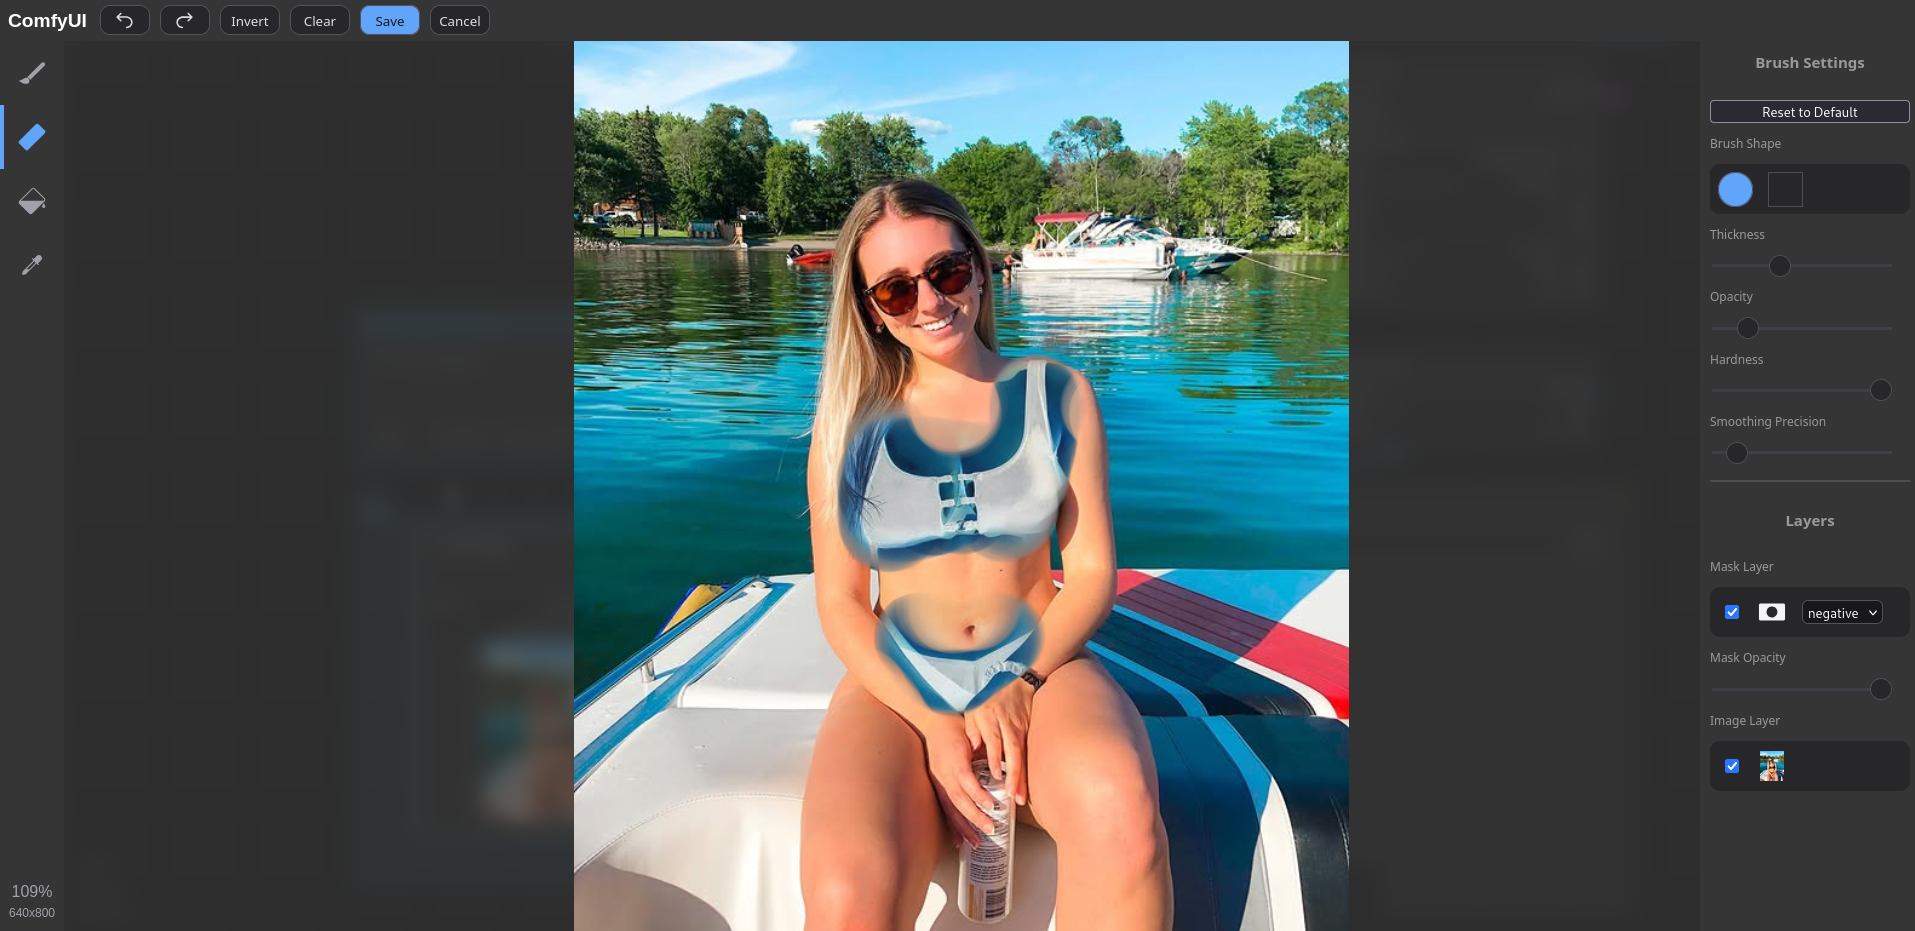
I have an image blur node set to a low level in order to hide those edit lines but it's not 100% necessary. The main thing we're going to pay attention to is the Settings node (which is named KSampler by default but I renamed it for clarity) and I'm going to go over each of these with a quick explanation:

Seed: The random numbers that it uses to generate static. You don't need to worry about it for now
Control After Generate: Used to generate the next seed. You don't need to worry about it for now
Steps: the amount of the image that it's trying to generate at any one time. Higher numbers take longer, lower numbers look worse. I find 18-30 is a great range to stay in.
CFG: How close the AI is going to try and match the prompt you give it. Adjust this carefully, half a point at a time.
Sampler name: Again, a thing dealing with randomness and static. Don't touch it unless the model you download tells you to.
Scheduler: Similar to the last setting but this one can actually make a big difference. If the model you downloaded suggests a Scheduler then use that, but otherwise try them until you find one that looks right. Normal works in most situations.
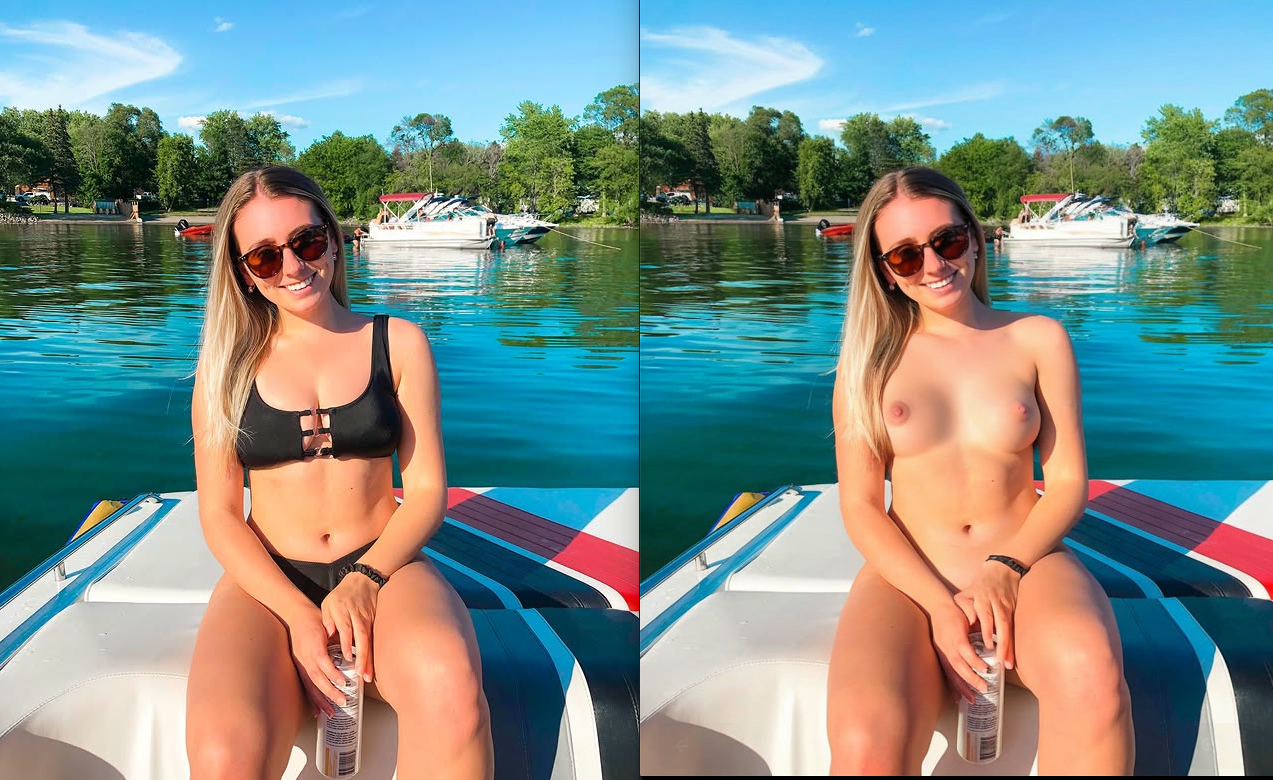
Denoise: Like I mentioned earlier, the denoise is what's turning it from the static noise back into an image. A higher denoise setting replaces more of the original image, a lower denoise replaces less. For inpainting I generally set it between .85 and .95.
Replies: >>936694215
AssetsWiz
7/6/2025, 1:51:52 AM No.936694215
Tutorial 13
Tutorial 13
md5: 83e81929d3fe95be4723577d2d7ae3df🔍
>>936694130
Alright, you also need to have an image save node but we're starting with the basic image save for now which is self explanatory so I didn't include a screenshot.
Only one more bit of setup before we get to the nudifying.
As I mentioned earlier the default model is kinda crap so I would suggest getting a new one off of CivitAI dot com.
My favorite for beginners is epiCRealism XL.
You'll need to sign up for an account but it's free so quit complaining.
Replies: >>936694239
AssetsWiz
7/6/2025, 1:52:29 AM No.936694239
Tutorial 14
Tutorial 14
md5: e8bfb9bf26946243dc4995d9790ab871🔍
>>936694215
After you've downloaded the model you'll see a file called
epicrealism_v10-inpainting.safetensors
Get that file and you're going to want to move it over to the checkpoints folder. You can just drag and drop it or copy it over.
To find the checkpoints folder you'll need to open up your ComfyUI folder in the file manager...
Replies: >>936694283
AssetsWiz
7/6/2025, 1:53:27 AM No.936694283
Tutorial 15
Tutorial 15
md5: ed46cfc079342afe7a801c56ed655194🔍
>>936694239
Then open the models folder and you'll see the checkpoints folder. This is going to be the of the only folders we interact with today, but if you try out new models and new types you might also need to put something in one of the older folders, like Loras (foreshadowing)


Again, if you ever have questions about how to install a particular model, check and see if the creator posted any instructions. The more helpful ones will tell you how to set it up and what settings work best. Refresh your page on the ComfyUI interface and you can select the new model from the checkpoints node and we're ready to go.
Ready to start inpainting?
Replies: >>936694302
AssetsWiz
7/6/2025, 1:53:53 AM No.936694302
Tutorial 16
Tutorial 16
md5: a34359df41263a61eefbb3f882420ebd🔍
>>936694283
Alright. So, after you've loaded your image in the load image node, right click on that preview image and select "Open in Mask Editor"
Replies: >>936694334
AssetsWiz
7/6/2025, 1:54:34 AM No.936694334
Tutorial 17
Tutorial 17
md5: b56eb7dd775e1f1e06f2f156d2dc522c🔍
>>936694302
Now you want to "Mask" the areas you want to change, so assuming you want to remove a bikini you draw over that bikini and hit save.
That said, there's a few things that will making your final results a little better.
Draw the mask to include just outside the borders of what you want to change. I use a lower opacaity setting to better blend the edges of the mask along with a round brush and I set the mask to negative to make it easier to see what I've selected.
Replies: >>936694351
AssetsWiz
7/6/2025, 1:55:02 AM No.936694351
Tutorial 18
Tutorial 18
md5: d9e6b45499d9bd787bfe41b73f4904ae🔍
>>936694334
After you draw and save your mask, enter your prompt and hit run to start the queue.
For demonstration I just entered the prompt as "nude" to show what happens when you try that.
Replies: >>936694406
AssetsWiz
7/6/2025, 1:56:07 AM No.936694406
Tutorial 19
Tutorial 19
md5: dec3a663df93aec7aa9a42f943bd08fb🔍
>>936694351
Honestly, I've seen way worse, but we can do a lot better. For one thing while that blur can help hide the edges of the edit, it's a noticeable downgrade. For another, most AI needs to be told if it's anything other than a bog standard full body picture facing front straight to the camera. Some of that can be addressed with describing your subject's position/skintone/bodytype/etc with the prompt as well as the quality of the light. You'll eventually get some intuition as to what prompts work best for what kinds of images. Finally, while it didn't come up with this source image, this workflow is completely incapable of handling images larger than 1024x1024 which is frustrating as hell.
Replies: >>936694434
AssetsWiz
7/6/2025, 1:56:41 AM No.936694434
>>936694406
If you're OK with that level of quality then you're basically done, but there's a lot of things this basic workflow can't handle and you're going to run up against those limitations constantly.

That said, you do now know the basics of how to nudify.
All the generated attempts got saved in the ComfyUI/output folder so I can share it or move it to wherever I'd like.
You can go try it out yourself if you'd like or you can stick around to learn about how to get better, more efficient results.
Replies: >>936694552
AssetsWiz
7/6/2025, 1:59:20 AM No.936694552
Tutorial 20
Tutorial 20
md5: a84a180ad48ed820acc6f5eb5e1f9828🔍
>>936694434
Now we're going to start talking about how to get better results overall and how to integrate specialized models called loras.
A checkpoint is the large model of images that the ai works off of to generate images. A lora is a specialized subset that can give better detail on specific areas. I like downloading new loras off of civitai and trying them out to see how well they work. Since they're generally smaller it's not uncommon for me to go looking for a new one if I get a request for something specific. The smallest checkpoint I have is 2.1gb, the largest Lora I have is under 700mb. Obviously when you download a Lora you'll save it to the Lora folder like you did the checkpoint. The only other thing to note is to make sure that the lora was designed to work with the base model of the checkpoint. If you're going to use the checkpoint I recommended you'll want to filter your searches to loras designed to work with SD 1.5.
This is an upgraded version of that earlier workflow that uses an advanced save function and a couple Lora nodes.
Replies: >>936694581
AssetsWiz
7/6/2025, 1:59:57 AM No.936694581
Tutorial 21
Tutorial 21
md5: 3b56928a4e9eaf7b75cff85d28545fa4🔍
>>936694552
So let's explain how these Lora settings work. The lora takes in the model and clip from the checkpoint and processes the model to refine it before passing along the clip to the prompt and the KSampler (I renamed that Settings earlier for simplicity). The setting for Strength Model is how much it should rely on the base model, and the setting for Strength Clip is how much it should rely on the Lora. These don't need to add up to 100% or anything. I usually keep a skin texture lora that helps to make skin look more natural and will change a second one between a handful of others depending on what I specifically want to see (pubic hair, nipples poking through fabric, etc).
Replies: >>936694597
AssetsWiz
7/6/2025, 2:00:24 AM No.936694597
Tutorial 22
Tutorial 22
md5: 9f137d9eef6a15d903f482e5a17a3fa2🔍
>>936694581
The other big change is to replace the basic Save Image with Save Image Extended.
There's a lot of settings on here and you can mouse over them to get a description of what each does, but I'm going to just point out the two that you should know right now. The first one is output_ext which allows you to select the file format you want your images to be output as. The second is quality which determines the final quality of the image you output. Why add this? Because /b/ has a ridiculously low restriction of 2mb for image uploads. Adding this in allows you to control how large the final output file is without having to compress the image or go through any other ridiculous measures.
Replies: >>936694610
AssetsWiz
7/6/2025, 2:00:42 AM No.936694610
Tutorial 23
Tutorial 23
md5: ba7cbe90142c31681f3a51c5c7957b1e🔍
>>936694597
One thing to note though is that this is a custom node (not made by me) that you'll need to install through the custom nodes manager. I honestly don't have the energy to walk you through how to do that since this is the only custom node we have and it's not a thing everyone needs. If you want to try and install it look for this button and see search for save image in the custom nodes manager.
Replies: >>936694646
AssetsWiz
7/6/2025, 2:01:33 AM No.936694646
Tutorial 24
Tutorial 24
md5: 7d145c5ea210afbe7cb6867b0381f1fa🔍
>>936694610
Ok so that explained what Loras do and how to set them up but why? Does it really make that big of a difference? Well if you want something *really* specific, you might need a lora or 2 to get it to look right. This one used a combination of pregnancy and transparent clothes. You can decide for yourself if it's worth the effort.
Again, this is another good place to jump off if you're happy with your results. There's still a few limitations but we're getting much better results than before in my opinion and we're able to get some specialized looks in too. If you want to go have some fun and play around with it then enjoy. The next (and last phase I'm doing today) is how to get even cleaner results, faster, from larger images. But it takes a lot more setup, so be prepared for more technical stuff.
Replies: >>936694662
AssetsWiz
7/6/2025, 2:02:02 AM No.936694662
Tutorial 25
Tutorial 25
md5: 9d52125779293ef67e505d9295442015🔍
>>936694646
This is the upgraded workflow I've been using recently. It includes an auto rescaler to handle larger images without distorting them. It also includes a latent composite mask to help the AI use more of the original image while still drawing over it. Essentially if you want better results that more closely match the posing, lighting, skintone, and proportions you're going to need something like this.
Replies: >>936694676
AssetsWiz
7/6/2025, 2:02:27 AM No.936694676
Tutorial 26
Tutorial 26
md5: 7fe832970a7abfcf3693565bcefaf74c🔍
>>936694662
First I'm going to go over the Mask/Image Composite group since it's relatively easy to set up. All you need is a latent noise mask node (essentially an image filled with static that the AI will draw on and then composite together with the original image), and a Latent Composite Masked node which is what combines the noise, the mask, and the original image together before sending it off to the KSampler for processing. This will, in general, help the AI to understand the original image better by letting it look at the entire image, not just the masked part.
Replies: >>936694735
AssetsWiz
7/6/2025, 2:03:59 AM No.936694735
Tutorial 27
Tutorial 27
md5: 4070985e93649dae1ac1c394b36841f3🔍
>>936694676
Now 'm going to go over my Auto-Resize group. This uses a few nodes from the ComfyMath extension so you might need to enable that in the custom nodes manager. When the image is first loaded in, I pass it to a Get Image Size node which reads the original resolution, NearestSDXLResolution which finds the closest resolution that will still fit in what the stable diffusion model is capable of creating while maintaining the original aspect ratio, and it also passes the image to ResizeAndPadImage along with the output from NearestSDXLResolution to take the original image and turn it into something the AI can actually handle. If you don't go through all that and try to edit a large image then it will get confused when it tries to go beyond those boundaries and will wind up repeating the prompt multiple times in multiple areas. If you've gotten results that wouldn't look out of place in a cronenberg film then that's probably why. Of course we don't want the image to stay at that small resolution which is where the upscaler comes in after the processor finishes but before it saves. I personally find that the bicubic setting works best in general, but feel free to try the others.
Replies: >>936694872
AssetsWiz
7/6/2025, 2:07:39 AM No.936694872
Tutorial 28
Tutorial 28
md5: 7438fd1f03f95095d46674605341d72a🔍
>>936694735
This one is super important to get right because you'll not only get better results overall, but because it's not trying to inpaint over a larger resolution image it will also finish much faster. That image I loaded in at the beginning that took nearly 3 full minutes just to process? I ran it again on this workflow and got this back in 43 seconds. The tradeoff is that the more it has to upscale an image on the backend the more pixelation and warping you'll notice so if you try and process a 4k image or something you might have to give it a few tries to look right. Also, depending on the resizing and aspect ratio you'll notice a black border on some images. Still trying to fix that. However, for the purposes of an image board with a 2MB file size cap it works great.

Now there's still areas to improve on this. For one thing, I need to adjust the auto resizer and to fix those issues. For another I can't do outpainting (adding new areas to an image). But that's for another day.
Replies: >>936694901
AssetsWiz
7/6/2025, 2:08:13 AM No.936694901
>>936694872
Now I'll be around for a while to answer questions and help clarify anything I might have glossed over.
Replies: >>936695863
AssetsWiz
7/6/2025, 2:27:16 AM No.936695642
Only gonna bump once
Anonymous
7/6/2025, 2:31:56 AM No.936695863
>>936694901
Thanks AssetWiz, going to follow this when i have time, ive saved it all down.
Replies: >>936695928
Anonymous
7/6/2025, 2:33:12 AM No.936695928
>>936695863
I tried the old fashioned way today of putting a deepface fake onto a body but needed to generate a face on a faceless pic. Was interesting but no where near as complicated
AssetsWiz
7/6/2025, 2:50:52 AM No.936696673
I was originally intending for my next tutorial thread to be an explanation of how to build your own lora but I haven't had the time to do my research. I might make another one on how to do a quick and dirty cumshopping workflow. But I want to fix that black border issue and also try and get my "Streaking Makeup" lora working properly.
Anonymous
7/6/2025, 3:25:13 AM No.936698128
I'm the guy from earlier that requested the tutorial. Thanks again!
Replies: >>936698202
AssetsWiz
7/6/2025, 3:27:24 AM No.936698202
>>936698128
No worries. Happy to help. Going to log off soon. Gonna watch star trek with the wife.