AI Nudify TUTORIAL THREAD - /b/ (#937235935) [Archived: 213 hours ago]

AssetsWiz
7/17/2025, 10:04:45 PM No.937235935
Tutorial 0 - Header Image
md5: e0389fcf58453f3efcc805574cfd081b๐Ÿ”
THIS IS NOT A NUDIFY THREAD! DO NOT POST REQUESTS IN THIS THREAD!
This thread is a tutorial, from start to finish on how to install stable diffusion with ComfyUI and then use it for inpainting to make nudify images.
I will be explaining settings, processes, nodes, workflows, checkpoints and basically everything else you need to get started
I've done this thread a few times now so I've tried to organize it a bit better and point out where there's new info so you can skip ahead if you already know the first few parts.
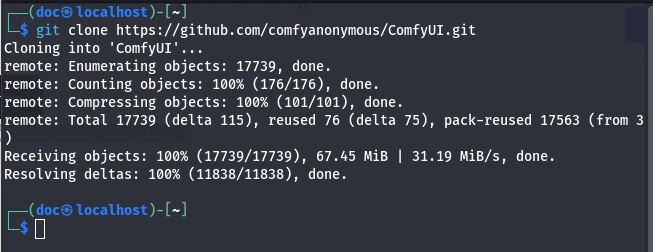
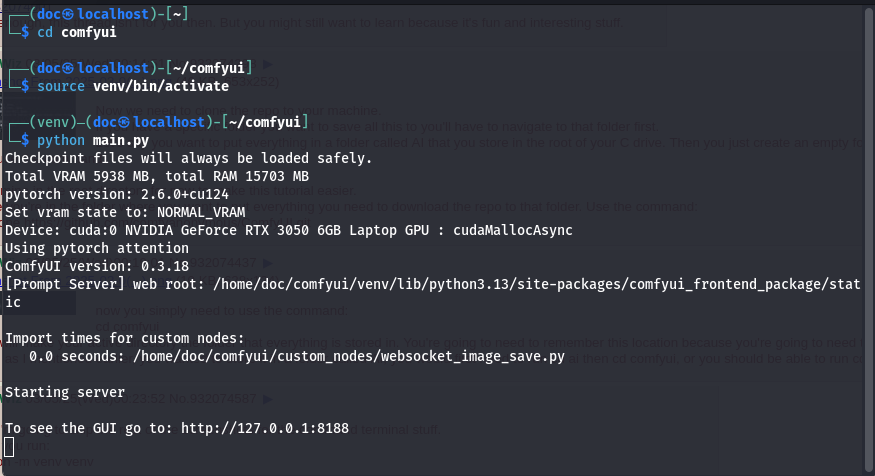
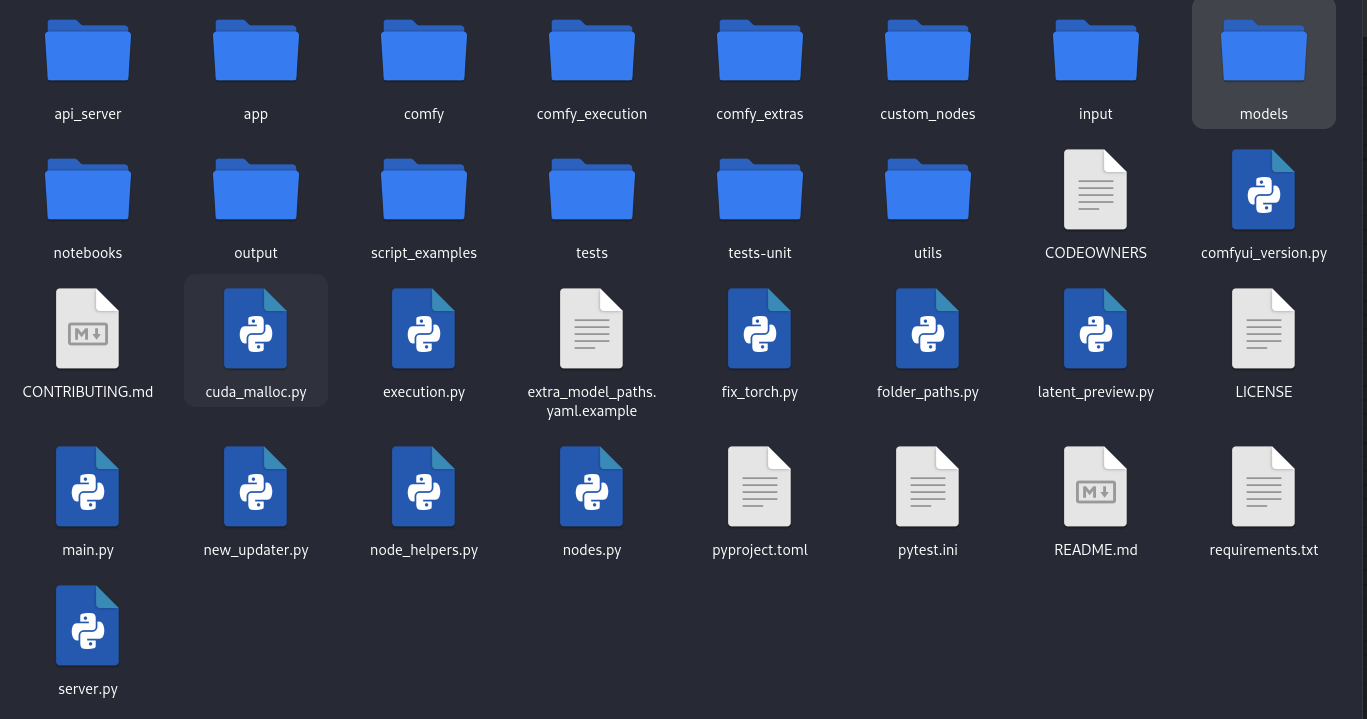
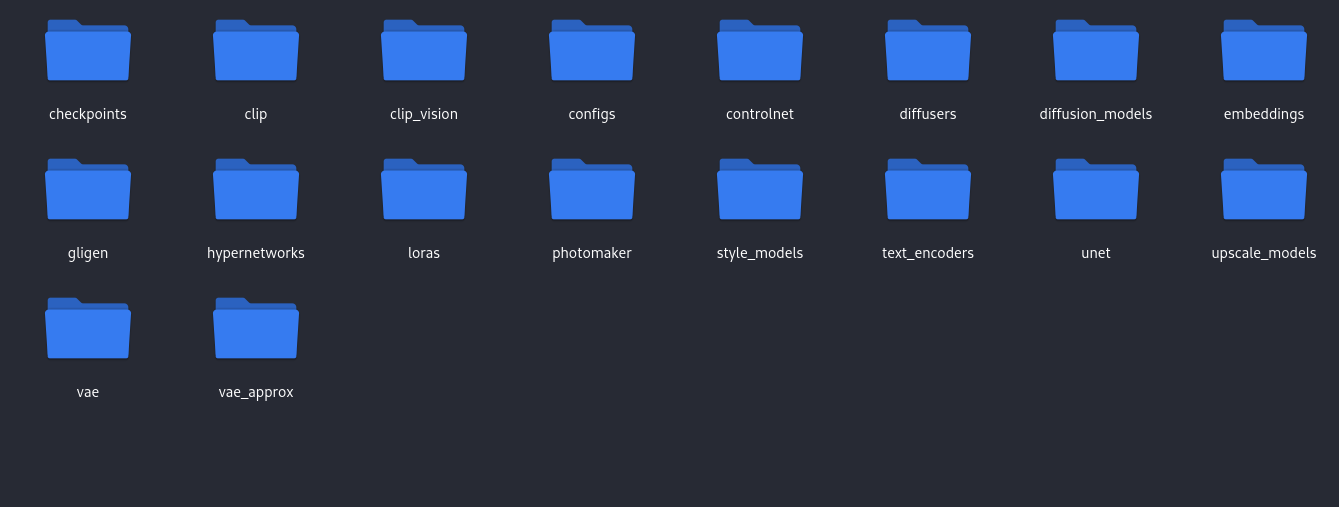
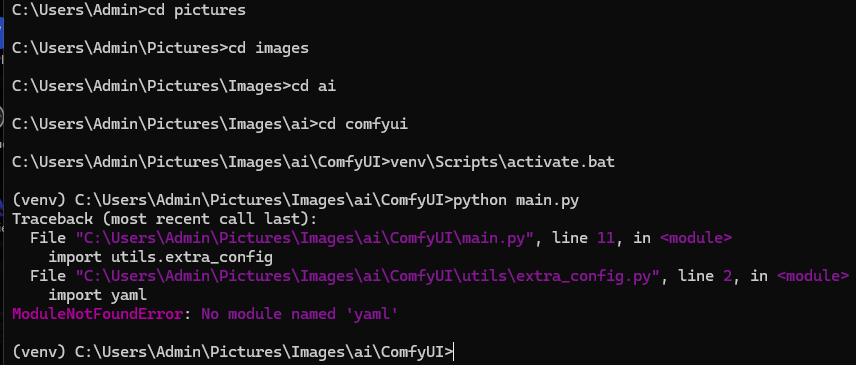
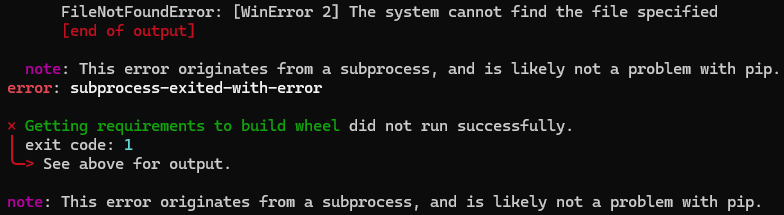
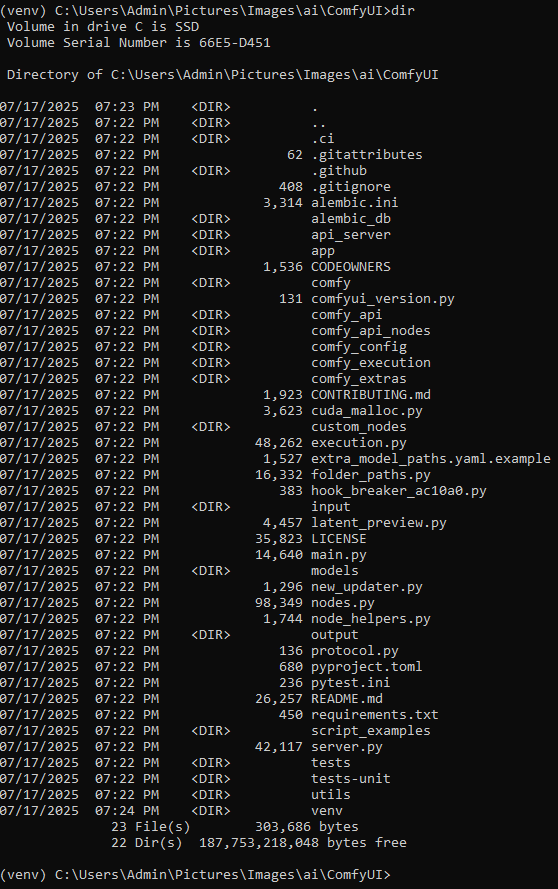
Section 1: Installing Stable Diffusion and ComfyUI
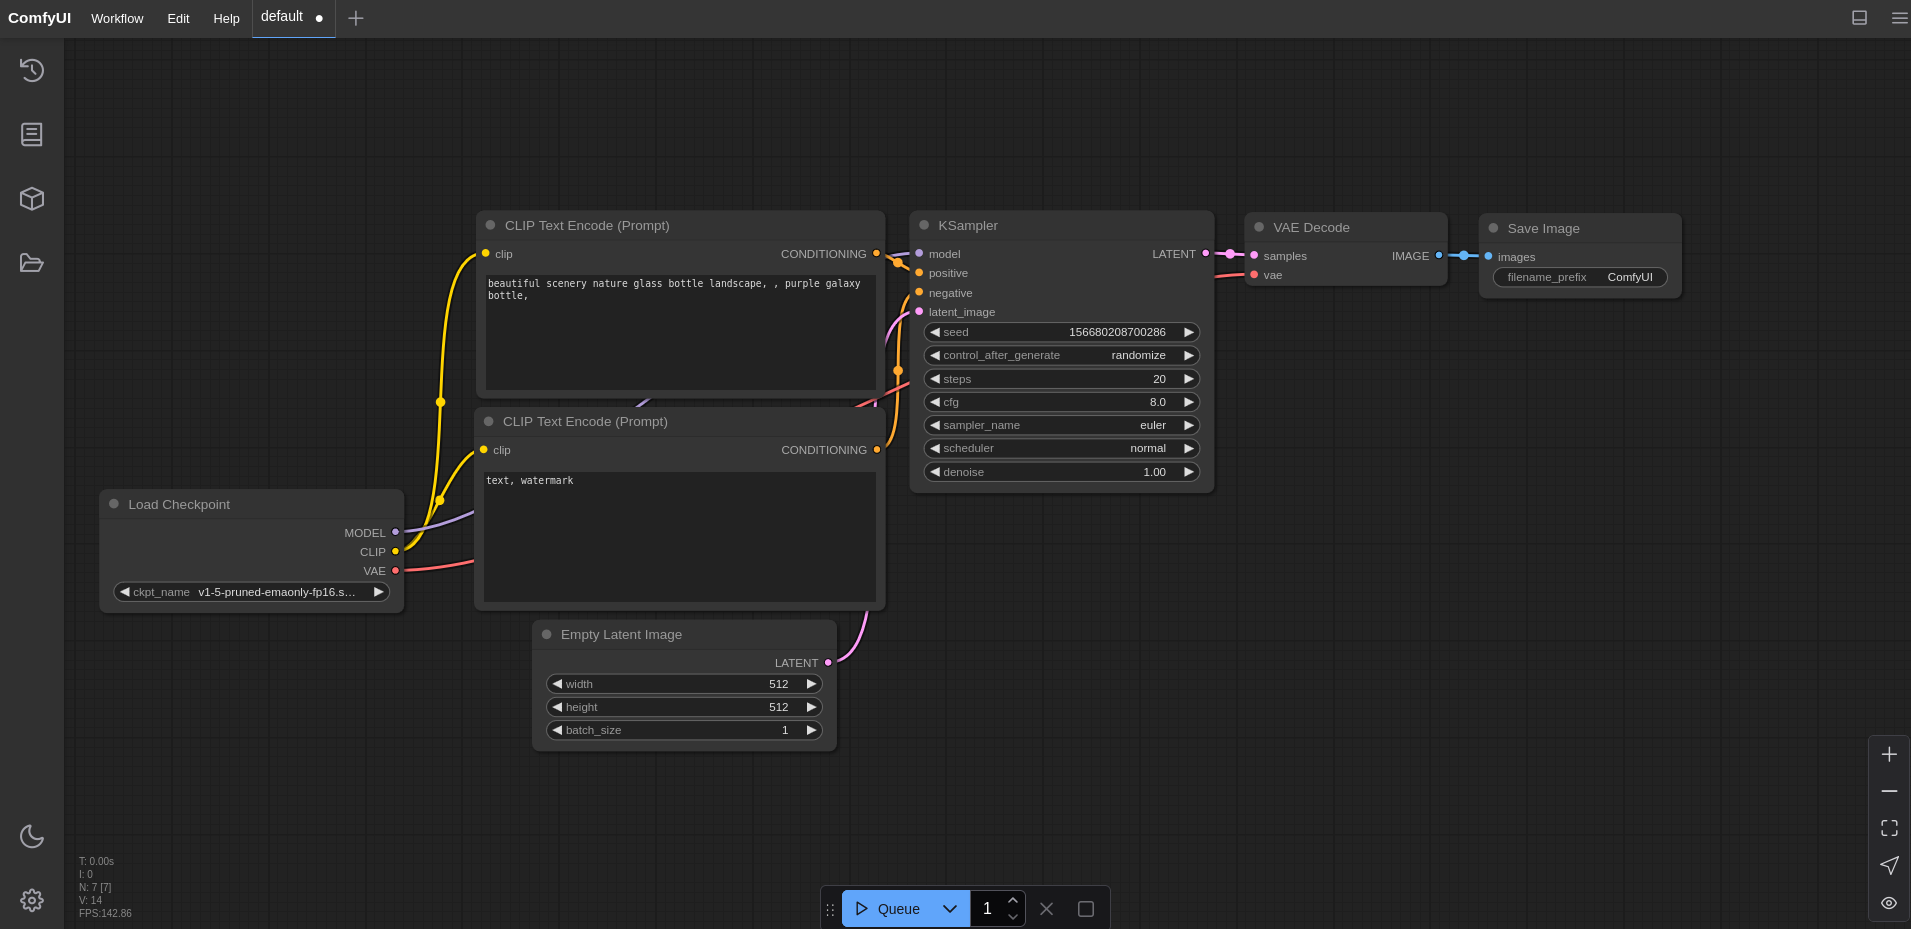
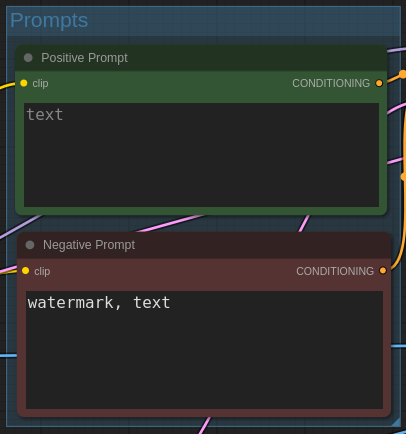
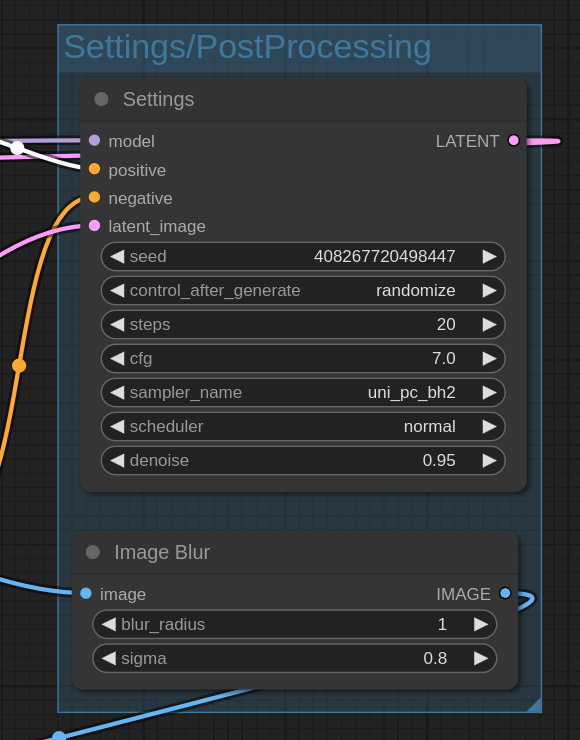
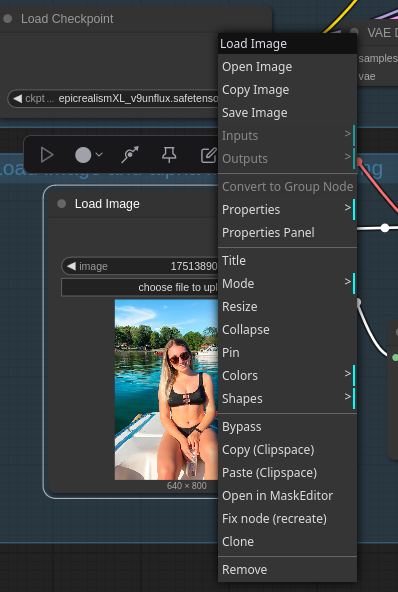
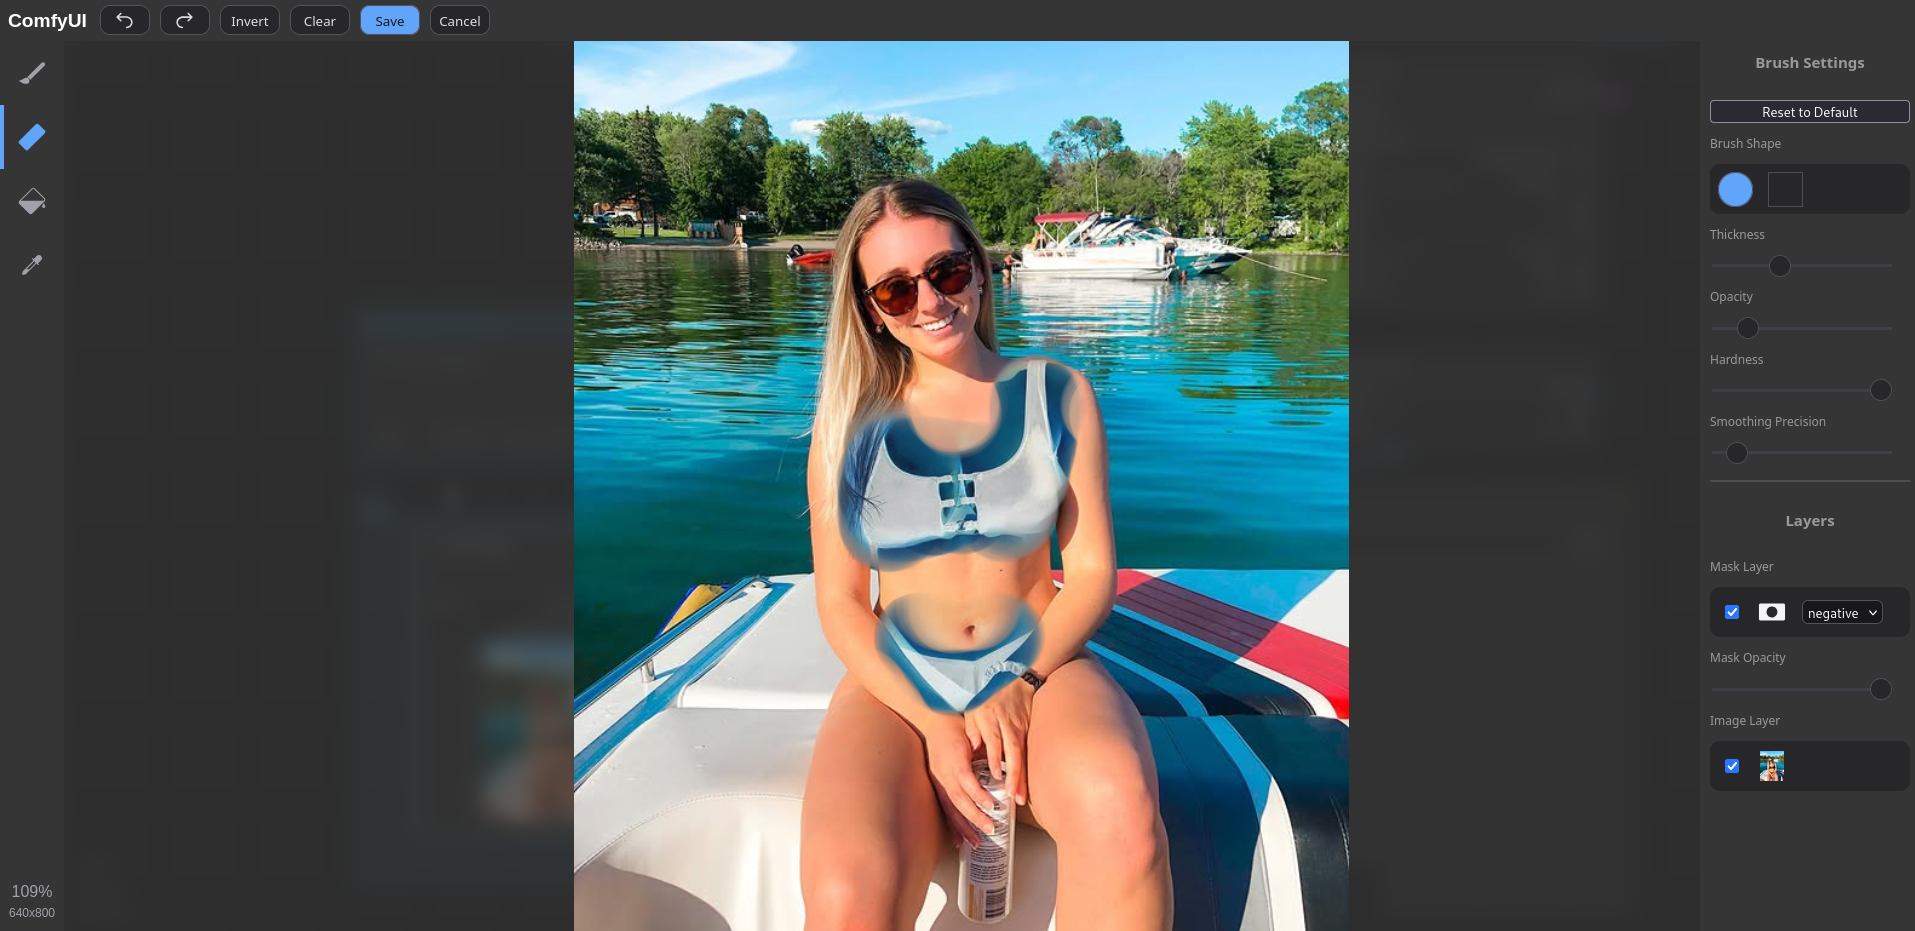
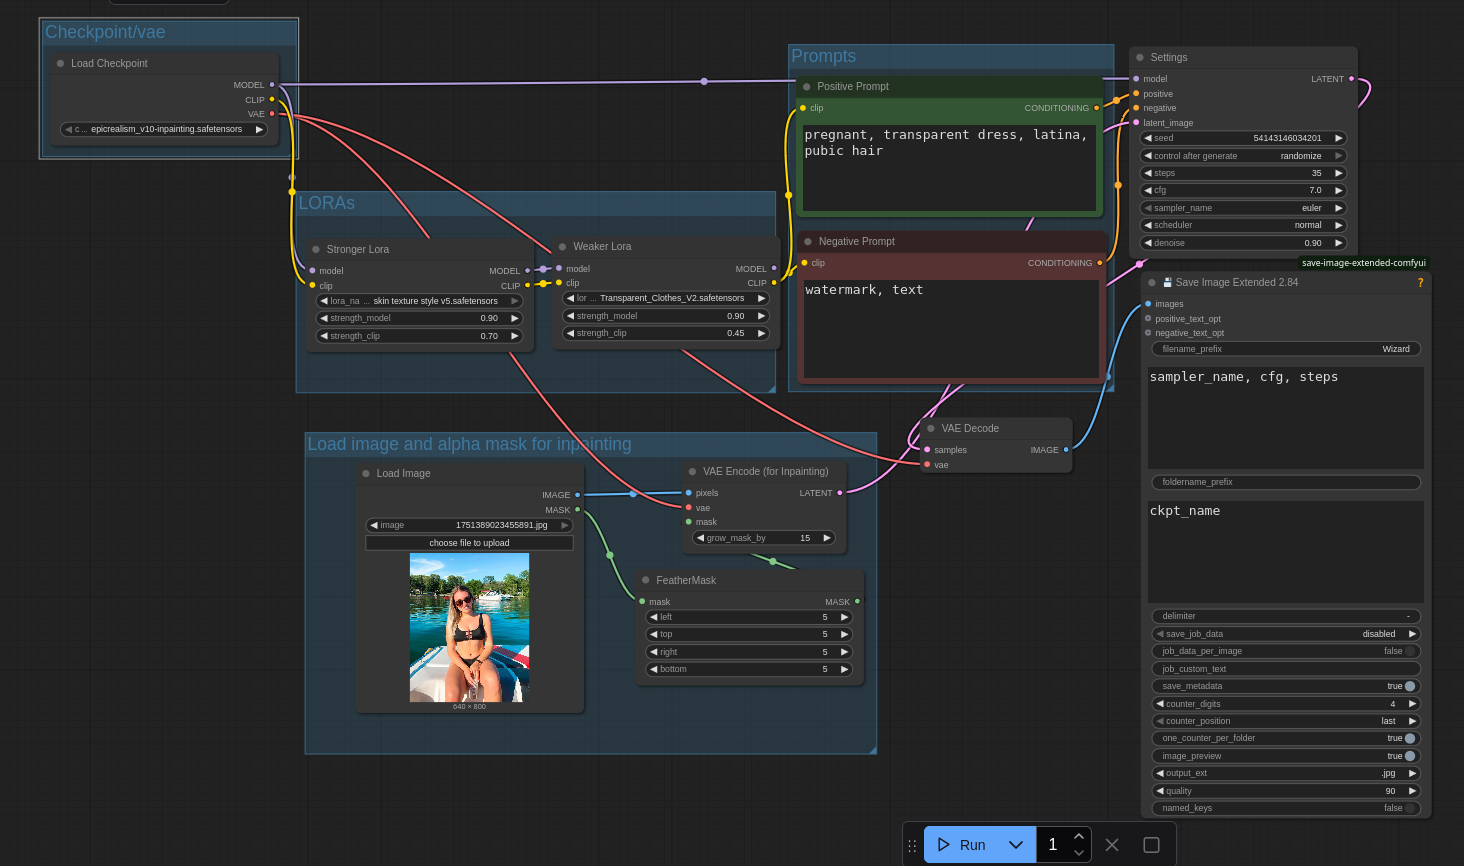
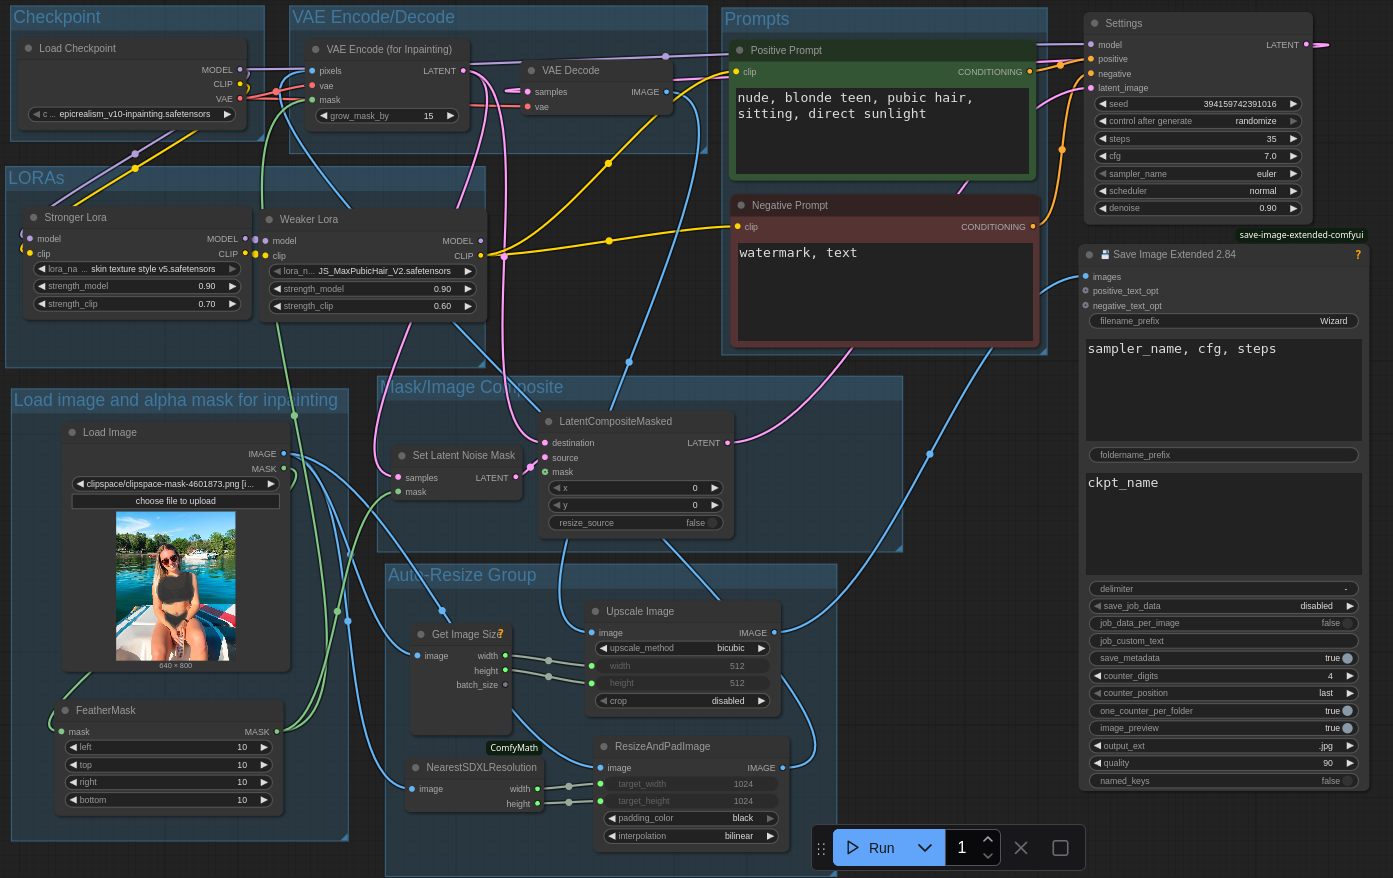
Section 2: Setting up your first inpainting workflow
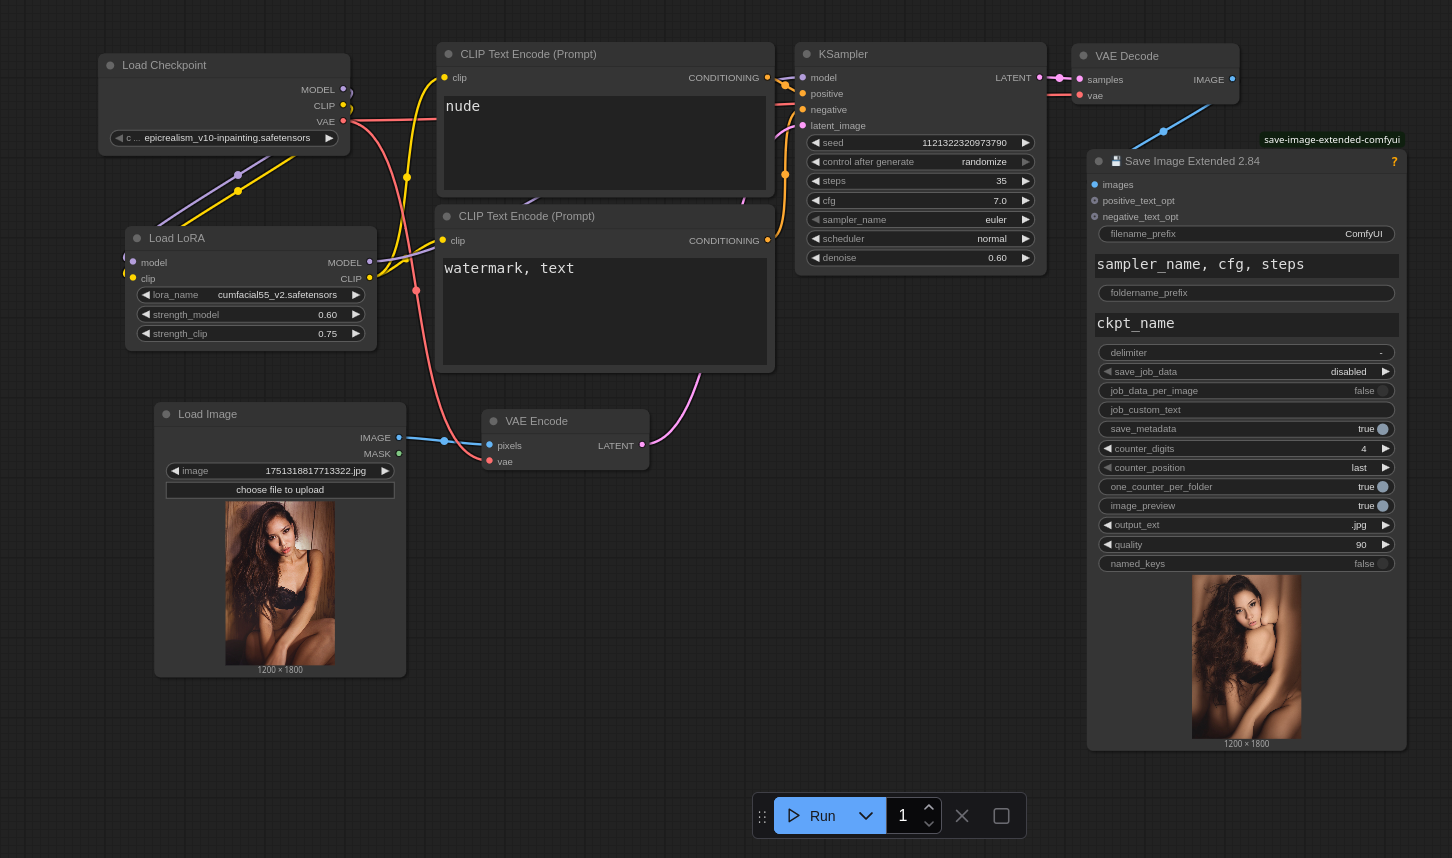
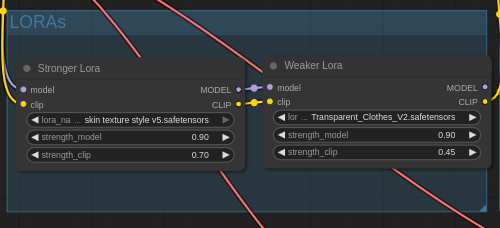
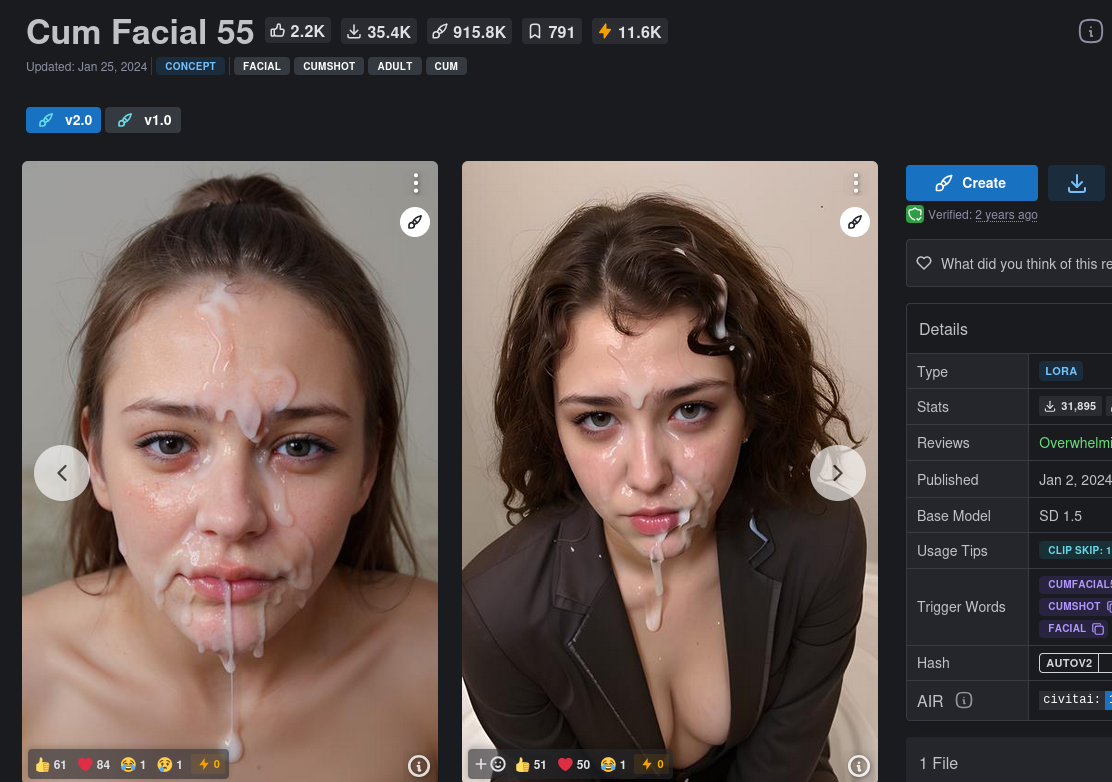
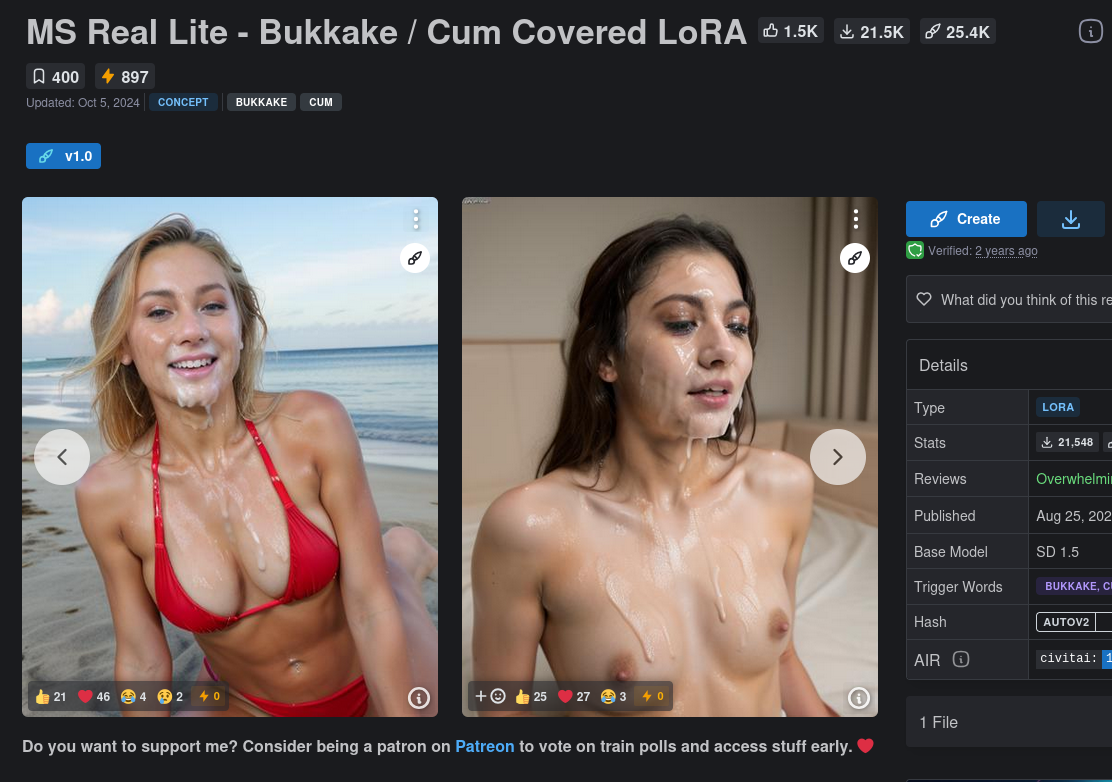
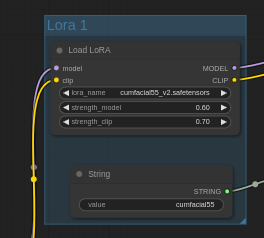
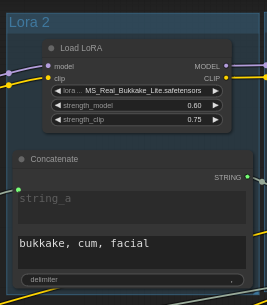
Section 3: Upgrading your workflow with Loras
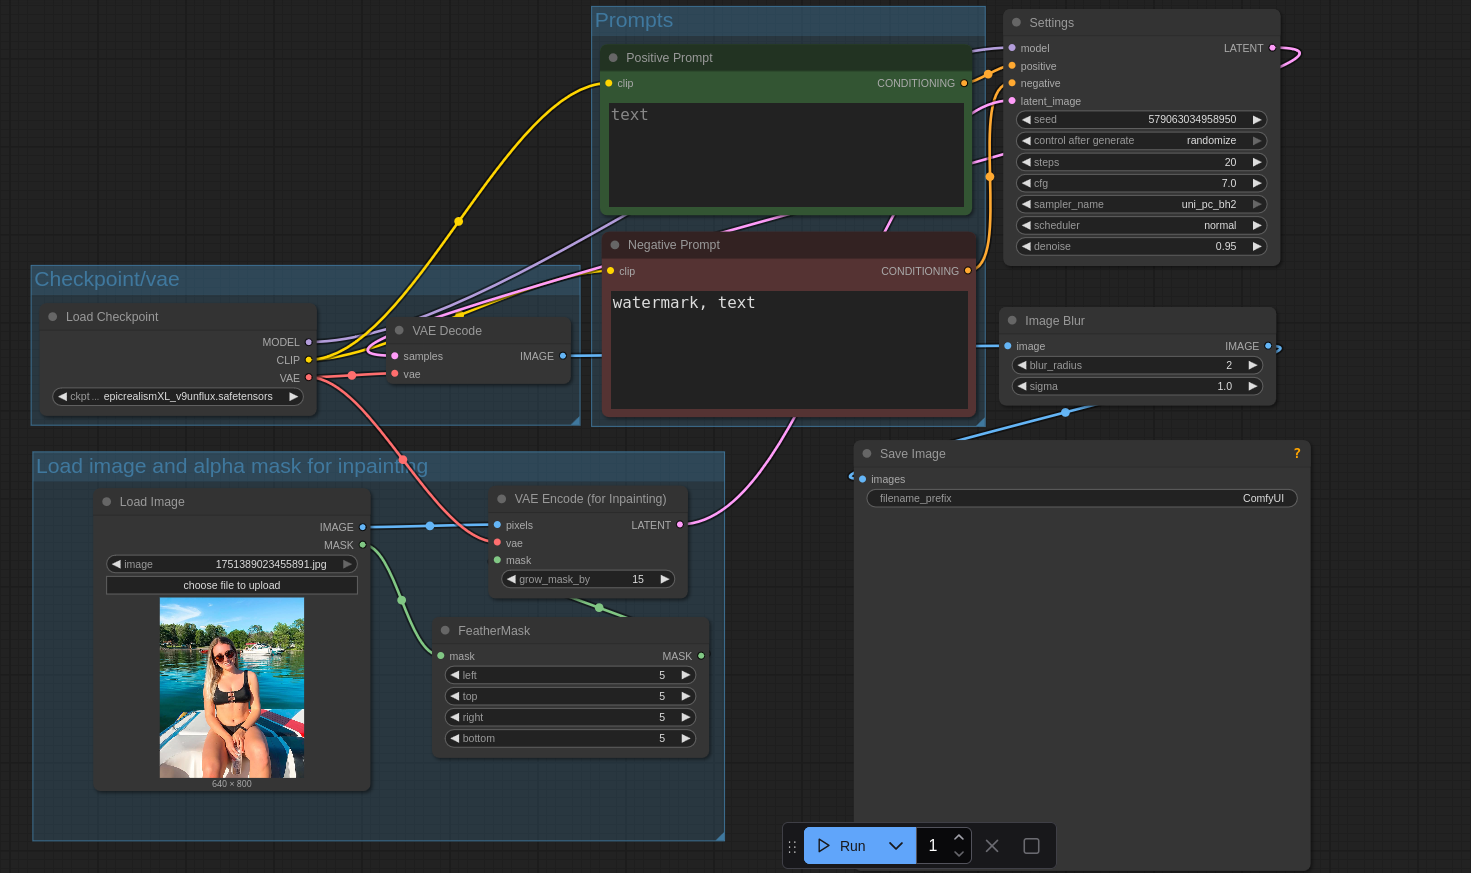
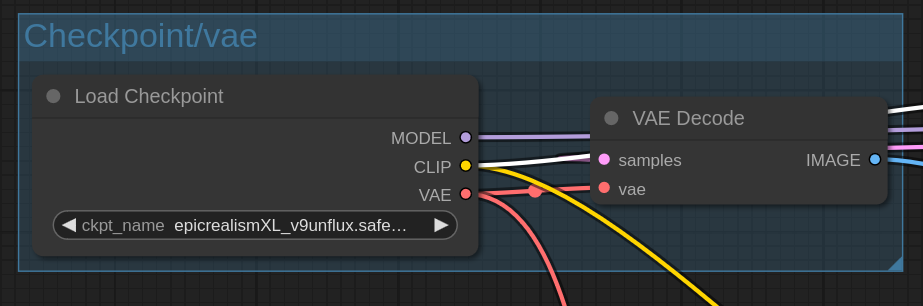
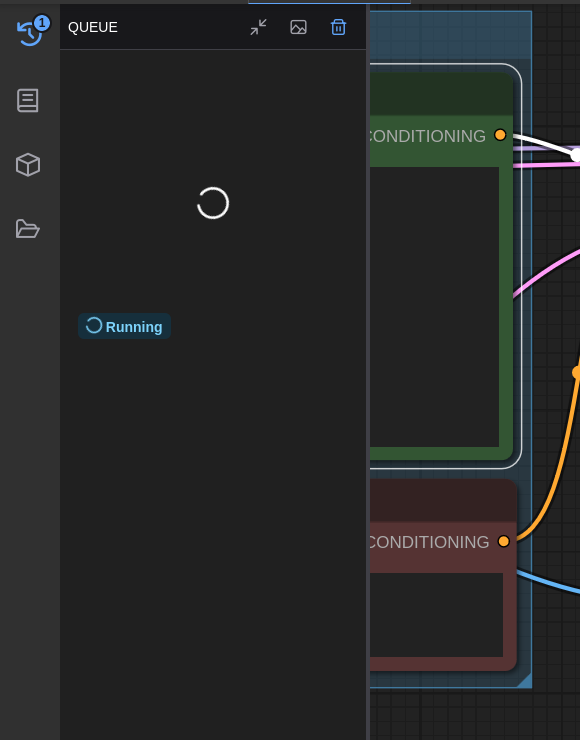
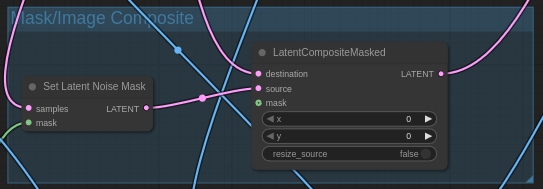
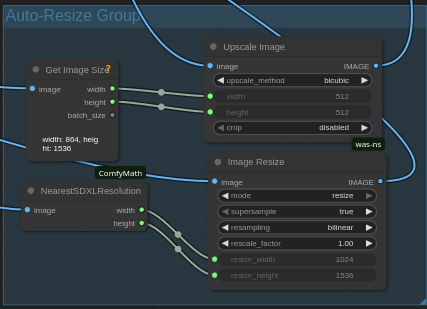
Section 4: Better, more efficient workflow (UPDATED WITH NEW AUTO RESIZER)
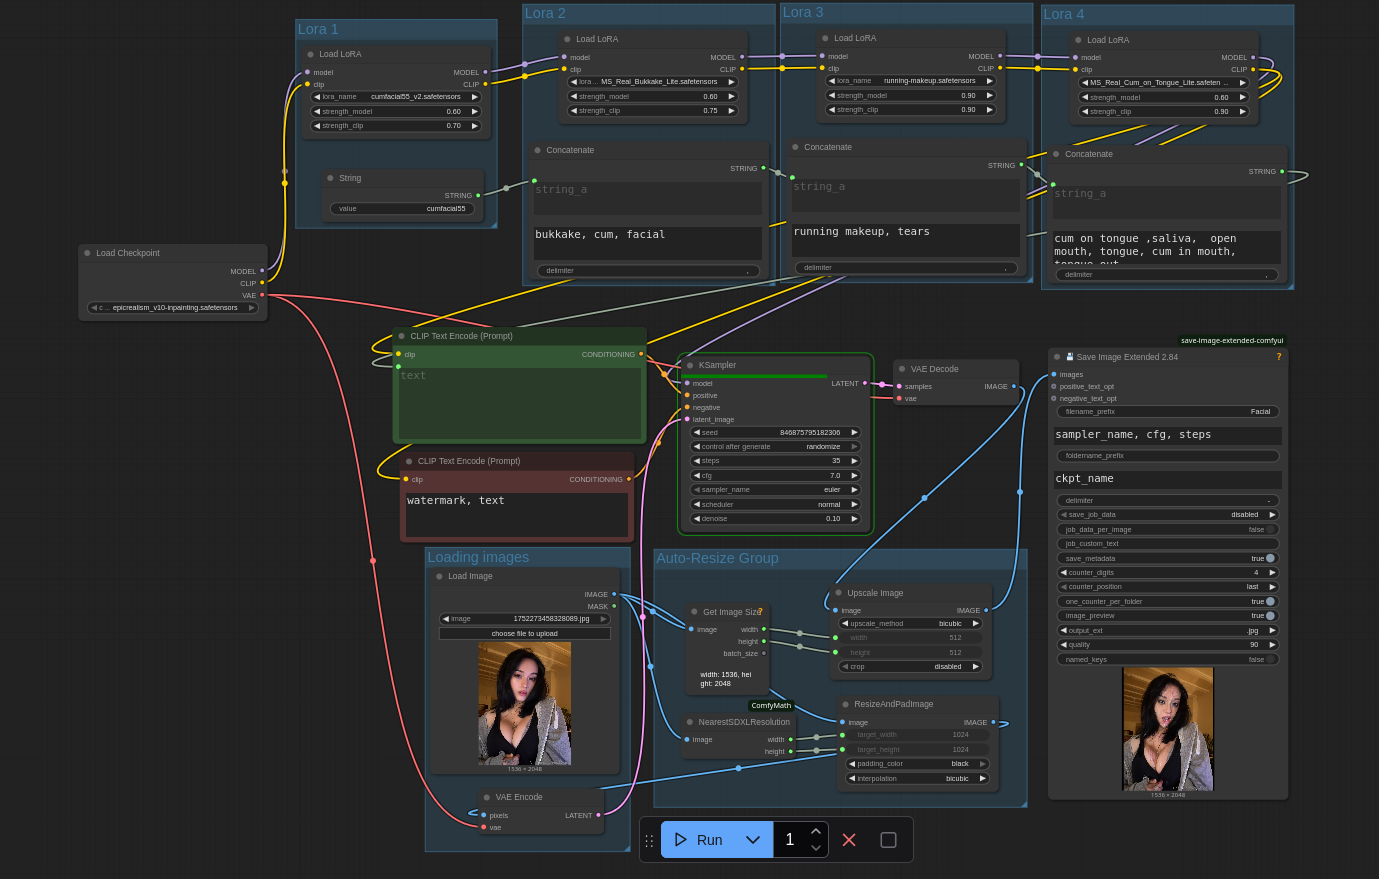
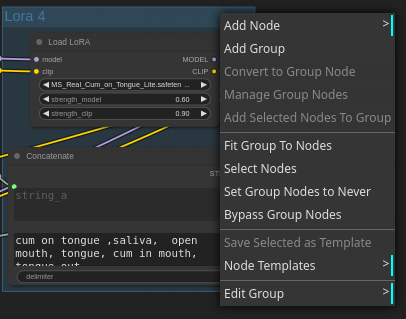
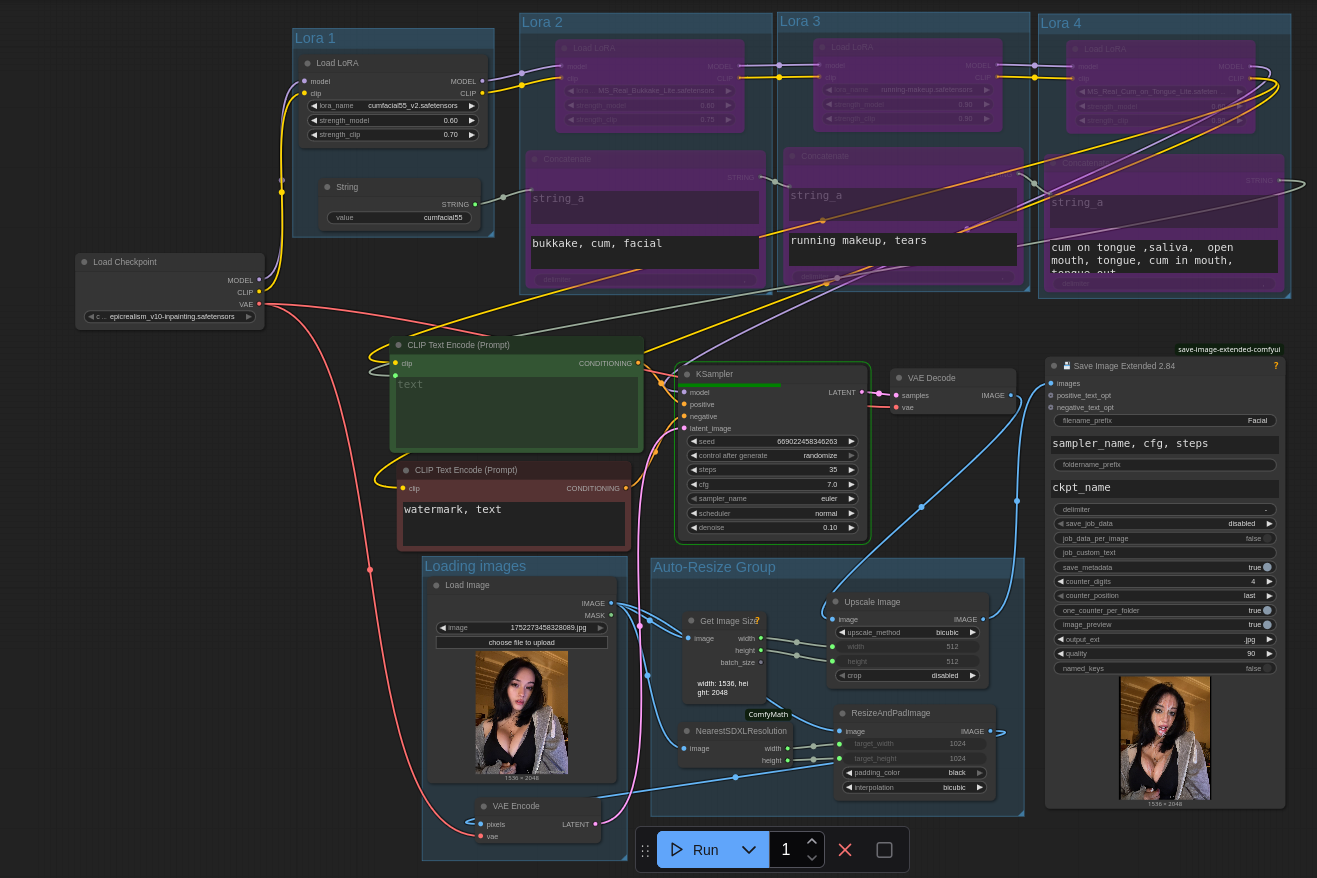
Section 5: Image to image (no inpainting) with multiple Loras and adjustable workflow (cumshopping)
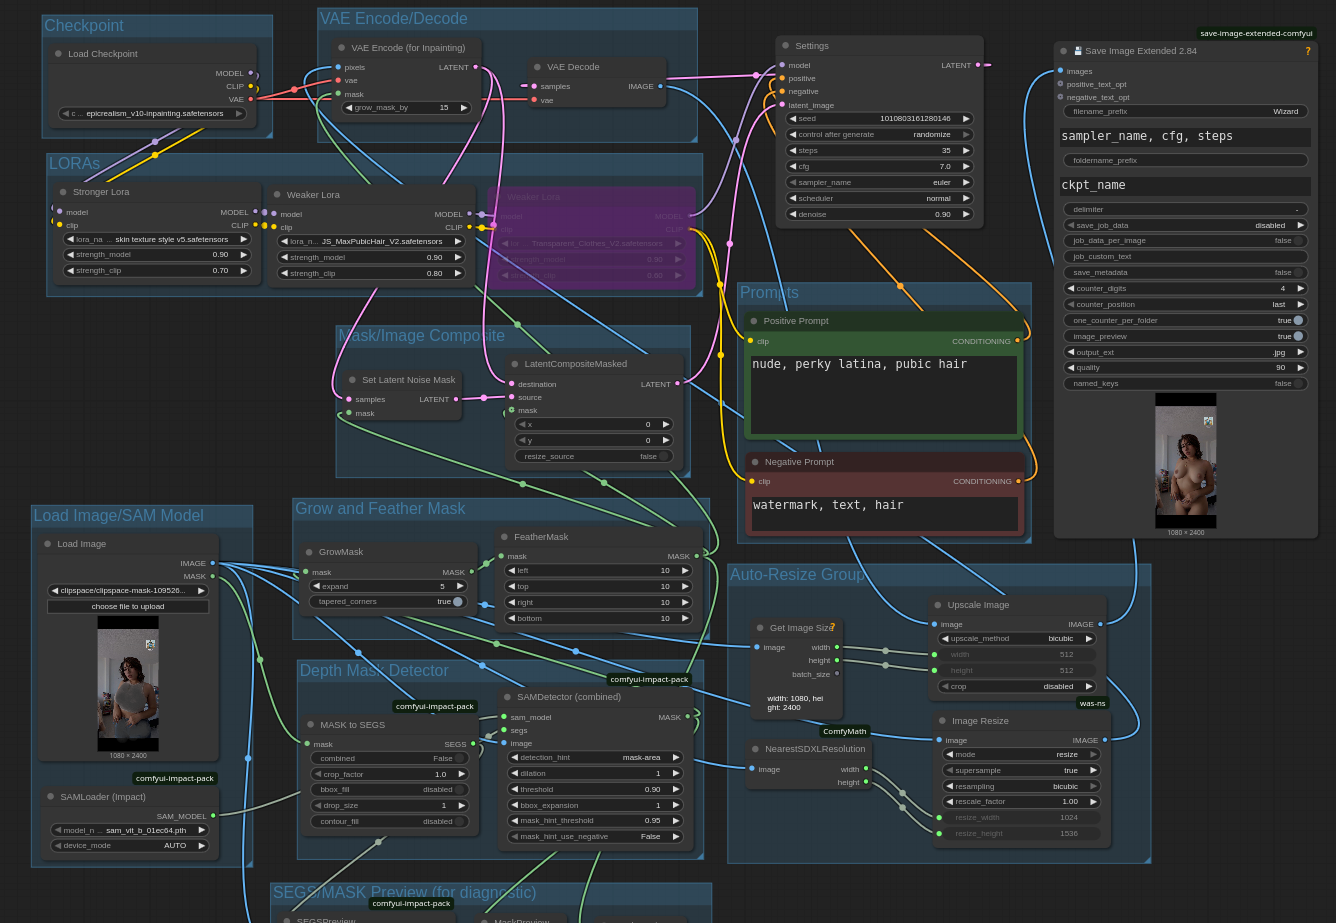
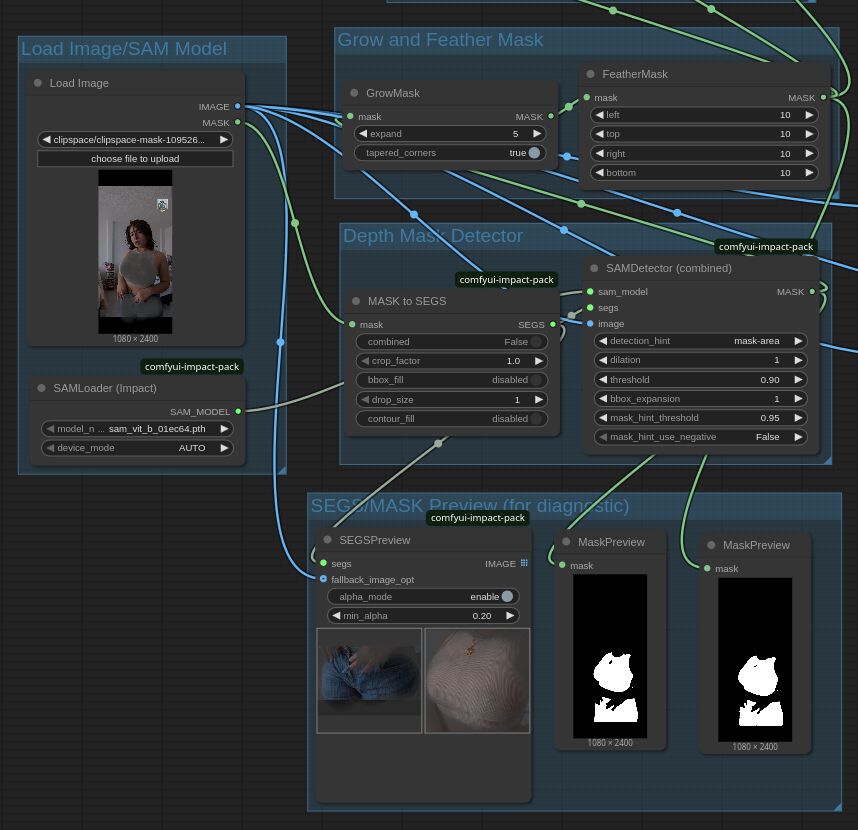
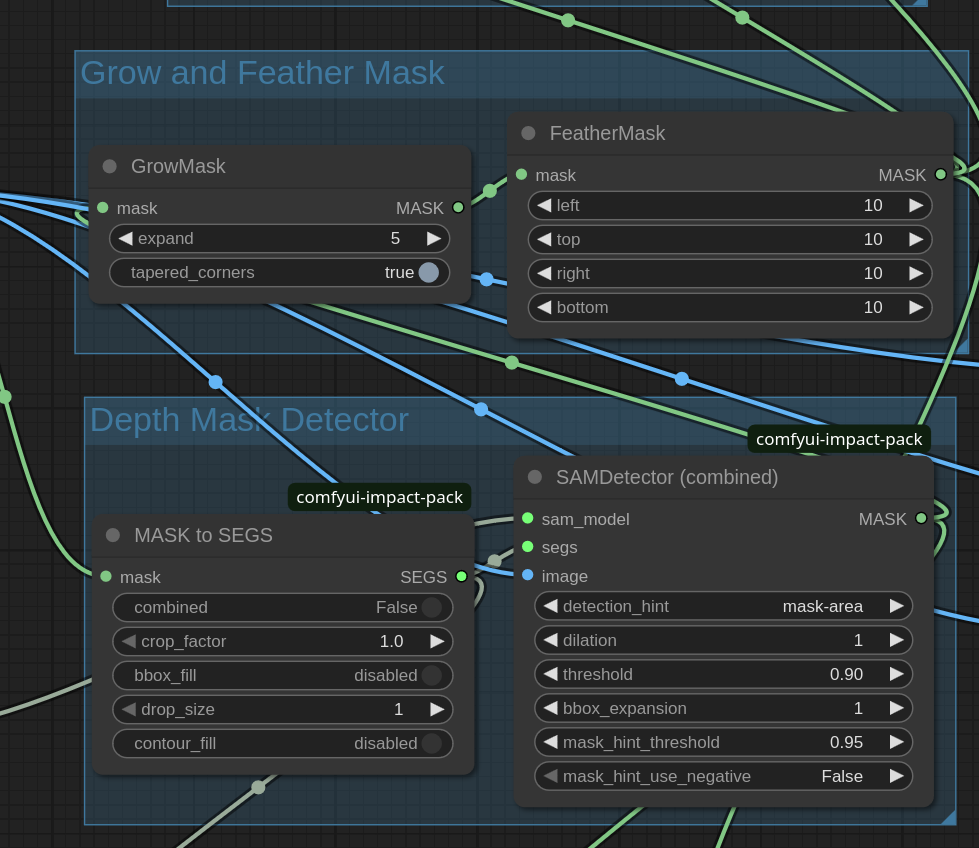
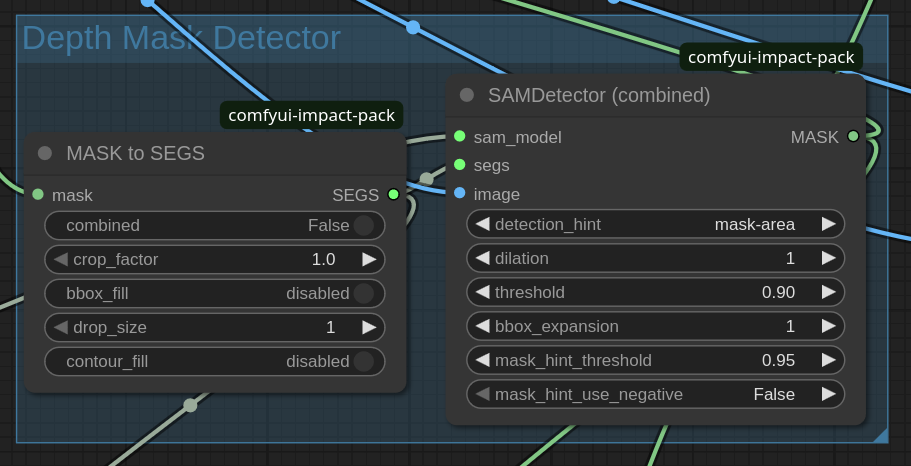
Section 6: SAM Detection for easier, more accurate masking
Replies: >>937235960 >>937245983 >>937246038
AssetsWiz
7/17/2025, 10:05:19 PM No.937235960
Tutorial 1 - Command Prompt
md5: 2bdf76ed42a05fa0de43c1b9886485ce๐Ÿ”
>>937235935 (OP)
So you want to get started with AI? Not a problem. Most PCs should be able to handle this, it just takes a bit to get set up, and that's what I'm here to explain.
A quick disclaimer, my screenshots are all from Linux but I'll be posting the instructions for both Linux and Windows so if it looks a little different don't get discouraged.
The very first thing you're going to need to do is open up a command terminal.
On windows hit the windows key and type "cmd" then select comand prompt from the results. On Linux you just click the icon
Replies: >>937235976
AssetsWiz
7/17/2025, 10:05:42 PM No.937235976
Tutorial 2 - Cloning the Repo
md5: 0c627c287f542704493aa74b97f4f822๐Ÿ”
>>937235960
Now we need to clone the repo to your machine.
If you have a specific folder you want to save all this to you'll have to navigate to that folder first.
Let's say you want to put everything in a folder called AI that you store in the root of your C drive. Then you just create an empty folder and use the command:
cd ai

I put mine in the root directory for now to make this tutorial easier.
Once you're in the folder where you want to put everything you need to download the repo to that folder. Use the command:
git clone https://github.com/comfyanonymous/ComfyUI.git
Replies: >>937236051
AssetsWiz
7/17/2025, 10:07:32 PM No.937236051
Tutorial 3 - Enter the location
md5: 335e60a30d45f9fb4639c4423d29e03f๐Ÿ”
>>937235976
now you simply need to use the command:
cd comfyui

This will make your active directory the folder that everything is stored in. You're going to need to remember this location because you're going to need to go to this folder any time you want to start up your AI.
So if, as I mentioned earlier, you wanted to store it in a folder called AI, you would first need to run cd ai then cd comfyui, or you should be able to run cd ai/comfyui
Replies: >>937236062
AssetsWiz
7/17/2025, 10:07:52 PM No.937236062
>>937236051
OK, I'm going to skip some of the screenshots for the command terminal stuff.
Next you run:
python -m venv venv

This creates a virtual environment (a temporary computer that exists inside of your computer).
Now the commands get different from Linux and Windows. Windows Command:
venv\Scripts\activate.bat

Linux Command:
source venv/bin/activate

This actually starts up the virtual environment and is a command you'll need to run any time you want to start up your AI
Replies: >>937236075
AssetsWiz
7/17/2025, 10:08:08 PM No.937236075
>>937236062
Now we need to install some tools that the AI needs in order to run.
Windows or Linux command:
pip install torch torchvision torchaudio --extra-index-url https://download.pytorch.org/whl/cu121

After that finishes running you then need to run this command:
pip install -r requirements.txt

After those finish you're basically set up and ready to go, at least if all you wanted was to generate images based on text. Inpainting (the thing we do when nudifying) takes a little more setup, but don't worry, we're mostly done with the command terminal
Replies: >>937236147 >>937258076
AssetsWiz
7/17/2025, 10:09:39 PM No.937236147
Tutorial 4 - Start the AI
md5: b68636a294299aad9dc6159dfedb330d๐Ÿ”
>>937236075
Alright, this is the last screenshot of the command terminal stuff but it's an important one. Any time you want to start up your AI you're going to need to run a few commands.
You need to get to the directory comfyUI is stored at, you need to start the virtual environment, and you need to actually run the program within the virtual environment.

On Windows it'll look like:
cd comfyui
venv\Scripts\activate.bat
python main.py

On Linux it'll look like:
cd comfyui
source venv/bin/activate
python main.py

Once it finishes running just open your web browser and go to the address that it gave you in the command terminal (since we're running this locally instead of setting up a web server it should start with http://127.0.0.1:)
Replies: >>937236157 >>937242899
AssetsWiz
7/17/2025, 10:10:07 PM No.937236157
Tutorial 5 - Default Workflow
md5: c7a28d613f6c41f4c656abaa69b7947c๐Ÿ”
>>937236147
OK, so we're actually done with the technical part of the setup. Now we just need to make the workflow and download a model.
When you go to interface for your AI you're going to see a premade tutorial workflow already set up for you. If you want to test it out just enter a prompt and hit queue and it'll generate an image based on the prompt.
The default model isn't great, and this workflow doesn't do anything but generate an image based on a prompt, but if you want to make sure you've set everything up hit the button and try it out
Replies: >>937236176
AssetsWiz
7/17/2025, 10:10:36 PM No.937236176
Tutorial 6 - First Test
md5: 518b54697c0d52b393c7d51a875fd9fa๐Ÿ”
>>937236157
Before we get to the inpainting though, I'm going to show you *why* we go through all this trouble. Suppose you just want to load an image in, give it a prompt, and then let the AI do it's thing. Skipping over how to set this up (for now) this is a basic image to image workflow that will allow you to do just that: Load an image, apply a prompt, hit run and watch the magic. So let's try just that.
Replies: >>937236191
AssetsWiz
7/17/2025, 10:11:06 PM No.937236191
Tutorial 7 - WTF is that
md5: 5b6f911d01410623f1318db9aeae5726๐Ÿ”
>>937236176
Oh... What the fuck happened? Well a lot of things were wrong with this approach, but in essence, the ai doesn't really know what it's looking at. So if you just say nude it will arbitrarily decide what is supposed to be nude on that picture and then make something similar. There's also a setting called denoise which controls how much the ai changes of the original picture. I set the denoise at .50 so that it would still be somewhat recognizable while making visible changes. If I had set it closer to 1.0 then it would have replaced almost the entire image. So If you want it to make a significant change like removing clothes, you need your denoise set higher, but that also warps the picture more. So we need extra instructions for the ai to know what to change and where before it can make anything even close to what we want. Also it took a solid 2 and a half minutes for my computer to generate it. Not bad for an old laptop, sure, but still frustrating to have to wait so long to see if it worked. We'll fix all of that though, just follow along.
Replies: >>937236205
AssetsWiz
7/17/2025, 10:11:37 PM No.937236205
Tutorial 8 - Basic Inpainting Workflow
md5: 3b02d541411d6480632544ac5768457e๐Ÿ”
>>937236191
Now... instead of using the default I'm going to show you how to build a new workflow. (if you want to skip some of the fancier stuff I do then you can just get the template inpainting workflow but clicking "Workflows>Browse Templates", then you can skip the next couple of steps)

This is a basic starter inpainting workflow, I'll go over each group and what it does, but feel free to use this as a reference for setting yours up
Replies: >>937236220
AssetsWiz
7/17/2025, 10:12:05 PM No.937236220
Tutorial 9 - Checkpoint_VAE
md5: 0dc9bdabc9084ce7fc0ebde66a87a734๐Ÿ”
>>937236205
First up we have the Checkpoint/VAE group, this is essentially the start and finish of the processing your image. Since nothing really changes on these I group them off to the side on their own.
The Load Checkpoint node loads in the model that you'll be using and the VAE Decode node takes the processed static from the image and turns it into the finished image.
Replies: >>937236235
AssetsWiz
7/17/2025, 10:12:53 PM No.937236235
Tutorial 10 - Image Load
md5: e0735d7b31ab2c39db64ca75efc95ffa๐Ÿ”
>>937236220
Next up we have the load image/mask group. This is essential for inpainting.
The Load Image node brings the image you want to work on into the ai.
The Feather Mask blurs the edges of the area you want to work on so that your edits blend into the finished image smoother.
The VAE encode breaks the image into static for the AI figure out how it's constructed in the first place. This specific version also tells it to grow the mask which basically means that it looks at stuff slightly outside of the selected area.

Don't worry, I'll explain more about image masks in a minute
Replies: >>937236247
AssetsWiz
7/17/2025, 10:13:14 PM No.937236247
Tutorial 11 - Prompt
md5: d0c4f4e72e0c0c445b950d92e5b22497๐Ÿ”
>>937236235
Now we have Prompts. Pretty self explanatory here. The positive prompts tell the ai what you want to add and the negative prompts tell the ai what you want to avoid.
For inpainting you almost never use negative prompts. I find some limited use out of it if I find that it's trying to draw a full body and I just want it to draw a torso, but more often than not I'll get a better result by just rewording the positive prompt.
The negative prompt is more useful when you're making a brand new image from text, but for the most part you don't want to touch it unless you're having trouble with a particular part or area (like if you've tried several times and it just keeps fucking up the hands so you put hands into the negative prompt and it should hide them behind something)
Replies: >>937236262
AssetsWiz
7/17/2025, 10:13:47 PM No.937236262
Tutorial 12 - Ksampler Settings
md5: d6ebd2d5047da6ea0b4c397e9abe473f๐Ÿ”
>>937236247
The last one I'm going to go over is the settings and post processing group.
I have an image blur node set to a low level in order to hide those edit lines but it's not 100% necessary. The main thing we're going to pay attention to is the Settings node (which is named KSampler by default but I renamed it for clarity) and I'm going to go over each of these with a quick explanation:

Seed: The random numbers that it uses to generate static. You don't need to worry about it for now
Control After Generate: Used to generate the next seed. You don't need to worry about it for now
Steps: the amount of the image that it's trying to generate at any one time. Higher numbers take longer, lower numbers look worse. I find 18-30 is a great range to stay in.
CFG: How close the AI is going to try and match the prompt you give it. Adjust this carefully, half a point at a time.
Sampler name: Again, a thing dealing with randomness and static. Don't touch it unless the model you download tells you to.
Scheduler: Similar to the last setting but this one can actually make a big difference. If the model you downloaded suggests a Scheduler then use that, but otherwise try them until you find one that looks right. Normal works in most situations.
Denoise: Like I mentioned earlier, the denoise is what's turning it from the static noise back into an image. A higher denoise setting replaces more of the original image, a lower denoise replaces less. For inpainting I generally set it between .85 and .95.
Replies: >>937236302
AssetsWiz
7/17/2025, 10:14:39 PM No.937236302
Tutorial 13 - A good model to start with
md5: f89831902af22700f756c7703a7dad4c๐Ÿ”
>>937236262
Alright, you also need to have an image save node but we're starting with the basic image save for now which is self explanatory so I didn't include a screenshot.
Only one more bit of setup before we get to the nudifying.
As I mentioned earlier the default model is kinda crap so I would suggest getting a new one off of CivitAI dot com.
My favorite for beginners is epiCRealism XL.
You'll need to sign up for an account but it's free so quit complaining.
Replies: >>937236336
AssetsWiz
7/17/2025, 10:15:34 PM No.937236336
Tutorial 14 - Where do files go 1
md5: 99f51e838d19ce7d4d9085865ea2d2f9๐Ÿ”
>>937236302
After you've downloaded the model you'll see a file called
epicrealism_v10-inpainting.safetensors
Get that file and you're going to want to move it over to the checkpoints folder. You can just drag and drop it or copy it over.
To find the checkpoints folder you'll need to open up your ComfyUI folder in the file manager...
Replies: >>937236350
AssetsWiz
7/17/2025, 10:15:58 PM No.937236350
Tutorial 15 - Where do files go 2
md5: 8ee61ac5824d01e8ab315c8715f0e2dc๐Ÿ”
>>937236336
Then open the models folder and you'll see the checkpoints folder. This is going to be the of the only folders we interact with today, but if you try out new models and new types you might also need to put something in one of the older folders, like Loras (foreshadowing)


Again, if you ever have questions about how to install a particular model, check and see if the creator posted any instructions. The more helpful ones will tell you how to set it up and what settings work best. Refresh your page on the ComfyUI interface and you can select the new model from the checkpoints node and we're ready to go.
Ready to start inpainting?
Replies: >>937236389
AssetsWiz
7/17/2025, 10:16:48 PM No.937236389
Tutorial 16 - Loading Image
md5: a34359df41263a61eefbb3f882420ebd๐Ÿ”
>>937236350
Alright. So, after you've loaded your image in the load image node, right click on that preview image and select "Open in Mask Editor"
Replies: >>937236416
AssetsWiz
7/17/2025, 10:17:25 PM No.937236416
Tutorial 17 - Drawing the Mask
md5: b56eb7dd775e1f1e06f2f156d2dc522c๐Ÿ”
>>937236389
Now you want to "Mask" the areas you want to change, so assuming you want to remove a bikini you draw over that bikini and hit save.
That said, there's a few things that will making your final results a little better.
Draw the mask to include just outside the borders of what you want to change. I use a lower opacaity setting to better blend the edges of the mask along with a round brush and I set the mask to negative to make it easier to see what I've selected.
Replies: >>937236450
AssetsWiz
7/17/2025, 10:18:14 PM No.937236450
Tutorial 18 - Starting the Queue
md5: e91b0abc068664e684a965910947e759๐Ÿ”
>>937236416
After you draw and save your mask, enter your prompt and hit run to start the queue.
For demonstration I just entered the prompt as "nude" to show what happens when you try that.
Replies: >>937236485
AssetsWiz
7/17/2025, 10:19:13 PM No.937236485
Tutorial 19 - First Results
md5: 6b099a4562af97e91d335ae1bf4a371e๐Ÿ”
>>937236450
Honestly, I've seen way worse, but we can do a lot better. For one thing while that blur can help hide the edges of the edit, it's a noticeable downgrade. For another, most AI needs to be told if it's anything other than a bog standard full body picture facing front straight to the camera. Some of that can be addressed with describing your subject's position/skintone/bodytype/etc with the prompt as well as the quality of the light. You'll eventually get some intuition as to what prompts work best for what kinds of images. Finally, while it didn't come up with this source image, this workflow is completely incapable of handling images larger than 1024x1024 which is frustrating as hell.
Replies: >>937236514
AssetsWiz
7/17/2025, 10:20:02 PM No.937236514
Tutorial 20 - Workflow_ Inpainting with Loras
md5: a84a180ad48ed820acc6f5eb5e1f9828๐Ÿ”
>>937236485
If you're OK with that level of quality then you're basically done, but there's a lot of things this basic workflow can't handle and you're going to run up against those limitations constantly.

That said, you do now know the basics of how to nudify.
All the generated attempts got saved in the ComfyUI/output folder so I can share it or move it to wherever I'd like.
You can go try it out yourself if you'd like or you can stick around to learn about how to get better, more efficient results.
Replies: >>937236572
AssetsWiz
7/17/2025, 10:21:11 PM No.937236572
(Meant to attach that screenshot to this post)
>>937236514
Now we're going to start talking about how to get better results overall and how to integrate specialized models called loras.
A checkpoint is the large model of images that the ai works off of to generate images. A lora is a specialized subset that can give better detail on specific areas. I like downloading new loras off of civitai and trying them out to see how well they work. Since they're generally smaller it's not uncommon for me to go looking for a new one if I get a request for something specific. The smallest checkpoint I have is 2.1gb, the largest Lora I have is under 700mb. Obviously when you download a Lora you'll save it to the Lora folder like you did the checkpoint. The only other thing to note is to make sure that the lora was designed to work with the base model of the checkpoint. If you're going to use the checkpoint I recommended you'll want to filter your searches to loras designed to work with SD 1.5.
This is an upgraded version of that earlier workflow that uses an advanced save function and a couple Lora nodes.
Replies: >>937236604
AssetsWiz
7/17/2025, 10:21:52 PM No.937236604
Tutorial 21 - Loras
Tutorial 21 - Loras
md5: 3b56928a4e9eaf7b75cff85d28545fa4๐Ÿ”
>>937236572
So let's explain how these Lora settings work. The lora takes in the model and clip from the checkpoint and processes the model to refine it before passing along the clip to the prompt and the KSampler (I renamed that Settings earlier for simplicity). The setting for Strength Model is how much it should rely on the base model, and the setting for Strength Clip is how much it should rely on the Lora. These don't need to add up to 100% or anything. I usually keep a skin texture lora that helps to make skin look more natural and will change a second one between a handful of others depending on what I specifically want to see (pubic hair, nipples poking through fabric, etc).
Replies: >>937236645
AssetsWiz
7/17/2025, 10:22:50 PM No.937236645
Tutorial 22 - Advanced Save Options
md5: d91e0042a82540d8873f2f803b87ff3b๐Ÿ”
>>937236604
The other big change is to replace the basic Save Image with Save Image Extended.
There's a lot of settings on here and you can mouse over them to get a description of what each does, but I'm going to just point out the two that you should know right now. The first one is output_ext which allows you to select the file format you want your images to be output as. The second is quality which determines the final quality of the image you output. Why add this? Because /b/ has a ridiculously low restriction of 2mb for image uploads. Adding this in allows you to control how large the final output file is without having to compress the image or go through any other ridiculous measures.
Replies: >>937236667
AssetsWiz
7/17/2025, 10:23:18 PM No.937236667
Tutorial 23 - Custom Node Manager
md5: ba7cbe90142c31681f3a51c5c7957b1e๐Ÿ”
>>937236645
ne thing to note though is that this is a custom node (not made by me) that you'll need to install through the custom nodes manager. I honestly don't have the energy to walk you through how to do that since this is the only custom node we have and it's not a thing everyone needs. If you want to try and install it look for this button and see search for save image in the custom nodes manager.
Replies: >>937236685
AssetsWiz
7/17/2025, 10:23:52 PM No.937236685
Tutorial 24 - Results with custom Loras
md5: 99ac9591526c1bce92aeb17aa0e27a18๐Ÿ”
>>937236667
Ok so that explained what Loras do and how to set them up but why? Does it really make that big of a difference? Well if you want something *really* specific, you might need a lora or 2 to get it to look right. This one used a combination of pregnancy and transparent clothes. You can decide for yourself if it's worth the effort.
Again, this is another good place to jump off if you're happy with your results. There's still a few limitations but we're getting much better results than before in my opinion and we're able to get some specialized looks in too. If you want to go have some fun and play around with it then enjoy. The next phase is how to get even cleaner results, faster, from larger images. But it takes a lot more setup, so be prepared for more technical stuff.
Replies: >>937236747
AssetsWiz
7/17/2025, 10:25:43 PM No.937236747
Tutorial 25 - Workflow_ Auto Resizer and integrated mask
>>937236685
This is the upgraded version of the previous workflow that has a few great quality of life improvements. It includes an auto rescaler to handle larger images without distorting them. It also includes a latent composite mask to help the AI use more of the original image while still drawing over it. Essentially if you want better results that more closely match the posing, lighting, skintone, and proportions you're going to need something like this.
Replies: >>937236759
AssetsWiz
7/17/2025, 10:26:09 PM No.937236759
Tutorial 26 - Mask_Image Composite
md5: 7fe832970a7abfcf3693565bcefaf74c๐Ÿ”
>>937236747
First I'm going to go over the Mask/Image Composite group since it's relatively easy to set up. All you need is a latent noise mask node (essentially an image filled with static that the AI will draw on and then composite together with the original image), and a Latent Composite Masked node which is what combines the noise, the mask, and the original image together before sending it off to the KSampler for processing. This will, in general, help the AI to understand the original image better by letting it look at the entire image, not just the masked part.
Replies: >>937236805
AssetsWiz
7/17/2025, 10:27:33 PM No.937236805
Tutorial 27 - Auto Resizer
md5: 9a8f45485f2e2521db577e03b40087be๐Ÿ”
>>937236759
Now 'm going to go over my Auto-Resize group. If you followed one of my previous tutorials, I fixed an outstanding issue with this which caused a black border to appear around the sides of the image occasionally, it only swaps out one node which we'll get to in a bit. This uses a few nodes from the ComfyMath extension and the WAS pack extension so you might need to enable those in the custom nodes manager. When the image is first loaded in, I pass it to a Get Image Size node which reads the original resolution, and also NearestSDXLResolution which finds the closest resolution that will still fit in what the stable diffusion model is capable of creating while maintaining the original aspect ratio, and it also passes the image to Image Resize (from the WAS pack) along with the output from NearestSDXLResolution to take the original image and turn it into something the AI can actually handle. If you don't go through all that and try to edit a large image then it will get confused when it tries to go beyond those boundaries and will wind up repeating the prompt multiple times in multiple areas. If you've gotten results that wouldn't look out of place in a cronenberg film then that's probably why. Of course we don't want the image to stay at that small resolution which is where the upscaler comes in after the processor finishes but before it saves.
Before we move on though I need to let you know the specific settings you're going to need on the Image Resize node and why.
Mode = Resize - we're not rescaling the image, just shrinking it and you don't want to distort it
Supersample = True - checks more of the image when sampling to up or downscale
Resampling = Bicubic - less pixelation with this
Rescale factor = 1.0 - this determines how big the image should be based on the width height you feed into it. Don't change this
Replies: >>937236834
AssetsWiz
7/17/2025, 10:28:22 PM No.937236834
Tutorial 28 - Better Faster Results
md5: 7438fd1f03f95095d46674605341d72a๐Ÿ”
>>937236805
This one is super important to get right because you'll not only get better results overall, but because it's not trying to inpaint over a larger resolution image it will also finish much faster. That image I loaded in at the beginning that took nearly 3 full minutes just to process? I ran it again on this workflow and got this back in 43 seconds. The tradeoff is that the more it has to upscale an image on the backend the more pixelation and warping you'll notice so if you try and process a 4k image or something you might have to give it a few tries to look right. However, for the purposes of an image board with a 2MB file size cap it works great.

That's normally the area where I stop but, as promised the last time I ran one of these threads, I'm also going to teach you how to build a workflow for quick and easy cumshopping/facial edits (it has more uses than that, but this is a lot of what I've been testing lately).
Replies: >>937236859
AssetsWiz
7/17/2025, 10:29:15 PM No.937236859
Tutorial 29 - Img2Img test subject
md5: 7a98e86a89c3092d330a8399c2fe7e3b๐Ÿ”
>>937236834
Ok, first thing you need is a good picture to work off of. This isn't an inpainting workflow, we're not worrying about masks or feathering or any of that, this is just load the image, adjust settings if needed, and hit run. A good picture for this specifically is at a decently sized resolution (at least 1024x1024) and shows the face clearly. Since this is for face edits generally speaking the more of the frame the face takes up, the better. I grabbed this one earlier off another thread for testing purposes (no I don't know or care who this is).
Replies: >>937236874
AssetsWiz
7/17/2025, 10:29:41 PM No.937236874
Tutorial 30 - Workflow_ Img2Image with multi Loras
md5: e929f28b0598677d7dd1544dd61af6bb๐Ÿ”
>>937236859
Here's the new-ish workflow we're building (feel free to copy and paste from the inpainting workflow and make changes as needed). As you can see there's some new nodes and we've got several lora nodes as well. I'll go over the new stuff and why it's organized this way, but in this case I'm going to give you the specific Loras I'm using in order of most to least important.
Replies: >>937236896
AssetsWiz
7/17/2025, 10:30:29 PM No.937236896
Tutorial 31 - Lora 1
md5: 64598ea8506ba06b14dc41844b9688e6๐Ÿ”
>>937236874
First up is Cum Facial 55. It has a built in depth mask which is *very* good at detecting the contours of faces. Can this sort of thing be done without this Lora? Sure, plenty of others do the same thing. Do I want to try out the hundreds of others that do similar things to find one to replace one I already like? Hell no.
Replies: >>937236920
AssetsWiz
7/17/2025, 10:30:57 PM No.937236920
Tutorial 32 - Lora 2
md5: 1eb6876d38c85024af18b057c08299eb๐Ÿ”
>>937236896
Next we have MS Real Lite Bukkake. While this generally does increase the amount of cum on the face by a decent amount I find that I get much better results from a wider variety of skintones by integrating this which is the main reason I keep this one on.
Replies: >>937236950
AssetsWiz
7/17/2025, 10:31:45 PM No.937236950
Tutorial 33 - Lora 3
md5: 26885427b297a612c965dadfe5516606๐Ÿ”
>>937236920
Next up is Running Makeup. This is where you'll see it go from a few cumshots to a proper drenching. One thing to note with this one is that, especially at higher clip strength, you'll notice the facial expression changing more.
Replies: >>937236966
AssetsWiz
7/17/2025, 10:32:12 PM No.937236966
Tutorial 34 - Lora 4
md5: 544069a5cc048e467328886a00dd3e32๐Ÿ”
>>937236950
Finally I have MS Real Lite Cum On Tongue. I've tried a number of different loras for cum in the mouth and so far this is the best one I've found. Will update this tutorial later if I've found better.
Also keep in mind that you can mix and match these however you like, I am by no means an authority on the available models for this sort of thing so if you find that you're not getting the specific results you like go ahead and take a look at what else is out there and experiment with it (I'll actually go over later how to better control your results when testing out new loras).
Replies: >>937237029
AssetsWiz
7/17/2025, 10:33:42 PM No.937237029
Tutorial 35 - First Lora Group
md5: 864fc7f7c5ad6b98ed6c144c2814c4a7๐Ÿ”
>>937236966
OK, so that's the loras we're working with. You can use the same epicrealism from the inpainting workflow and it works great for this. The only other thing I want to quickly note before I start talking about the new nodes and how to set this up is about settings. I've already talked a little about them before but image to image without inpainting is a little tricky. Since we don't want to change the structure of the face set your denoise low. Very low. 0.1 or lower. Literally even turning it up by 0.05 is enough to warp the face of your target in some cases. You'll also want to be careful with the clip strength of your loras. I usually keep them between 0.6 and 0.7. With that out of the way let's talk about the new groups and nodes. This is the starter Lora group which I just called Lora 1. It *is* important that you group together a lora and a basic string field for this, I'll explain why later. In the string field you'll want to put the trigger phrase for the lora itself. Most of them are activated by a specific prompt, generally listed on the download page on civitai. If you're using civitai to download check the Trigger Words section on the right. For Cumfacial 55 it's cumfacial55. Naturally. But they're often different based on how the creator constructed it in the first place, so always check the documentation.
Replies: >>937237043
AssetsWiz
7/17/2025, 10:34:11 PM No.937237043
Tutorial 36 - Remaining Lora Groups
md5: c4d376bb0f8103d96598901c4ee445be๐Ÿ”
>>937237029
The second lora group (and 3rd and 4th) has a Concatenate node instead of the basic string node. This adds the string a and string b together and outputs them as a single string. So if you feed the output of the last groups string into the input of this groups concatenate node string a, then put the lora trigger into string b, it will output a single string containing the trigger words for each lora you've connected. You'll also need something to separate these so it doesn't just mash them into a single word, that's the delimiter. In that field you'll want to type a comma. Each group after the first is set up the same way with only the last one being connected slightly differently. In essence you want to take the output of Model and Clip from the Load Checkpoint node, feed it into the first group's Lora inputs, and then take those Model and Clip outputs and feed them into the next lora's inputs, until you get to the last which feeds the last clip into the clip text encode (positive and negative) and the last model into the ksampler. For the strings you take the first string, into the second, combine them, and so on until you eventually send the final output string into the Positive Text encode (don't send it to the negative or it will cancel itself out). I usually color code my text encoders so I don't mix up which is connected where.

I understand that's a lot of setup, but that's essentially it. There's the resizer group that we went over back in the inpaint and the save image extended, but again, every other node is something we've already gone through. I actually built this one by saving a copy of my inpainting workflow and removing a few nodes before adding in some extra lora groups. So we've got all this facial stuff set up, how well does it work. Let's load up that test image and give it a try.
Replies: >>937237070
AssetsWiz
7/17/2025, 10:34:42 PM No.937237070
Tutorial 37 - Cumshopping Excessive
md5: 8ca89e571e7b291dd660f41850ba77a6๐Ÿ”
>>937237043
Now that's a lot of cum. Some would say too much. Also it has her sticking her tongue out and it's a little awkward. But that's exactly why I had you assign the loras to groups to make the next part easier.
Replies: >>937237086
AssetsWiz
7/17/2025, 10:35:16 PM No.937237086
Tutorial 38 - How to bypass groups
md5: 7872cd9cc644096ad1b34414f2692ae6๐Ÿ”
>>937237070
One of the neat features of ComfyUI that you can take advantage of is to Bypass nodes allowing you to maintain connections without having the underlying effect of the node taking place. So if, for instance. I want to scale back the amount of cum from a trial by drowning to a more realistic squirt on the face, I can do that by bypassing the lora nodes and string nodes that are making the overall effect more intense or adding things like a tongue that I might not want for this image. And because they're in groups I can simply right click on the group I want to temporarily bypass and select Bypass Group Nodes. If I want to turn it back on later I do the same thing but select Set Group Nodes to Always. This allows me to quickly turn on and off whole sections of prompts, loras, entire portions of my workflow if I want. I mostly use groups to keep my workflow better organized and for this quick bypassing feature but there's genuinely so much more you can do with this.
Replies: >>937237098
AssetsWiz
7/17/2025, 10:35:39 PM No.937237098
Tutorial 39 - Workflow_ Loras bypassed
md5: dd725c4ac08c032b1d2ee38277ec00d5๐Ÿ”
>>937237086
Now to show you how dramatic of a change you can get by stacking those loras I temporarily set my Ksampler's "Control after Generate" setting to "Fixed" so I could use the exact same random seed to generate a second image but with a different set of loras/prompts. This is how you can test out how a lora works by using "fixed" to test it side by side in an on/off fashion or by using "increment" which allows you to generate several images with more subtle changes in the exact same style. Using the exact same seed as before I bypassed all but the cumfacial 55 group. Let's see the difference
Replies: >>937237123
AssetsWiz
7/17/2025, 10:36:21 PM No.937237123
Tutorial 40 - Cumshopping single lora
md5: 97e237636b5589d834e70c6bbbd2b74d๐Ÿ”
>>937237098
Much more understated. Honestly I might have wanted to bump up the weight just a bit just to make it more visible but you can see how it's a massive difference while still having a noticeable effect on the original image.
And as you might have guessed, while this last part has been focused on cumshopping the central concept of [base image > several loras > finished image] allows for a ton of flexibility depending on the loras you have.

Now that you have this set up you have an efficient image to image workflow that doesn't require you to inpaint which is very useful for quick generation and testing out loras. Suppose for instance you have a specialized lora that adds tattoos or changes labia shape, or even the bog standard Ghibli style; all of those are now possible with just loading in the lora and tweaking a few settings.
Replies: >>937237176
AssetsWiz
7/17/2025, 10:37:35 PM No.937237176
Tutorial 41 - SAM Detection Workflow
md5: 3027ea0a14686da14f143c71b775028e๐Ÿ”
>>937237123
Ok, that's the cumshopping and basic image to image, but maybe you prefer the control of inpainting, you just wish it were easier to draw a good mask. Oh boy do I have the solution for you. Now we're going to work on SAM Detection mask refinining. This isn't much more complex than what we've already set up, but it's got some new things that we need to go over and there's some significant drawbacks to it. This is the newly upgraded workflow, lets go over those changes in detail.
Replies: >>937237213
AssetsWiz
7/17/2025, 10:38:46 PM No.937237213
Tutorial 42 - New Nodes for SAM Detection
md5: 934848cf861e14c0266270465fb18fb4๐Ÿ”
>>937237176
This is where pretty much all of the new parts take place, to give a quick explanation of how this new part of the workflow functions. It starts with loading in not just the image but a new type of model called the SAM (Segment Anything Model). This should come by default with your setup, but you might need to install the SAMLoader node from the Impact pack of custom nodes. It takes the mask you draw on the image and send it to a node that turns it into segments the SAM detector can read. You can leave the settings on Mask To SEGS as default. Mask to SEGS, the SAM Model and the image itself all get loaded into the SAM Detector. What it's doing from there is that it's using similar nearby colors to automatically adjust your mask to more precisely select the borders of your mask. This makes it much easier to select *just* the borders of clothes and nothing else. I find that those edges are usually a little too sharp so I send them off to a grow mask node followed by a feather mask node to blur those edges just a bit and blend it more evenly. We'll need to go over these settings in more detail, but that's for later. After that mask edge has been blurred it then gets sent off to the Mask Compositer as usual.
Replies: >>937237262
AssetsWiz
7/17/2025, 10:40:10 PM No.937237262
Tutorial 43 - Mask detection and finishing
md5: 095e2f1a28a5e13ddeba50650c890b15๐Ÿ”
>>937237213
Replies: >>937237274
AssetsWiz
7/17/2025, 10:40:26 PM No.937237274
Tutorial 44 - SAM Settings
md5: a3340f4032ac8b7445f1d02d387eb9ff๐Ÿ”
>>937237262
Before we go into any other setup it's important to get your settings right. So we're going to go over each setting on the SAMDetector node.
Detection Hint - This is what tells the SAM Detector where to look for an idea of what needs to be masked. You should set this to mask-area for our purposes since you're trying to only alter what you've masked over.
Dilation - The expands the mask but we only want to do that a small amount after the Detector has finished, so I generally leave it at 1.
Threshold and Mask_Hint_Threshold - These decide whether or not an individual pixel should be added to the mask. The threshold is essentially how sure the detector needs to be before it adds it, and the mask_hint_threshold is how closesly the detector is trying to mask the pixels in the original image. Keep these high and adjust them carefully
BBox_expansion - This tells the Detector how much outside of the mask it should look at for more parts to draw. I keep this low because I don't want it searching the whole image for similar colors.
Mask_Hint_Use_Negative - This is for drawing Negative or exclusion masks. I don't find it useful in this workflow so I keep it set to False.
Replies: >>937237297
AssetsWiz
7/17/2025, 10:41:07 PM No.937237297
Tutorial 45 - New Masking
md5: 88c3ebf3e4efa9a6409ffb39535e627c๐Ÿ”
>>937237274
Now previously we drew masks by including just outside the area we wanted to change. Now we're going to do the opposite. Select just a small area of the target clothes you want to change. Enough that the SEGS has a rough idea of how large of an idea to feed into the SAMDetector, but include as little skin as possible. One important thing to note is that if your target is wearing multiple different items of clothing with multiple different colors, you might have to draw a mask for each area independently. This doesn't mean adding a bunch of new mask or image load nodes, just that you keep separation between those areas.
This can also struggle if the target is wearing clothes that are very close their skintone or the background. You can try to adjust the thresholds to 1 to compensate for that but in some cases I find it's best to just keep a backup manual masking workflow on hand for those situations. It's frustrating to have to go back to a manual mask after you've spent so long tweaking settings on the SAMDetector but sometimes doing it manually is best.
Replies: >>937237335
AssetsWiz
7/17/2025, 10:41:53 PM No.937237335
Tutorial 46 - Diagnosing the problem
md5: 0b5b2c5695dba4b7306cec8bf96e18d2๐Ÿ”
>>937237297
This part isn't strictly necessary, but I found it incredibly helpful to diagnosing issues with the SAM Detector while I was messing around with the settings. These are SEGS and Mask Previews that can be easily added to your workflow by connecting the output of the appropriate nodes to the input of the previews. This allows you to get an idea of what the detector is looking at when it goes through detection, and the mask it drew based on those segments. In my example I have a SEGS preview followed by 2 mask previews. The first one is connected to the SAM Director output and the other one is connected to the feather mask output. This way I can see the segment, the detection, and the final mask, so if I try changing a setting and it suddenly starts including huge portions of the background I know that I messed something up.
Replies: >>937237398
Anonymous
7/17/2025, 10:43:01 PM No.937237377
God bless (You)
AssetsWiz
7/17/2025, 10:43:28 PM No.937237398
Tutorial 47 - Final Result with SAM Detection
md5: 549c88969ed83d1ba68553916d37a112๐Ÿ”
>>937237335
Ultimately the benefit of all this is partly that it makes masking individual parts much easier as you don't have to worry about a lot of fine detail, and as a particularly nice benefit, your mask will automatically be drawn around things like hands and fingers making your final results better overall.

Now there's still areas to improve on all this. For one thing I can't do outpainting (adding new areas to an image). For another I need to add an optional exclusion map which can keep the ai from auto masking anything you specifically don't want to change. I've also been looking into adding body positioning models for those trickier poses.And naturally I want to go ahead and start making my own loras. But that's for another day.
Replies: >>937237479
AssetsWiz
7/17/2025, 10:45:12 PM No.937237479
>>937237398
I managed to time it right as I finished right as I got a text from my wife letting me know she was on her way home from work. If you've got questions ask them now as I won't be online for too much longer
Replies: >>937237889
Anonymous
7/17/2025, 10:54:24 PM No.937237889
>>937237479
when inpainting boots, have you found any way at all to get it more consistent? sometimes i get great results and sometimes it takes dozens of tries, sometimes it just masks their legs into the background.
Replies: >>937238087
Anonymous
7/17/2025, 10:58:55 PM No.937238085
Can you share your workflow .json OP? I'm getting close to creating it from scratch but running into problems. Pastebin perhaps? Thank you for the tutorial!
Replies: >>937238235
AssetsWiz
7/17/2025, 10:58:56 PM No.937238087
>>937237889
Honestly no. I generally just leave the boots on because I think it's hotter. I'm willing to bet a specialized "Foot" lora would work though
Replies: >>937238202
Anonymous
7/17/2025, 11:01:27 PM No.937238202
>>937238087
i'm meaning putting boots on someone who doesn't have them, i also think it's crazy hot lol
Replies: >>937238269
AssetsWiz
7/17/2025, 11:02:20 PM No.937238235
>>937238085
pastebin com zPXhMEM1
Replies: >>937238386 >>937250407
AssetsWiz
7/17/2025, 11:03:05 PM No.937238269
>>937238202
Oh, I usually find describing the style of boot helps, but again, look for a boot lora. Might help?
Anonymous
7/17/2025, 11:05:58 PM No.937238386
>>937238235
Yes! Thank you AssetsWiz!
Anonymous
7/17/2025, 11:08:02 PM No.937238474
can my laptop spec generate those? i5 4gb ram rtx 2gb
Replies: >>937238808
AssetsWiz
7/17/2025, 11:14:59 PM No.937238808
>>937238474
Its a little low so you might struggle with some of it. It really depends more on your GPU than your CPU. I would be a little surprised if it didnt crash your machine to do all the complex stuff and it only gets worse the more models and loras you load in but im still able to comfortably do all this on a gtx3050
Anonymous
7/17/2025, 11:48:22 PM No.937240229
thanks for this! would you happen to have a guide or workflow for nudifying v2v?
Replies: >>937242470 >>937242652 >>937242704
Anonymous
7/17/2025, 11:52:49 PM No.937240419
It's working but for some reason it is changing image details outside of my mask. Is that expected?
Replies: >>937242503
Anonymous
7/17/2025, 11:53:28 PM No.937240455
What models do you recommend from CivitAI?
You said the one at the start was good for beginners, what about for non-beginners?
Replies: >>937242549
Anonymous
7/18/2025, 12:24:47 AM No.937241837
based
Anonymous
7/18/2025, 12:26:55 AM No.937241946
IMG-20250625-WA0002
IMG-20250625-WA0002
md5: a38f69967c973c2d576a984df20ef994๐Ÿ”
AssetsWiz
7/18/2025, 12:39:00 AM No.937242470
>>937240229
I tried to get that set up but unfortunately im only on a 3050 with 6g vram and 16g ram. It kept crashing on me. Maybe one day ill figure out how to make if efficient enough to do that but not now
Replies: >>937242652 >>937242704
AssetsWiz
7/18/2025, 12:39:49 AM No.937242503
>>937240419
Post a screenshot of your workflow and ill see if I can figure it out.
AssetsWiz
7/18/2025, 12:40:52 AM No.937242549
>>937240455
Ive been so focused on making these things work with the tutorials and keeping it simple that I actually haven't tested too many. I would actually check with Waz if you see him around
Anonymous
7/18/2025, 12:43:49 AM No.937242652
>>937242470
>>937240229

>>19799683
Anonymous
7/18/2025, 12:45:27 AM No.937242704
>>937242470
>>937240229


/r/
>>19799683
Anonymous
7/18/2025, 12:51:04 AM No.937242899
Screenshot 2025-07-17 184700
md5: d0a8e4a3f92005c9299be93b2b283158๐Ÿ”
>>937236147
getting this error any idea what to do?
Replies: >>937243102
AssetsWiz
7/18/2025, 12:55:43 AM No.937243102
>>937242899
Pip install pyyaml

If that doesn't work

pip install -r requirements.txt

For whatever reason it didnt install all the packages
Replies: >>937243416
Anonymous
7/18/2025, 1:03:53 AM No.937243416
Screenshot 2025-07-17 190259
md5: 0477a7425098a11e045cdcdf5cfda4d4๐Ÿ”
>>937243102
tried both got this after
>pip install -r requirements.txt
Replies: >>937243668
AssetsWiz
7/18/2025, 1:09:42 AM No.937243668
>>937243416
Ok. Its not finding your requirements file which explains the missing yaml install. Look in your ai/comfyui folder in the file manager. If you don't see files there at all then it didnt clone the repo properly. Repeat those steps and see if any other errors pop up. If you do see a requirements.txt file in that comfyui directory let me know.
Also are you windows?
Replies: >>937243758
Anonymous
7/18/2025, 1:11:46 AM No.937243758
>>937243668
yep on windows, i have files in /comfyui including the requirements file
Replies: >>937243914
AssetsWiz
7/18/2025, 1:15:44 AM No.937243914
>>937243758
Close your command terminal, go back to the icon for it and right click "run as administrator" go back to where you were and try the pip install requirements again.
If that doesn't work we'll have to set up sudo for windows
Replies: >>937244285 >>937244397
Anonymous
7/18/2025, 1:24:55 AM No.937244285
>>937243914
stability matrix might be an easier way for the less tech inclined
Anonymous
7/18/2025, 1:27:49 AM No.937244397
>>937243914
tried with admin but got same result FUCK i just wanna beat off
Replies: >>937244529
AssetsWiz
7/18/2025, 1:31:08 AM No.937244529
>>937244397
Sorry man im trying. Drop your disc and ill do a few requests for you and we can figure out this out some other time. You're not the first person to get stuck on this and I need to make a note of how to fix it in the tutorial when we figure this out
Replies: >>937244582
Anonymous
7/18/2025, 1:32:19 AM No.937244582
>>937244529
eh im fine for reqs you mentioned sudo, would the work?
Replies: >>937244701
AssetsWiz
7/18/2025, 1:35:38 AM No.937244701
>>937244582
It might, but I'm starting to think it's a file location issue instead. Can you just try

ls

and post a screenshot? That should show what directory you're in and what files the system can see
Replies: >>937244819
Anonymous
7/18/2025, 1:38:32 AM No.937244819
Screenshot 2025-07-17 193738
md5: 32f00900e4d59ca95db2c10528bb1c8e๐Ÿ”
>>937244701
>ls
on windows but here
Replies: >>937245045 >>937245196
AssetsWiz
7/18/2025, 1:44:32 AM No.937245045
>>937244819
Open up your requirements.txt
It should look like this:

comfyui-frontend-package==1.23.4
comfyui-workflow-templates==0.1.30
comfyui-embedded-docs==0.2.3
torch
torchsde
torchvision
torchaudio
numpy>=1.25.0
einops
transformers>=4.37.2
tokenizers>=0.13.3
sentencepiece
safetensors>=0.4.2
aiohttp>=3.11.8
yarl>=1.18.0
pyyaml
Pillow
scipy
tqdm
psutil
alembic
SQLAlchemy

#non essential dependencies:
kornia>=0.7.1
spandrel
soundfile
av>=14.2.0
pydantic~=2.0
pydantic-settings~=2.0
Replies: >>937245136 >>937245196
Anonymous
7/18/2025, 1:46:54 AM No.937245136
>>937245045
>should
do i edit them?

comfyui-frontend-package==1.23.4
comfyui-workflow-templates==0.1.36
comfyui-embedded-docs==0.2.4
torch
torchsde
torchvision
torchaudio
numpy>=1.25.0
einops
transformers>=4.37.2
tokenizers>=0.13.3
sentencepiece
safetensors>=0.4.2
aiohttp>=3.11.8
yarl>=1.18.0
pyyaml
Pillow
scipy
tqdm
psutil
alembic
SQLAlchemy

#non essential dependencies:
kornia>=0.7.1
spandrel
soundfile
av>=14.2.0
pydantic~=2.0
pydantic-settings~=2.0
Replies: >>937245228
AssetsWiz
7/18/2025, 1:48:20 AM No.937245196
>>937244819
>>937245045
If it looks like that try this

pip install --user -r requirements.txt

make sure you include --user and -r that can mess with pip sometimes
AssetsWiz
7/18/2025, 1:49:15 AM No.937245228
>>937245136
No you're fine that's just the latest version. Shouldn't have any impact on what you're trying to do
Replies: >>937245470
Anonymous
7/18/2025, 1:55:52 AM No.937245470
>>937245228
any other ideas just stuck on
>python main.py
Replies: >>937245888
AssetsWiz
7/18/2025, 2:06:32 AM No.937245888
>>937245470
So it's just saying it can't find a module named yaml when you run that.
If you attempt to run
>pip install pyyaml
nothing changes
And if you attempt to run
>pip install --user -r requirements.txt
It says it can't find the file?
Replies: >>937251409
Anonymous
7/18/2025, 2:09:26 AM No.937245983
>>937235935 (OP)
her nipples are in the wrong place
Replies: >>937246190
Anonymous
7/18/2025, 2:11:10 AM No.937246038
>>937235935 (OP)
What's the difference between stable diffusion, and other models?
Also, does this use 4chan's servers?
If not, what should I use?
Replies: >>937246121 >>937246245
AssetsWiz
7/18/2025, 2:13:33 AM No.937246121
>>937246038
It does not use 4chan's servers. This thread shows you how to set this up so you can run it on your personal computer. Once it's running you literally don't even need an internet connection
AssetsWiz
7/18/2025, 2:15:11 AM No.937246190
>>937245983
And I'd be willing to bet you'd be able to do far better yourself. Care to show me how it's done?
AssetsWiz
7/18/2025, 2:17:00 AM No.937246245
>>937246038
As for Stable Diffusion vs other models, Most of us use SD because it's open source and free so we don't have to pay for any kind of license or have restrictions like what you'd get from commercial AI.
I would guess that every nudify bot and 90% of the AI photo editors out there use some form of Stable Diffusion.
Anonymous
7/18/2025, 2:40:51 AM No.937247093
Wizard-euler-7.0-40-0001
md5: 3b8b0879320b7269168268eea57dff0a๐Ÿ”
thanks for this - much appreciated :)
Replies: >>937247423
AssetsWiz
7/18/2025, 2:50:07 AM No.937247423
>>937247093
Nice! Do it yourself?
Replies: >>937247629
Anonymous
7/18/2025, 2:55:46 AM No.937247629
>>937247423
that particular result is using your pastebin setup. but i have setup my own flow.

i was using swarmui before but comfyui is so much better lmao
Replies: >>937247865
AssetsWiz
7/18/2025, 3:01:30 AM No.937247865
>>937247629
Very nice. Glad it's working for you. I saw that one in the request thread earlier and almost took it, but kept getting side tracked by tweaking SAMDetector settings
Anonymous
7/18/2025, 4:01:12 AM No.937250296
any chance of a catbox with workflow?
Replies: >>937250350
AssetsWiz
7/18/2025, 4:02:46 AM No.937250350
>>937250296
Catbox?
Replies: >>937250407
AssetsWiz
7/18/2025, 4:04:01 AM No.937250407
>>937250350
>>937238235
Here's a pastebin I posted earlier
Replies: >>937250566
Anonymous
7/18/2025, 4:08:13 AM No.937250566
>>937250407
thank you
Anonymous
7/18/2025, 4:32:53 AM No.937251409
>>937245888
if youre still here, i get a result with the first command
>Using cached PyYAML-6.0.2-cp313-cp313-win_amd64.whl.metadata (2.1 kB)
Using cached PyYAML-6.0.2-cp313-cp313-win_amd64.whl (156 kB)
Installing collected packages: pyyaml
Successfully installed pyyaml-6.0.2

but the second command give me an error
>Getting requirements to build wheel ... error
error: subprocess-exited-with-error

ร— Getting requirements to build wheel did not run successfully.
exit code: 1
Replies: >>937251693
AssetsWiz
7/18/2025, 4:41:13 AM No.937251693
>>937251409
About to hop in the shower but if the first one worked then it should have installed yaml. Are you still getting the missing module error when you try to rub main.py?
Is it the same module error?
Replies: >>937251857
Anonymous
7/18/2025, 4:45:47 AM No.937251857
>>937251693
both errors happen i just didnt see the "Getting requirement..." one
Replies: >>937252636
AssetsWiz
7/18/2025, 5:06:59 AM No.937252636
>>937251857
Can you paste the exact text of the error you get when you run main.py from the venv?
Replies: >>937253601
Anonymous
7/18/2025, 5:32:22 AM No.937253601
>>937252636
(venv) C:\AI\ComfyUI>python main.py
Traceback (most recent call last):
File "C:\AI\ComfyUI\main.py", line 11, in <module>
import utils.extra_config
File "C:\AI\ComfyUI\utils\extra_config.py", line 2, in <module>
import yaml
ModuleNotFoundError: No module named 'yaml'
Replies: >>937253675 >>937253697
Anonymous
7/18/2025, 5:34:37 AM No.937253675
>>937253601
prior to that i get these two errors
error: subprocess-exited-with-error

ร— Getting requirements to build wheel did not run successfully.
exit code: 1
โ”€> [48 lines of output]

and

FileNotFoundError: [WinError 2] The system cannot find the file specified
[end of output]

note: This error originates from a subprocess, and is likely not a problem with pip.
error: subprocess-exited-with-error
AssetsWiz
7/18/2025, 5:35:06 AM No.937253697
>>937253601
I think I'm an idiot, was your venv running when you ran the install requirements?
Replies: >>937253767
Anonymous
7/18/2025, 5:35:54 AM No.937253723
5D6AA29D-13AB-4409-A636-635A5453DF8F
md5: da08ef9e7e8f26d396fd3a97fe1581d9๐Ÿ”
What do I do now Jesus Christ? Do I order another black sweater?
Anonymous
7/18/2025, 5:37:19 AM No.937253767
>>937253697
thats the order it had it in the thread kek
Replies: >>937253815
AssetsWiz
7/18/2025, 5:39:13 AM No.937253815
>>937253767
Well that might explain why I've had to walk people through fixing this before. Try it and if that fixes it I'll rewrite the copypasta before I forget
Replies: >>937254044
Anonymous
7/18/2025, 5:42:42 AM No.937253932
00047-563403595
00047-563403595
md5: 43261bd28d2201c4872e5e159f708a83๐Ÿ”
Jesus christ OP. Just make this into a Rentry, at least that way you can host the workflow.
Replies: >>937253977
AssetsWiz
7/18/2025, 5:44:19 AM No.937253977
>>937253932
I do things my way. You do them yours
Replies: >>937254487
Anonymous
7/18/2025, 5:46:00 AM No.937254044
>>937253815
still get the same two errors about Getting requirement to build wheel
Replies: >>937254095
AssetsWiz
7/18/2025, 5:47:10 AM No.937254095
>>937254044
Dammit. I'm sorry man. I gotta head to bed. Do you have Disc? I'll hit you up on there tomorrow to help you fix it
Replies: >>937254126
Anonymous
7/18/2025, 5:48:06 AM No.937254126
>>937254095
corspe_01.mdll
checking github and shit now for a fix since its a genreal ComfyUI error
Replies: >>937254173
AssetsWiz
7/18/2025, 5:49:27 AM No.937254173
>>937254126
Yeah. I've run into this before but I don't remember how it got fixed last time.
Anonymous
7/18/2025, 5:58:58 AM No.937254487
00024-1013854893
00024-1013854893
md5: 1c18cf55d4d990d8bda15c00ff0577c8๐Ÿ”
>>937253977
Why do all of this work for it to be 404'd in less than a day?
Replies: >>937254572
Anonymous
7/18/2025, 6:01:12 AM No.937254572
>>937254487
nice taytay
Replies: >>937254663
Anonymous
7/18/2025, 6:03:00 AM No.937254663
00008-1561436273
00008-1561436273
md5: 0c7f5f47c58da2d0535cc70f4ec57e2d๐Ÿ”
>>937254572
Thanks. Not trying to be an asshole to OP, this is legitimately good info. It should be preserved. Would be a shame for it to be gone.
Replies: >>937263507
Anonymous
7/18/2025, 6:52:18 AM No.937256355
Someone archive this
Replies: >>937266300
Anonymous
7/18/2025, 7:22:27 AM No.937257309
Oh now you've done, the discord jeets are going to have your head for this.

Great tutorial though. The absolutely wretched trolling and obvious gatekeeping on here motivated me to build a serious rig and I'm genning "OK" gens after just a few days.
Replies: >>937265126
Anonymous
7/18/2025, 7:51:45 AM No.937258076
>>937236075
I also ran into the issue of file not found, requirements to build wheel, etc. when running pip install -r requirements.txt. My solution was installing python 3.12.10 (after having installed 3.13). I guess that worked.

My new issue is immediately after with "AssertionError: Torch not compiled with CUDA enabled", which I guess(?) is caused by my Radeon, FUG. What appears to have worked is uninstalling all the torch components, reinstalling torch with "pip install torch-directml", reinstalling torchvision and torchaudio with the original command (omitting the first torch) and then running "python main.py --directml". Doing this, I have at least reached the web interface.
Replies: >>937258356 >>937263646 >>937263669 >>937264118
Anonymous
7/18/2025, 8:04:11 AM No.937258356
1c616f122a31ab591ca3b639ac31eb20264050fa95737152e21044efb51d5270
>>937258076
Aand it needs NVIDIA drivers, lmao okay it's midnight, I'll come back to this tomorrow.
Replies: >>937263669 >>937264118
Anonymous
7/18/2025, 10:33:42 AM No.937261008
Probably for more official way, but itโ€™s weird to think that this is gonna be a more common part of our society soon provided that the masses donโ€™t freak out like they do in parliament with the advanced of medical science and start banning the practices that were aloud to use under ethics.
But a lot of jobs will most likely be lost and replaced by people who teach people how to use this to make things to do with picture, art, video and audio. Obviously I know itโ€™s already happening, but like I said itโ€™s currently on a small scale and seen as a bad thing in media, what with deepfakes ruling the mediaโ€™s view on it and it being seen as a bad thing. But Iโ€™d think if it gets traction then youโ€™ll eventually get classes in schools on teaching this shit. And it will probably become yet another โ€œlow income jobโ€ by teachers standards. Just a thought, but to say most people around this part of the internet just use it to strip girls of their clothes (not that Iโ€™ve got a problem with that) itโ€™s interesting to think this has the possibility of becoming a lot of peopleโ€™s actual 9-5 in 10 years.
AssetsWiz
7/18/2025, 12:54:25 PM No.937263507
>>937254663
Awake now. Honestly part of the reason I do it this way is because im teaching myself all of this as a hobby and running these tutorials helps me figure out where my explanations have gone wrong, and by forcing myself to explain it I wind up with a better understanding myself. Like obviously I need to go back and re-write that first section once I find a more reliable way to get past that build issue. Its not my day job (im a software developer). I just like understanding how things work, and building this out piece by piece rather than just slapping something together from a YouTube tutorial and then downloading someone else's workflow. I don't think there's anything wrong with downloading those workflows once you have a firm understanding of things, but in my experience if you use someone else's shit to get what you want then you tend to be too afraid to make changes because you're like "well it works, don't fuck with it".
That sort of thinking leads to stagnation, not innovation
AssetsWiz
7/18/2025, 1:00:47 PM No.937263646
>>937258076
Yeah, I run into build wheel issues all the time professionally whenever im setting up new testing environments. Unfortunately it's usually not a simple fix like the error telling you what youre specifically missing.
Ooh yeah. Damn I forgot about the Radeon issue. Right now there isn't a comfyui build thats native to windows that runs on Radeon. I really need to mention that in the copypasta. Hopefully soon, but for now, if you're still motivated to fix this, the answer is actually to install Linux. They have a working radeon build for Linux and you can dual boot your machine easily enough. It's been a year or so since the last time I did a Linux install but I could still walk you through it if you'd like.
AssetsWiz
7/18/2025, 1:01:57 PM No.937263669
>>937258076
>>937258356
The other alternative is to install automatic1111 again. Plenty of guides available for it but i prefer the organization of comfyui
AssetsWiz
7/18/2025, 1:24:40 PM No.937264118
>>937258076
>>937258356
Good news bro, I just did some googling and it looks like there's a new tool that can get you past that CUDA issue and use Radeon on comfyui. Its called ZLUDA.
I don't know much about it yet, only just learned about it 2 minutes ago but it looks like it might be your answer. I have actual work at my actual job to do this morning so I probably won't have time to help much more but there's a potential starting point for you
Anonymous
7/18/2025, 2:12:55 PM No.937265126
>>937257309
i occasionally drop in with stuff i'm not really interested in just to stick it to them. fuck gatekeeping.
Anonymous
7/18/2025, 2:25:29 PM No.937265420
Is there any AI that lets you load a bunch of photos of a person and then create fully AI images from a prompt that look like the person in the photos you loaded into it?

Say like you load 100 photos of yourself into it, then you can make up what ever prompts you want, and it will create images of you doing whatever is in the prompt?
Replies: >>937265578
AssetsWiz
7/18/2025, 2:31:50 PM No.937265578
>>937265420
Yeah, essentially what you're talking about is creating a custom Lora. I haven't done the research on how to do that yet, but I'll run a tutorial on that eventually.
In essence, you would train your own model on those pictures (the more and the better quality the better) then you would load it into the lora spot on a prompt to image or image to image workflow.
I'll have to figure out how to make those and the best way to integrate them, but yes it is possible. If you can't wait for me to figure it out and make a tutorial try looking up "making a custom lora" on youtube and start there
Replies: >>937265865
Anonymous
7/18/2025, 2:44:47 PM No.937265865
>>937265578
Oh, hell yeah. I'll give it a look on youtube.

Do you have discord or another messenger? I don't check here too often these days.
Replies: >>937266033
AssetsWiz
7/18/2025, 2:52:17 PM No.937266033
>>937265865
I do, but I don't tend to post it on here because I get spammed with messages. Post yours and I'll ad you
Anonymous
7/18/2025, 3:03:07 PM No.937266300
>>937256355
It'll be archived on /thebarchive