Search Results
2/23/2022, 3:50:32 PM
>>624910
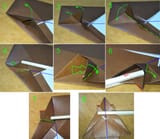
I assume step 36 is the problem. The blue line in each picture is the center line (I used another paper for the explanation and only folded the relevant parts to get a larger model for the pictures).
1., 2. From step 35, open the rabbit ear.
3. Refold on the long crease, going all the way up.
4., 5. Now for the tricky part: insert a finger where indicated by the arrow, and start folding along the (non-existent) green valley fold. See pictures 6, 7, 8 for the final position of the red part (perpendicular or so to the center line).
6. When that red part is placed as intended, keep it in place and flatten the rest of the layer (green mountain fold).
Then, repeat on the other side.
7., 8. Result.
As before, tell me if it isn't helpful. That step is not so hard to do, but not so easy to explain.
Page 1
