Search Results
7/17/2025, 10:27:33 PM
>>937236759
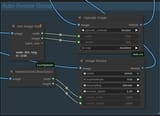
Now 'm going to go over my Auto-Resize group. If you followed one of my previous tutorials, I fixed an outstanding issue with this which caused a black border to appear around the sides of the image occasionally, it only swaps out one node which we'll get to in a bit. This uses a few nodes from the ComfyMath extension and the WAS pack extension so you might need to enable those in the custom nodes manager. When the image is first loaded in, I pass it to a Get Image Size node which reads the original resolution, and also NearestSDXLResolution which finds the closest resolution that will still fit in what the stable diffusion model is capable of creating while maintaining the original aspect ratio, and it also passes the image to Image Resize (from the WAS pack) along with the output from NearestSDXLResolution to take the original image and turn it into something the AI can actually handle. If you don't go through all that and try to edit a large image then it will get confused when it tries to go beyond those boundaries and will wind up repeating the prompt multiple times in multiple areas. If you've gotten results that wouldn't look out of place in a cronenberg film then that's probably why. Of course we don't want the image to stay at that small resolution which is where the upscaler comes in after the processor finishes but before it saves.
Before we move on though I need to let you know the specific settings you're going to need on the Image Resize node and why.
Mode = Resize - we're not rescaling the image, just shrinking it and you don't want to distort it
Supersample = True - checks more of the image when sampling to up or downscale
Resampling = Bicubic - less pixelation with this
Rescale factor = 1.0 - this determines how big the image should be based on the width height you feed into it. Don't change this
Page 1