← Home ← Back to /diy/

Thread 2938757

57 posts 54 images /diy/
Anonymous No.2938757 >>2938759 >>2940692 >>2942611
Ant formicarium buildalong
I want to build an ant enclosure, more formally known as a "formicarium" myself because ant enclosures are overpriced as shit and the materials needed are pretty cheap all things considered.
I'll document it here similarly to a cookalong thread in /ck/, so whoever is interested can come along for the ride.

I'm also a rentoid and only have shit tier tools, which both means if you want to do what I'll do in this thread it'll be easy with minimal equipment, and I'll likely fuck up, meaning you get to at least laugh at me.
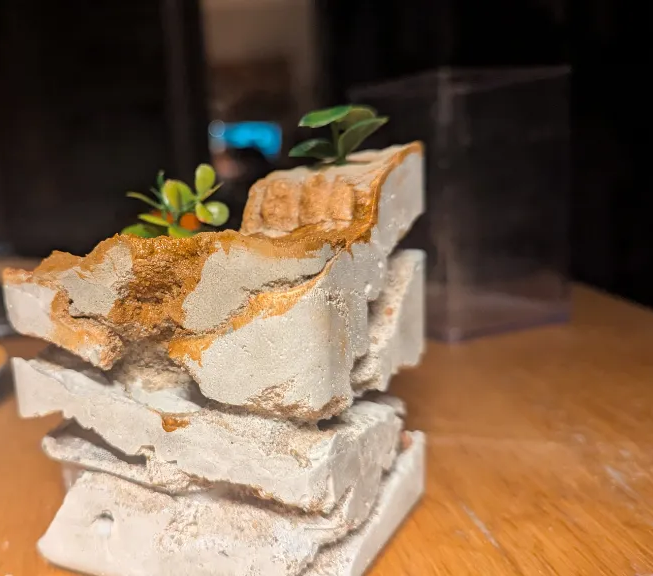
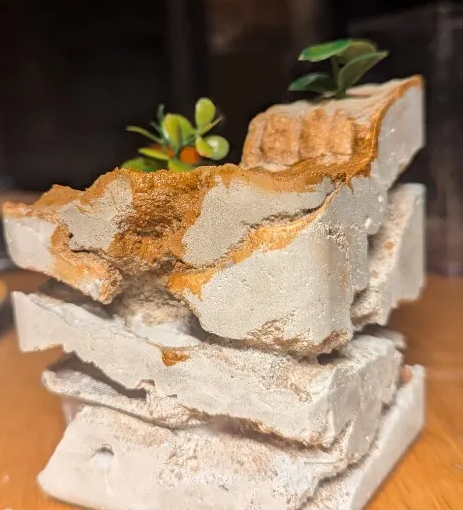
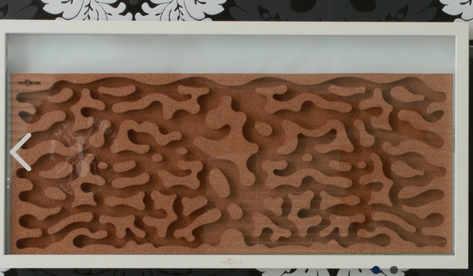
We'll build 2 (ideally) ant enclosures; one made of ytong (a porous building material) and the other made of grout.

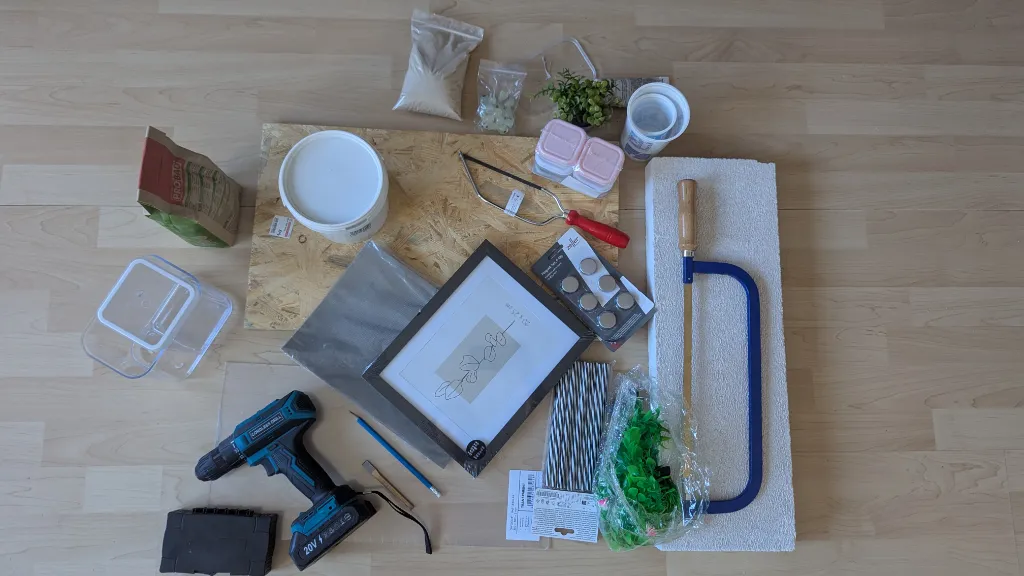
Picrel is what I got for the project, all pretty cheap materials. Price estimates will be behind the items.
>For the Ytong nest
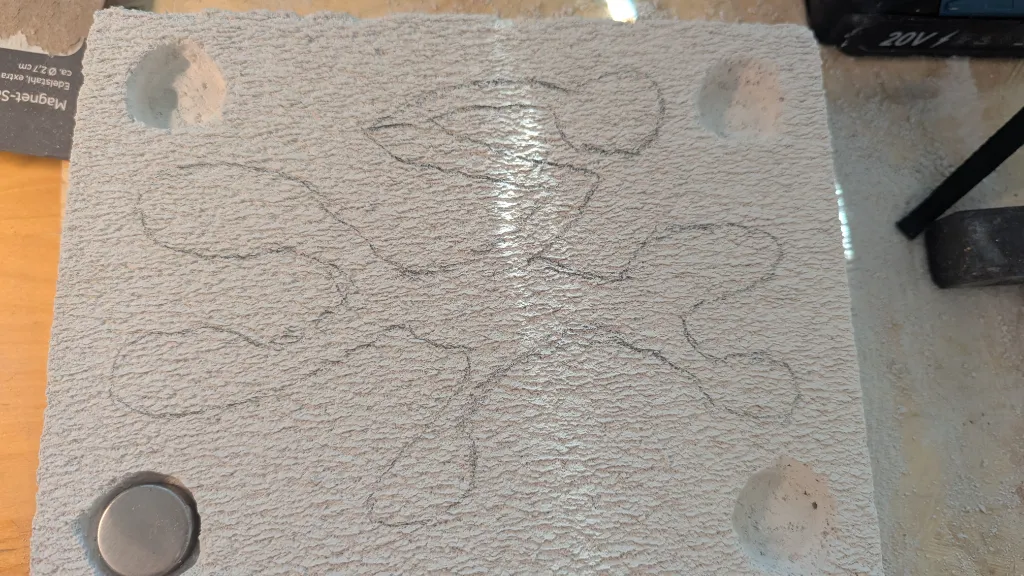
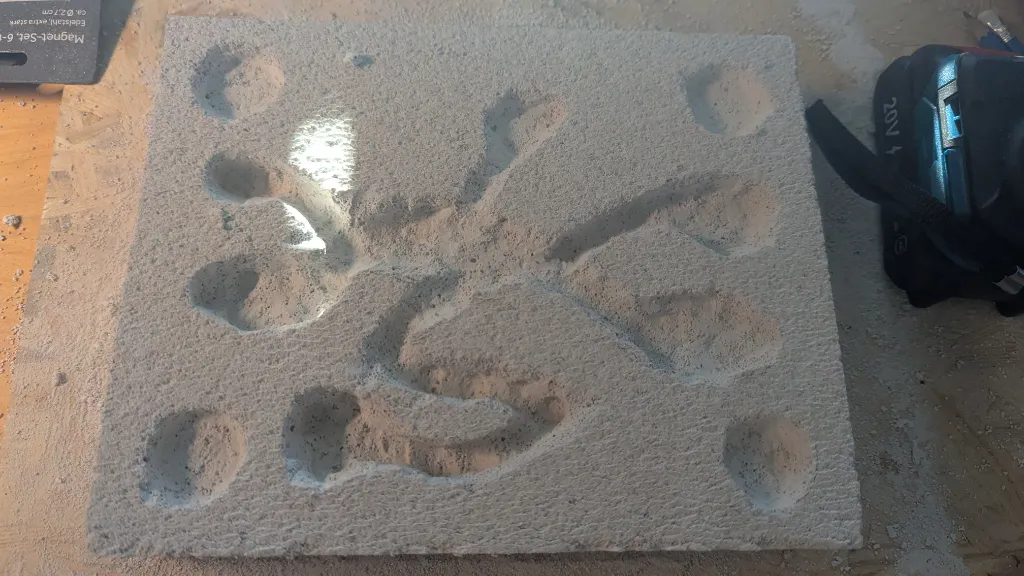
This is probably the cheapest nest you can build, and surprisingly decent for that price.
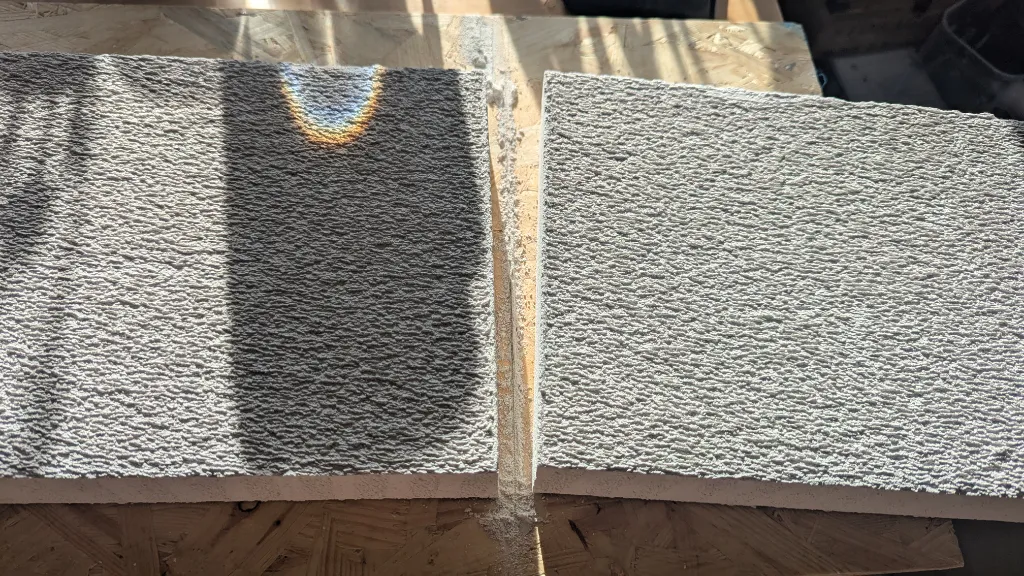
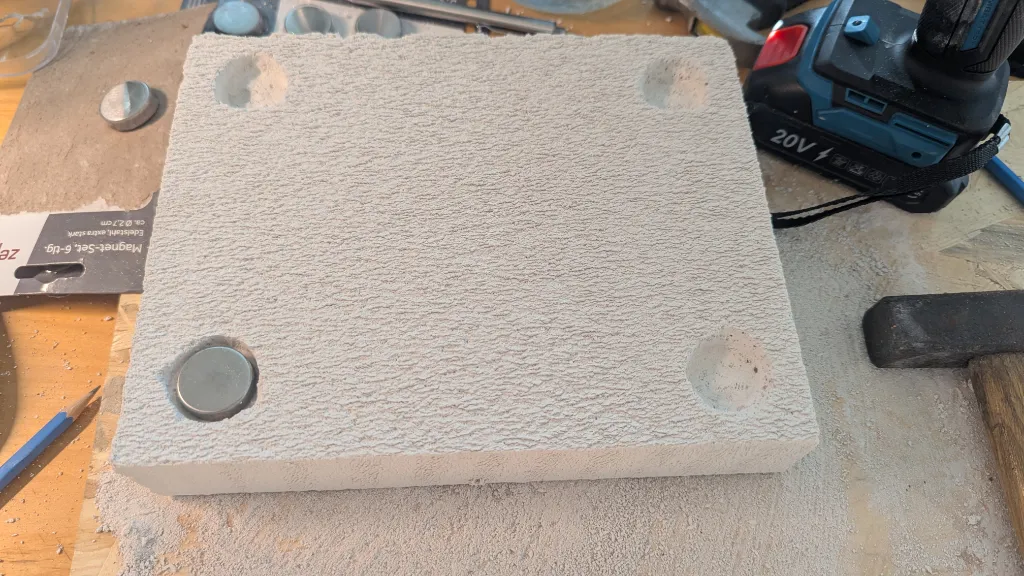
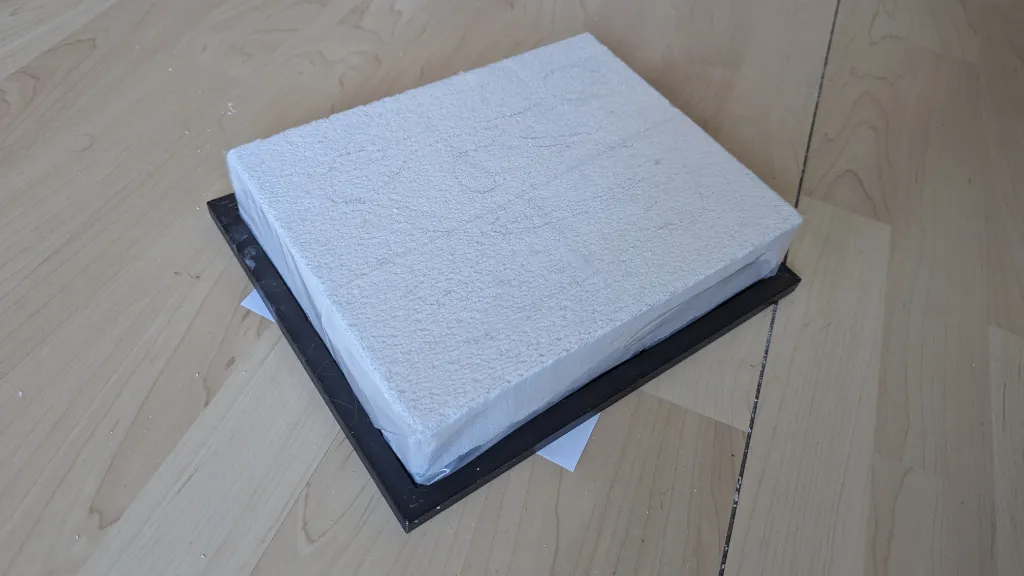
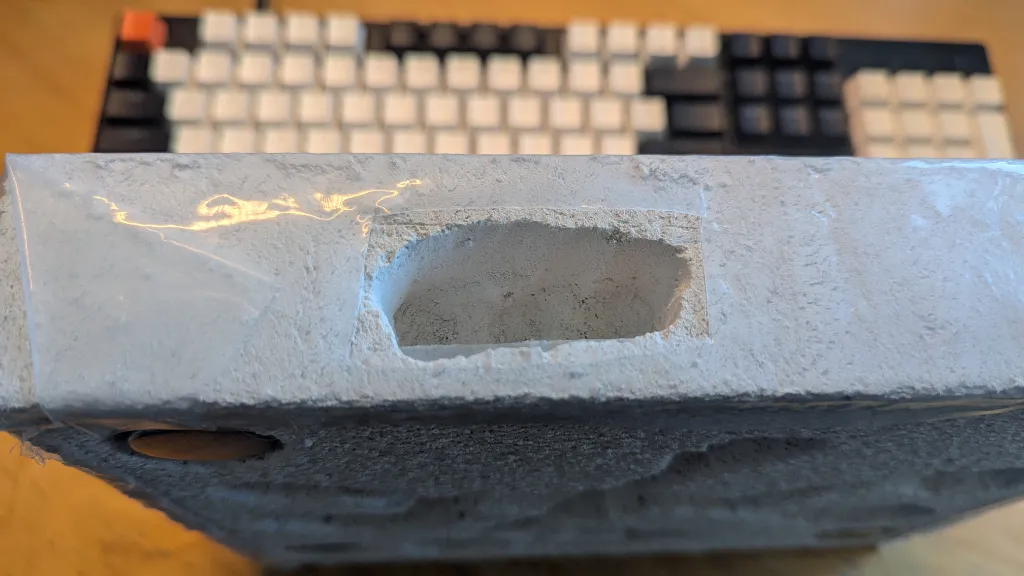
- 1 block ytong. This one is 60x5x20 cm big and cost me 1.50€. Density of 0.5 g/cm^3 iirc.
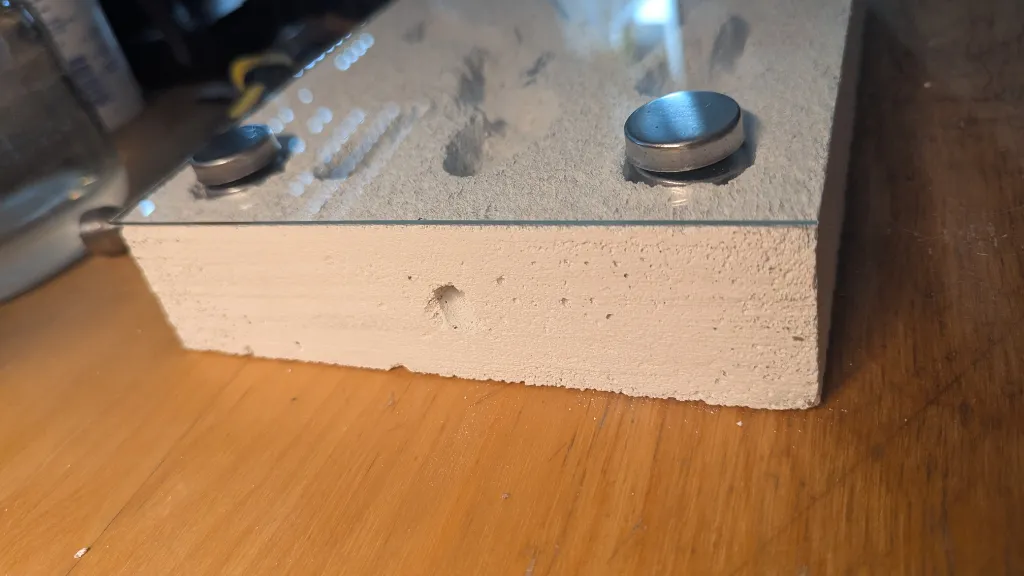
- Acrylic or plastic sheet (25x50x0.2cm for me) 3€, or picture frame (1.5€)
- 8 Magnets that are somewhat flat at the top (4€/6, so 5.33€ for 8)
That's ~10€ for the entire nest or less.
>For the Grout nest
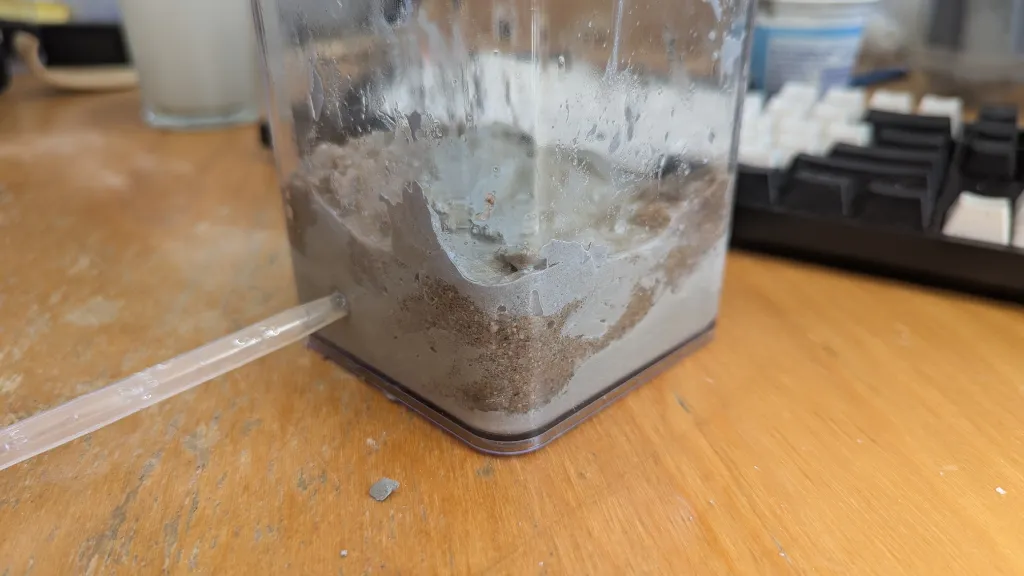
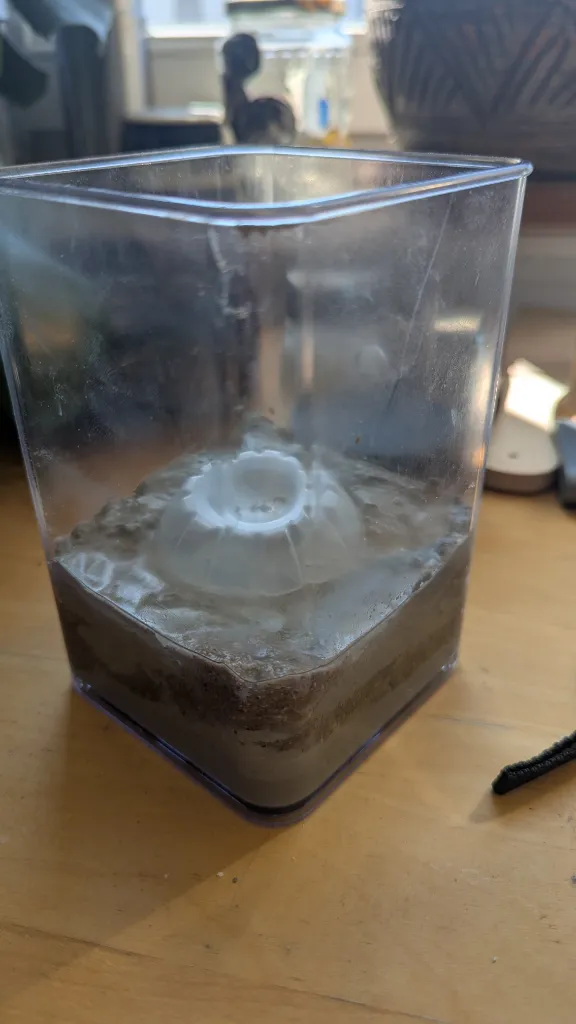
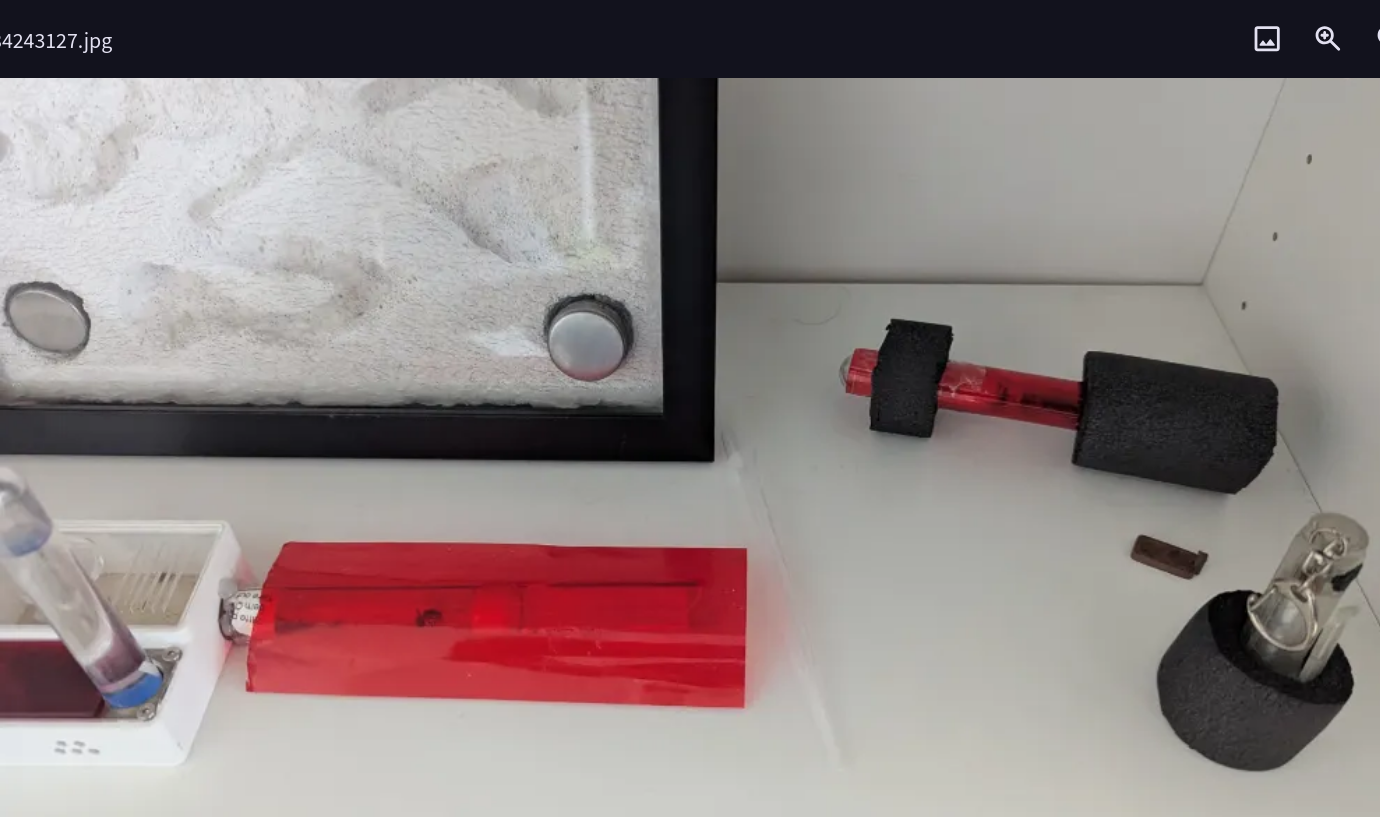
- See-through plastic container (3€)
- Grout (7€/2kg, you need maybe a quarter, also if you order in bulk it's much cheaper, let's say 3€)
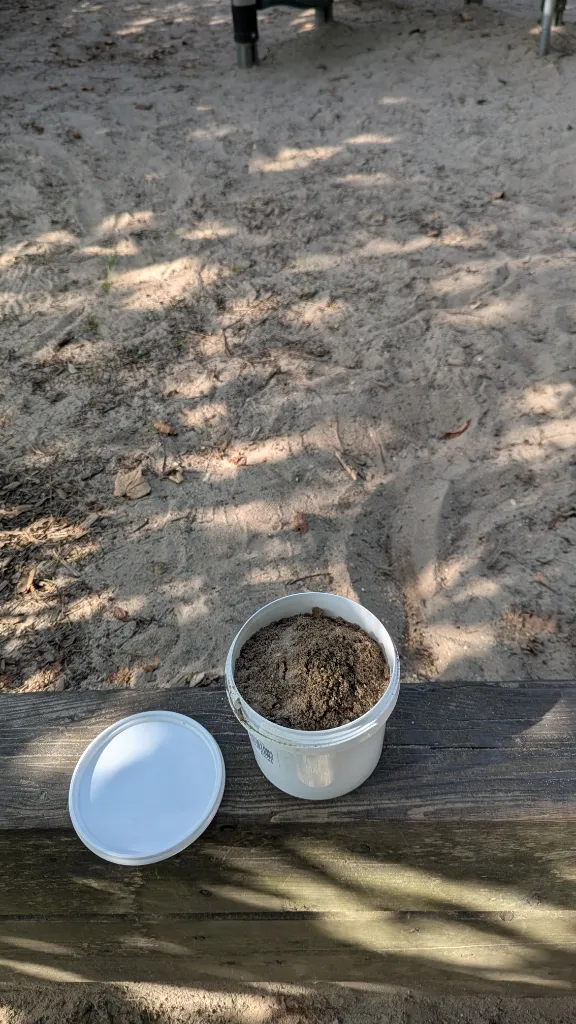
- Sand (Free or 1€)
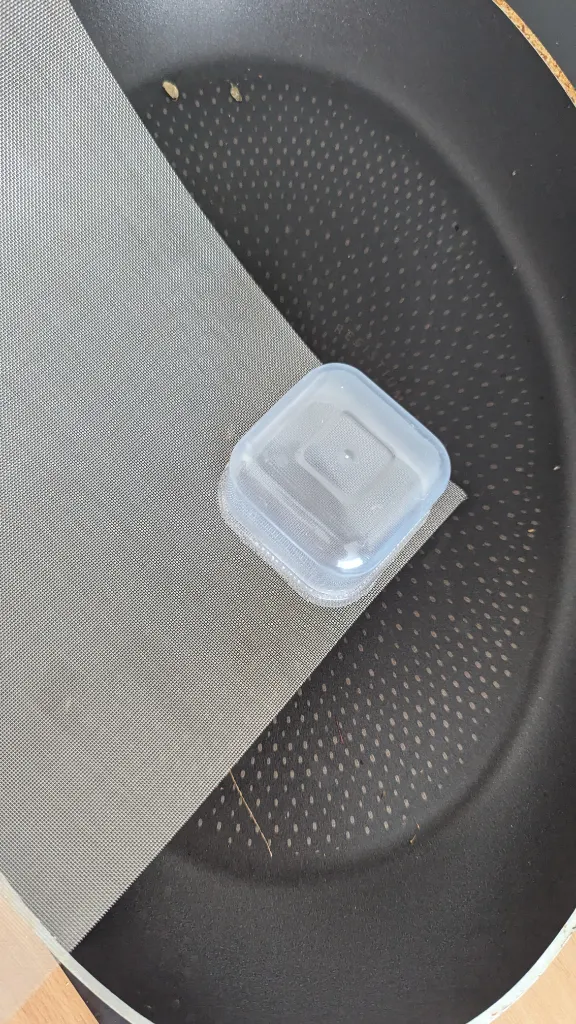
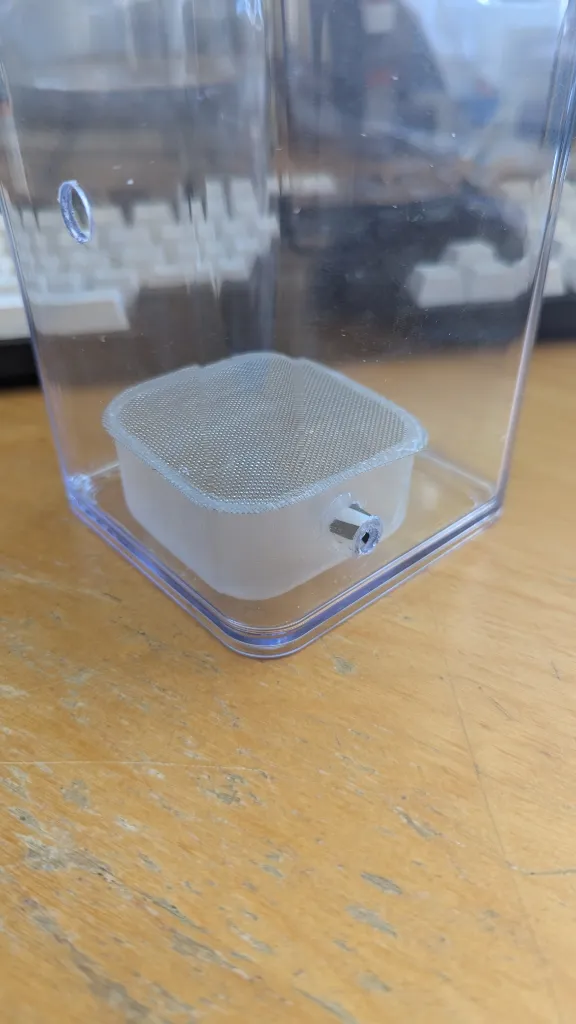
- A cheap small plastic container (1€ for 6, say 0.5€)
- Plastic drinking straw (0.2€)
- Metal mesh (How fine depends on species, at least 30 mesh, 7€ for 4 A4 pieces, we'll use maybe 1/8th of one sheet, say 1€ total)
That's also ~10€, though slightly more initial cost as you likely have to buy more than you need for these things.
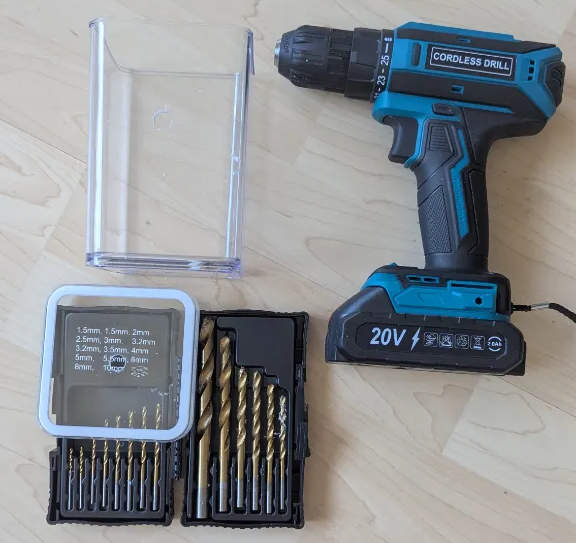
>Tools and misc stuff
You'll need a drill, a saw (optional but helps), and a chisel or screwdriver you don't care too much about.
I also got some fake plants for decoration later.
Anonymous No.2938759 >>2938764 >>2938868
>>2938757 (OP)
I forgot to mention that you'll also need some cooking oil.
Also that big plate of wood is not something you need, it's just from the offcut section of the hardware store and what I use as a sacrificial plate to drill into or saw on so I don't ruin my desk, as I don't have a proper workshop.

Alright, we'll get started with the grout nest, then whenever that has to set we'll pivot to the ytong nest for variety.
The plan for the grout nest is to pour it and form tunnels with wet sand, to do so we need sand.
Sadly the hardware store sells sand in 25 kg sacks, and I was there by bike, so I didn't really feel like carrying 25 kg of sand on my back on a bike in city traffic.

The solution? A devious heist.
The local playground has sand after all. Animal excrement and dirt included. So we go for a quick trip to the local playground and borrow some sand.
Note that we'll get back most of the sand used in this process, but not all. It'll stick to the grout and form the tunnels of our new ant formicarium.
(Of course I got the city's permission to temporarily borrow this sand beforehand through the proper channels)
Anonymous No.2938764 >>2938766
>>2938759
The sand has a bunch of stuff in it that we don't want. Large stones, sticks, dirt.
More importantly though, it may contain eggs of parasites or organisms that we do not want in our formicarium.
So to get rid of that stuff we'll wash the sand a few times, anything that floats on top we skim off, for me that was about 3 tbs of wood and leaves.
Then we boil it with water to kill whatever eggs might be in there.
As you can see, it's not perfectly clear, there's still dirt in the water, but this will be enough, we just need to get rid of the really coarse stuff.
Keep it simmering for a bit, then add cold water to cool it down so we can use it. This will be much more sand than we need probably.
Anonymous No.2938766 >>2938767 >>2939182
>>2938764
Next up, we have to drill into the container, this is probably the hardest part of the entire process.

I chose this container for my grout formicarium, it's 9cm x 9cm x 14cm. For ants that's already on the larger side, they don't need much space overall. The goal is to add a nest (lower half of the container) and outworld (the term for the area the ants can walk and explore in, that you give them food in etc.) in the top half.
To do so we need one hole at least, I added two already for expansion down the line that I'll plug. We'll need a third later but we don't know where yet.
One hole is on the top, for air. I drilled a 1cm diameter hole in the middle of the lid for this.
One hole is on the side toward the bottom of the outworld, for expansion later. Same diameter. You can attach a 8/10mm tube into that hole and give the ants new places to go, outworlds, arenas, new nest. You could drill that hole when you need it, but by that point there'll be a bunch of ants in there, so I wanted to do it now.
One last hole will be the watering system, which is going to be our next step.

General advice for drilling acrylic or plastics: Acrylic is brittle, so use as little pressure as you can (shave small bits off at a time with the drillbits), and start with a small bit getting progressively bigger. If you go too hard it will shatter and either look bad or be unusable. I tried it on another cheaper container and it shattered making it unusable, so take your time.

The getting sand and the drilling of these two holes are the only steps I did beforehand, so from here it'll get a bit slower.
Anonymous No.2938767 >>2938770
>>2938766
Ants like having a nest that has various levels of moisture, so they can pick and choose where to keep brood or food and where to stay themselves. As such some way of moisturizing some area of the nest.
For acrylic nests (the ones you can often buy) that's often a sponge that touches one of the tunnels so the humidity is moved via the air. For most other nest types, it's usually some material that can transfer moisture, like gypsum or ytong.
Grout can move humidity, but only fairly limited, so we'll have to rely on the air as well similarly to an acrylic nest.
To do so, we use something called a "water tower", which is a reservoir that'll touch the tunnels that we can easily refill with water.

To do so you'll need your metal mesh and the small plastic container. Any container of similar size will do, bigger means less frequent refills. Those plastic tealight shells are popular for this use as well.
We'll melt the container onto the mesh with heat, so you'll also need a pan, preferably one you don't care much about.
I'm using a old nonstick pan that flaked off anyways, so I don't care about it, but if you don't have that you may be able to get away with either adding aluminum foil to protect the pan inbetween, using a lighter as a heat source rather than a pan, or just using some sort of glue instead (silicone would work well for example, anything that ants won't eat or isn't toxic).

Now we'll put the pan on high heat on the stove, and put our mesh into that pan to heat it up. Once sufficiently hot, slowly and carefully press the plastic container onto the mesh, so it melts and bonds with the mesh. Once that bonding is done, remove container and mesh from the pan and let cool. Too hot and the plastic burns and turns black (still works, just looks worse) too little heat and it won't bond properly. This is fairly easy to get right though.
Anonymous No.2938770 >>2938780
>>2938767
Once hardened, simply cut the mesh with scissors and you have your tower. You also have to ask yourself where you want to put it at this point.
Now that the tower is done, we'll have to add a way to water it conveniently, and to do that, we'll have to drill our last two holes. One in the tower, one in the container. As for the size of this hole, bigger makes watering easier, but also increases the chance of spores, dirt and animals getting in there, so I'm a fan of smaller overall.
I'll use cheap plastic pipettes to refill the tower, and those have a 3mm end, but I chose a 5.5mm drillbit. Truthfully you can get away with larger if you want an easier time watering.
You can also drill this hole at the end, after the grout has dried, if you choose not to use plastic straws. It'll lead to a bit more water seeping into the grout, which may or may not be beneficial depending on the ant variety. It will more importantly be easier to drill though, so frankly, I think making that channel at the end and skipping the straw might be the way to go rather than how I did it here.
Anyways I drilled the hole into the water tower and container, and cut a piece of the plastic straw to size and glued it onto the tower with hotglue (but any glue should work).
Anonymous No.2938776 >>2938787
https://www.youtube.com/watch?v=EzX_YcGkWbY
Anonymous No.2938780 >>2938785
>>2938770
Time to get started with the grout.
Any grout will do, unsanded is usually seen as mildly better than sanded due to a tendency to spread moisture better. If you have the choice between "flex" grout and normal grout, get the normal.
We'll get started with a very small amount of grout, as we only want to seat the tower for now.
For this step we'll need the grout, wet sand, a container to mix the grout in, cooking oil and the water tower.

First you'll want to oil the container with the cooking oil. This oil will be our mold release later, so make sure it's everywhere.
As for the grout consistency, it's your call. Thinner is easier to pour, thicker is easier to mold.
The general workflow is: Add wet sand to where you don't want grout (tunnels), add grout everywhere else.
Add some sand on top of the water tower, so that the water can evaporate from there and have a path to it.
Keep going until you reach the level of the water tower's cave roughly. It's a bit messy obviously.
Anonymous No.2938785 >>2938815
>>2938780
If you want, you can add a small plastic container for the "inner part" of the nest, as filler, so that you save on grout.
Given the small amounts we're talking here (probably like 500g total) and the relatively cheap price of grout, I'd say don't bother.

One important point: You want the sand to model the channels to be wet, not soaked. I didn't dry mine enough after the cooking and it results in water pooling in the process, which I have to remove with a pipette periodically. Letting it dry and then slightly wetting it until you can form it is almost certainly smarter.

I've said I don't have anything better/else to do today, but I've gotten a call and an invite to do some stuff, so I will be going out to drink and eat with some friends. Will keep going once I'm back, worst case if it's too late tomorrow. The lower part of the grout can just start drying in that time, that's perfectly fine.
Anonymous No.2938787
>>2938776
I really should watch flying circus one of these days.
Anonymous No.2938815 >>2938818
>>2938785
I'm back from the drink with friends and did the rest of the container. It got pretty messy, but that's okay. I tried to form a sort of mini hill at one corner for visual interest, then remembered I might want a tunnel in there, panicked and tried to fix it retroactively. As a result the plastic I used to hold the grout back collapsed.
It is what it is, I'm letting it dry now and will see how it looks after. Tile grout that isn't 100% hardened is still fairly easy to fix, and if needed I can even take the chisel to the harded material and remove what I don't like down the line.
This will have to dry, at least until tonight, probably until tomorrow.

Meanwhile, I'll get started on the ytong nest.
Anonymous No.2938818 >>2938826
>>2938815
Ytong nest time.
This one won't have a outworld, it'll only be a nest.
I decided against using the plastic sheet and for using the dollar store picture frame, so I measured the ytong and cut it.
Since it's such a low density material, it's really easy to saw through, took barely a minute with an iron saw.
Ytong, also called Autoclaved aerated concrete, or AAC is fairly easy to get in europe, not so sure about the US. As previously said, any AAC will work.
Anonymous No.2938826 >>2938832
>>2938818
Next up are 4 holes the size and depth of the magnets you bought. If in doubt, a little deeper is better than not deep enough.
A chisel or old screwdriver and hammer is an easy way to make the holes, a hole saw would be better if you have it.
Pre-drilling the holes with a drill and 3 holes or so reduces the amount of material you have to remove and makes it much faster.
Warning this creates a lot of dust.
Anonymous No.2938832 >>2938834
>>2938826
Once those holes are made, roughly sketch the ant nest you want onto the ytong using a pencil.
You can still change that, but this will help you keep to your desired shapes.
Anonymous No.2938834 >>2938836
>>2938832
As you can see, this process creates a large amount of fine ytong dust. If you're doing this with kids as a weekend project or something, get them a respirator. Doing it outside would be ideal, inside mans a lot of cleaning required.
Simply chisel out or mill out the channels and holes with a chisel, screwdriver or drill, vary depth and size of caves to give the ants variety.
Anonymous No.2938836 >>2938839
>>2938834
Next up we want to add the magnets into the holes, drill a hole in the side to one of the caves in the size that we want the opening to be (10mm in my case) and check that the glass or acrylic sheet really fits.
Anonymous No.2938839 >>2938841
>>2938836
Added the picture frame again and glued on the opposite side magnets.
Anonymous No.2938841 >>2938861 >>2938975
>>2938839
Most ant varieties can't see red light, so a red foil makes for a good way to cover the nest.
For the ants it's dark, and the humans can still observe them.

To do so, cut out the red foil to fit. I glued on the other 2 magnets on opposite sides onto the foil, so I can choose if I want foil or not.
Anonymous No.2938861
>>2938841
As an upgrade you can add a chaber with a high density (often PVA) sponge that doesn't directly touch the other chambers. By adding liquid to that sponge you can then hydrate the ytong stone.
Adding some plastic foil to the back is also a good idea, partially because it catches the small ytong pieces that fall off when you are moving it too much, but primarily to keep the moisture in. This reduces the times you need to water it as less water evaporates, and protects the wall behind the ytong from any moisture and mold.
If I do either of those upgrades, it'll be tomorrow though.

The grout nest is also still drying, so any further work on that will have to happen tomorrow too.
Anonymous No.2938868 >>2938873
>>2938759
based playground sand thief
Anonymous No.2938873
>>2938868
Thank you anon, I have managed to evade authorities since.
Anonymous No.2938975 >>2938976
>>2938841
The grout has dried.
Removing it from the container was a bit of a pain, after the break I took yesterday I forgot to reapply the oil, so the upper half was hard to get loose. If you take a break, reapply the oil to make your life easier.
A bit of light(!) hammering on the bottom got it dislodged thankfully though.
Simply hold the block under the sink and wash the sand away. If you have a tunnel that didn't seal properly you can still shape the walls or even break through minor blockages.

Bad news: the water tower wasn't pressed down properly, letting it slightly harden with a weight would have been smarter probably. Now it's angled towards the filling hole. Still works, but lowers the capacity it has.
The broken section at the side of the water tower is semi intentional, you want that to be able to see water tower capacity, but in my case the sand mixed with grout and when I tried to remove it it all broke off in a larger part than intended.
Doesn't affect functionality much (other than more light meaning slightly higher chance of algae) but it would look nicer if that hadn't happened.

I used the chisel to create some grooves in the top so it doesn't look like poured grout.
Anonymous No.2938976 >>2938977
>>2938975
Because I'm not the biggest fan of the grout grey on top for the outworld (I don't mind it for the nest), I added some cheap brown paint and applied it with a piece of sponge. Just for visual interest. Best if your paint isn't toxic to ants.
Anonymous No.2938977 >>2938978
>>2938976
While that paint is drying, I wrapped the ytong nest in foil to trap the moisture in.
Anonymous No.2938978 >>2938979
>>2938977
And added a hole in the top to water it from. That hole will get a high density sponge stuffed into it later, to hold water and slowly release it into the stone.
Anonymous No.2938979 >>2938981
>>2938978
For the grout nest, I cut up a dollar store plastic plant and glued pieces of it onto it, again for visual interest. I also had a glow-in-the-dark figurine (tree spirit / kodama from princess mononoke) that I added in there too, it might look neat at night.

You can see the acrylic is slightly scratched from the grout removal process, that's normal. You can fix it with a heat source if you're carefully (too much and it burns), but I don't really care enough to do so.
Anonymous No.2938981
>>2938979
Lastly I added some sand to cover most of the grout. This way it still shines through, but is less obvious.
Also cut a 15mm square and glued that onto the opening on the top, so ants can't climb out (easier to maintain than talcum)

In retrospect, this is the one area where I wish I had done it differently, the entrance to the nest being relatively large and in a low area means sand will over time fall in there. I'd much prefer if the entrance was slightly elevated so very little sand got in. The ants likely will manage this issue themselves, but it's an oversight on my part.
So really the two things that I would do differently if I were to do it again are ensuring the water tower was level and a elevated nest entrance. Other than that I'm very happy with how this turned out.
Anonymous No.2938983 >>2939019 >>2939045
And here's my 3 formicaria on a shelf.
Left is a pre-bought formicarium from acrylic from aliexpress, middle is the ytong nest, right is the grout nest.
I'll have to 3D print a plug for the right one so I don't have to use the cotton as a plug, but other than that they're done, so this is it.
Anonymous No.2939006 >>2939036
Came from the /csg/ thread.
Really neat autism anon.
Anonymous No.2939019 >>2939036
>>2938983
How do you plan to conect them down the line for them to fight?
Anonymous No.2939036
>>2939006
Thanks anon. What's life for if not to indulge in some 'tism once in a while.
>>2939019
All 3 of these have holes to attach tubes to, so you could connect them to each other or to a central outworld/arena.
But I just like to watch the lil fellas do their thing, so no fighting for me.
Anonymous No.2939045 >>2939055
>>2938983
very cool anon, nice little project. where did you get your hot ant tips from? sounds like you did a bunch of research to plan this out.
Anonymous No.2939055
>>2939045
A mix of reading a lot, videos and various sources.
First I think I saw an ant farm on aliexpress, then I watched a youtube video about antkeeping, and from there it escalated.
A lot of it was from a local (german) website that sells ant supplies, but also has a few paragraphs for most things they sell explaining the what and whys, especially for nest types, materials and what specific ant varieties need.
The grout nest idea came from a youtube channel called "D Colony", who I think i some SEA dude using TTS. The idea of melting the tower onto the mesh is from him.
The red foil trick I noticed from videos where I wondered what that foil was. I also read a bunch of wikipedia articles, though those were mostly about the species and not formicaria.
Lastly a decent amount of ant forum posts, about half english and half german.

So sadly I don't have one go-to source I used and the closest to one isn't in english.
Anonymous No.2939059
Bonus while we're at it I made a misshapen gondola while watching a show as well.
Next time I do something like this I'm gonna use the machine, sewing this by hand took far too long.
Anonymous No.2939182 >>2939208
Cool work OP nice thread. One tip

>>2938766
> hardest part
> start with a small bit getting progressively bigger
Get yourself a cheap step drill set from Lidl and it’ll become the easiest part
Anonymous No.2939185
Cool
Anonymous No.2939208
>>2939182
Yeah I ordered a step drill online, but the one at the hardware store was like 40€ and I didn't think that was worth it. Ordered a set of 3 from AliExpress for 2.50€ instead, probably going to be soft metal but for plastic and wood that should still be fine.
Anonymous No.2939296 >>2939310 >>2939318
Also a /csg/gger from >>>/g/106289060, gem of a thread anon
Anonymous No.2939310
The entrance being at a low point of the outworld kept bothering me, so I mixed up a few tbsp of grout with just enough water so it's the texture of Play-Doh and shaped a new entrance to the nest. Painted it and will have to let it dry until tomorrow. I think if I didn't do that the nest would fill up with sand too fast, and pure sand (rather than sand clay mix) isn't great for tunneling, so I'd have to keep it at the right moisture so the ants could dig in it, that all just sounds like a big hassle, this seemed like a much easier solution as long as the ants aren't in yet.

>>2939296
Thanks anon.
Anonymous No.2939318 >>2940675 >>2940680
The entrance being at a low point of the outworld kept bothering me, so I mixed up a few tbsp of grout with just enough water so it's the texture of Play-Doh and shaped a new entrance to the nest. Painted it and will have to let it dry until tomorrow. I think if I didn't do that the nest would fill up with sand too fast, and pure sand (rather than sand clay mix) isn't great for tunneling, so I'd have to keep it at the right moisture so the ants could dig in it, that all just sounds like a big hassle, this seemed like a much easier solution as long as the ants aren't in yet.

>>2939296
Thanks anon.
Anonymous No.2940675 >>2940695
>>2939318
have a bump anon, cool thread, also a both a /diy/ enjoyer and a chinkshitter
Anonymous No.2940680 >>2940695
>>2939318
pretty cool ants nest you have made!
Anonymous No.2940692
>>2938757 (OP)
Ok Anton

Were staying tuned.
Anonymous No.2940695
>>2940680
>>2940675
Thanks anons, we need more retards like myself who just build shit. Not like it takes much skill or good tools, as I'm sure I've proven.
Anonymous No.2941255 >>2941260 >>2941263
Thanks for posting this, anon. How do you populate them? I assume you want a queen, and a few simp ants to keep her comfy, and one or two chad ants to produce more ants. Do you buy them at a pet store or what? If you get a scoop of ants from the woods you'll just end up with a bunch of wagecuck ants that won't reproduce, right?
Anonymous No.2941260 >>2941263 >>2941474
>>2941255
Basically you need a fertilized queen ant.
Most (almost all) ant varieties work like this:
In a hive, new queens are born. These are queens that have wings and will leave the hive. Around the same time, males with wings are also born, both in this hive and others (all worker ants, so the ones you usually see, are female). Then the queen goes and rides the antcock carousel for a bit during which time she collects all the genetic material she needs. Then she'll find a spot to found her new colony, and bite off her wings.
Then she goes into a small hole where she feels safe in the ground.
Now there's some species which are "claustral" and some which are "semi-claustral", if it's one you found locally, 99% chance she's fully claustral, which means she doesn't need food or workers to help her during this stage. She'll consume the muscles on her back and energy reserves to lay the first eggs of the colony without eating. If she's semi-claustral she will have to hunt for food at this stage.
Then the first workers will hatch which will be much smaller than normal (so called "nanitics"), which will get started to collect food and tend to the brood at which point it's starting to actually be a colony of sorts.
The queen ant never mates again, she got all her genetic material from that first flight after leaving her origin hive, so she won't need chad ants.

As an owner that means all you have to do is get a fertilized queen ant - you can either find and catch them outdoors (when you see ants with wings around, it's usually a good time). Then you catch whatever queen ant you can find, usually still with wings, from there it's luck if she's fertilized or not yet, if she lays eggs, she was, if not, she wasn't. You can't just grab random ants from the street as those won't be queens.

There are petstores that sell them, but they're kinda rare, so online is usually better. The more hardy varieties can handle shipping no issue.
Anonymous No.2941263 >>2941277 >>2941474
>>2941260
>>2941255

Then it's a question what variety you want.
Usually whatever naturally exists where you live will both be cheap to buy and relatively easy to keep.
In my case that's lasius niger, which is a generic black ant we have all over the place in europe, which you can get for ~5€ for just the queen or ~10€ with 11-25 workers (as a headstart of sorts).
Then there's also a great collection of other species with interesting properties.
Those ants that grow a giant fungi by feeding it leaves, ants with different "special types" (like specific warrior classes and stuff), ants that look cool, ants that like to dig, or forage, or fight.
My second queen is a "messor barbarus" queen, also relatively cheap (8€ for a queen and 1-4 workers). Messor barbarus has some interesting behavior as they collect seeds and make a thing called "ant bread" from it, plus they have OCD and will sort the grains into neat piles, so if you want to watch them you can disturb their piles and they'll sort it back into order. They also have big workers (so called majors) in addition to small workers, with bigger heads.

So TL;DR you buy them online, depending on the variety they can be very cheap or expensive.
Anonymous No.2941277 >>2941279
>>2941263
>lasius niger

you misspelled lazy
Anonymous No.2941279
>>2941277
>>>/g/106199399
Anonymous No.2941474 >>2941479
>>2941260
>>2941263
That's amazing. Thinking of doing a build with my son, he's at the age where stomping on bugs is fun and I'm trying to teach him that ants are our friends (except when they're not, but that's a later chapter in life). About a week ago we had winged ants all over the place but they seem to be gone now so I guess we missed the window. Gonna look into available online alternatives. Again, thanks for posting all this, it's really interesting!
Anonymous No.2941479
>>2941474
You're welcome anon, it's a pretty good parent child bonding activity (since you can build a nest together) and as far as pets go they're relatively low maintenance. The first bit of time until there's some workers and the colony moves into its first nest is a bit dicey because what the ants really need is calm and quiet, which is the opposite of what you as the owner want to do (watch them), but after that it's smooth sailing.
If you don't care about the DIY aspect there's also ready-made nests you can buy online, just keep in mind that those get pricey quick.
>Again, thanks for posting all this, it's really interesting
Thanks for the appreciation, that's what these threads are for after all.
Anonymous No.2942577 >>2942616
Where are the ants?
Anonymous No.2942599 >>2942617
Best thread in a long time OP. Thank you so much for posting all the info. Very interesting stuff!

What do you have to do in terms of feeding and watering? I’d assume different types have different needs.
Anonymous No.2942611 >>2942616
>>2938757 (OP)
ohhh boy is this a drill as a router thread?
Anonymous No.2942616
>>2942577
It's really hard to take photos of them at this stage, as they're still too small population wise to sustain a colony effectively. Left under that red foil is the messor barbarus queen, which has one nanite so far. In that test tube on the right is the lasius niger queen, she has ~10 nanites and is probably due to be able to leave soon into a nest.
>>2942611
It sure is, I don't own a router and I don't intend to buy one until I have more space.
Anonymous No.2942617 >>2942813
>>2942599
>Best thread in a long time OP. Thank you so much for posting all the info. Very interesting stuff!
Glad to hear anon.
>What do you have to do in terms of feeding and watering? I’d assume different types have different needs.
Correct. There's basically 3 things all ants need: moisture (water and air moisture), carbohydrates (as an energy source) and protein (mostly for the brood). How they get each of them can differ between species.

For air moisture you usually have a reservoir of sorts, such as the water tower in my build.
For drinking they just need water. When the colony is small you want to give them a bit of cotton soaked in water or a small droplet, so they don't get sucked in by surface tension and drown, later you can use small containers or dedicated ant water feeders.
For carbohydrates the classic solution is sugar water. About 30% solution of sugar in water, honey is also popular. Then give it to them to drink like you would normal water.
For protein it's often insects, though some species are a bit more specialized (such as the ants that keep fungi and shit). They prefer alive insects but dried and re-hydrated often are fine (depends a bit on species). Also pieces of egg or meat work too.

In my case the lasius niger is the least demanding, they pretty much only need sugar water and a generic protein source (dried insects in my case).
The Messor barbarus are a bit more interesting and demanding, because they don't eat sugar water, instead they get their carbohydrate source from seeds, which they turn into "ant bread" and eat that. They also have the specialized major worker variant with the specific use of cracking larger harder seeds. You can give them seeds like quinoa or sesame at the start, but they prefer a bunch of different varieties, so the budget way is to buy budgie mix at a pet store (just make sure it doesn't have added iodine). ~4€ in my case with enough seeds to last for more than 2 years.
Anonymous No.2942813
>>2942617
Very interesting! Thanks for typing all that up. I appreciate it. Please keep us updated.