Anonymous
7/30/2025, 1:52:25 PM
No.1016085
[Report]
>>1016089
is vulkan working so far?
Why are they obsessed with spending developer time on shit no one fucking uses?
This is getting ridiculous. Could as well have been an April fools
Anonymous
7/30/2025, 2:00:01 PM
No.1016089
[Report]
>>1016085
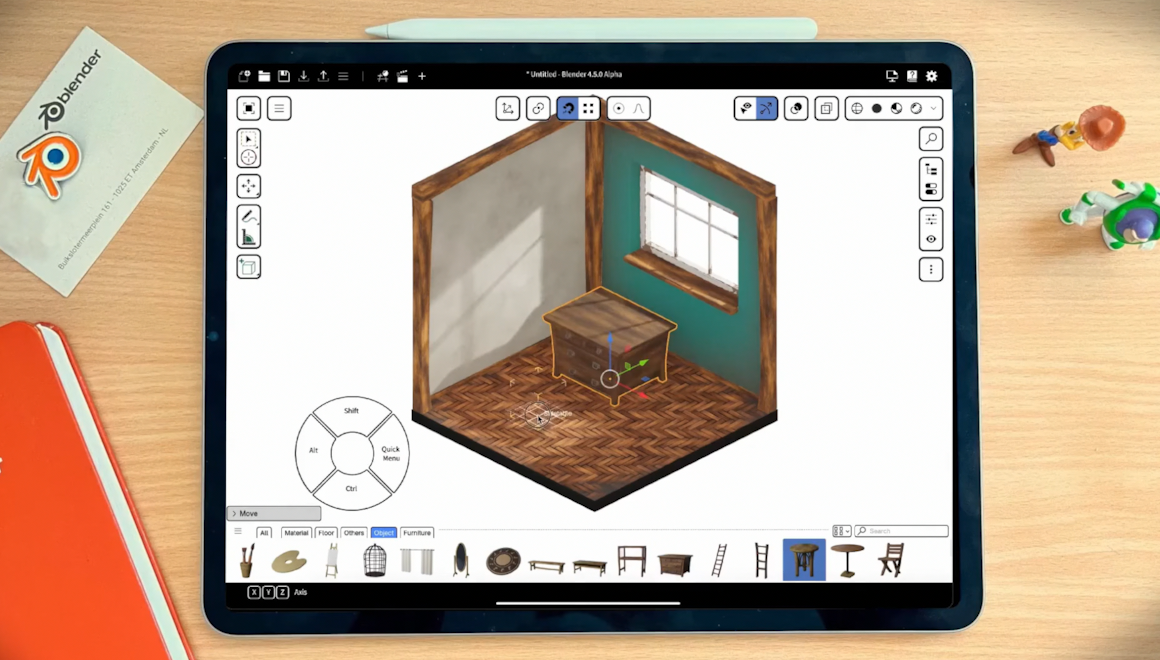
So far so good, only one crash and I forgot what caused it
>>1016088
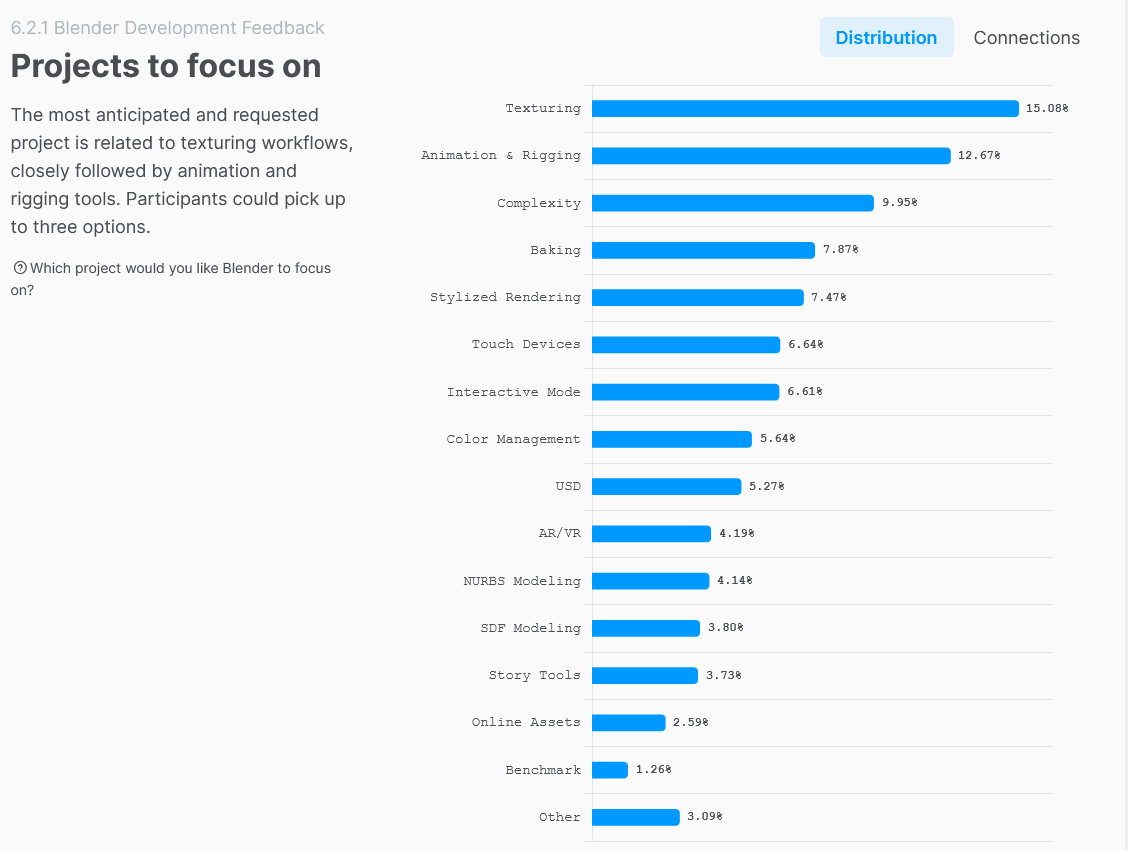
it was the 6th in the survey, people want a tablet build and it would improve the interface too, yes the most requested is texturing followed by animation/rigging, things like nurbs or sdf were less requested, some people could want/need other things too.
Anonymous
7/30/2025, 2:10:08 PM
No.1016091
[Report]
>>1016088
I hate the wheel menu btw.
>>1016090
>things like nurbs or sdf were less requested
People are stupid, those would have been higher up on the list if they knew what those words meant
Anonymous
7/30/2025, 2:41:54 PM
No.1016094
[Report]
>>1016093
to be honest I was amazed to see sdf in the list at all
Anonymous
7/30/2025, 3:11:07 PM
No.1016096
[Report]
The snoot has returned
Anonymous
7/30/2025, 6:12:20 PM
No.1016110
[Report]
>>1017050
>>1016093
Reddit tier normie humor.
>>1016088
we might get a decent sculpt mode out of this and anything is an improvement
>>1016113
>we might get a decent sculpt mode out of this
How would a year long developer hogging added fat finger touch support improve the sculpt mode?
Anonymous
7/30/2025, 7:09:04 PM
No.1016121
[Report]
>>1016118
do you even use blender?
Anonymous
7/30/2025, 7:36:41 PM
No.1016123
[Report]
>>1016127
>>1016113
>decent sculpt mode
I'm actually pretty fine with the current sculpt mode, what would you change?
Anonymous
7/30/2025, 7:45:37 PM
No.1016124
[Report]
>>1016090
SDF would be great but still seems exploratory/early days. Not sure what this guy's plans are but he has a paid alpha
https://www.youtube.com/watch?v=Sdz_9Vbbi3k
https://www.youtube.com/watch?v=CsycMAyYLOo
>>1016123
a tablet mode on PC would be nice, the interface could use another update and that ipad one looks good for pen use. the survey itt points to texturing improvements so that's another bonus. For sculpt mode I really just want it to be closer to zbrush but I'm still experimenting. VR sculpting would be a nice change, the default blender vr leaves a lot to be desired.
[spoiler]but of course tablet pens and VR are like 20% of users max so I'm not expecting much[/spoiler]
Anonymous
7/30/2025, 8:24:33 PM
No.1016128
[Report]
>>1016137
>>1016088
>>1016090
Wtf man, who voted for touch devices? This is so fucking stupid. How would you efficiently model with all the shortcuts required, render images/animations, work with geometry nodes that require processing power etc.
I enjoy Blender a lol, although it has many flaws, but I don't want the devs to waste developing time on some useless implementation for the average zoomer who can't get his eyes of his iPad - nobody needs iPads for production. I rather welcome the devs working on new features and improving existent ones. ... Fucking touch devices ... I can't even ...
Anonymous
7/30/2025, 10:17:45 PM
No.1016137
[Report]
>>1016128
>>1016088
>>1016118
>nobody needs iPads for production.
You can use that with a cintiq too, anyhow the main problem is not the new ui template or the multitouch but the android and ios support.
Anonymous
7/30/2025, 11:17:01 PM
No.1016141
[Report]
>>1016144
>>1016146
>>1016090
>grease pencil not even on the list
o-oh...
Anonymous
7/30/2025, 11:55:05 PM
No.1016144
[Report]
>>1016141
you'll grease paint nothing and you'll be happy
Anonymous
7/31/2025, 12:38:28 AM
No.1016146
[Report]
>>1016141
Grease pencil is the personal project of that bald Mexican guy, Pedro whatever, It has nothing to do with blender.
I'm still pretty new to blender, how do I achieve this gradient effect?
Anonymous
7/31/2025, 7:42:18 AM
No.1016155
[Report]
>>1016084 (OP)
Blender is for idiots
Anonymous
7/31/2025, 10:30:35 AM
No.1016160
[Report]
>>1016161
>>1016153
Depends on whether you want to render a single image or an animation and on how the effect(s) should be applied.
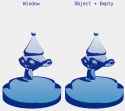
Here is a quick and very simple example I came up with as a demo (pic related):
In this case I used a single material and the window coordinates to apply the gradient. You could also use the Z component of the object coordinates too, but it would behave a bit differently. In the provided image I used shading option A for two colors. shading option B can be used to have multiple shading steps. Of course more details, like the slight color spill along the edges and the grainy texture can be added into the material too. Basically anything you can think of can be added through the shader/material.
Same, or at least similar results, can be achieved with the compositor too.
Again, you need to decide for yourself which method suits your project best and experiment a bit with different styles and effects. Good luck.
Anonymous
7/31/2025, 11:28:49 AM
No.1016161
[Report]
>>1016173
>>1016176
>>1016160
Hi Anon, Thanks a lot. I plan to use it for minor animation, mainly just an inanimate model with some camera pan, with at best a few simplistic movements here and there like this video:
https://www.youtube.com/watch?v=ScRNhdiNFUE
I really appreciate you pretty much doing the job for me, but is the entire process simply a matter of shaders? I'm planning on watching a tutorial for it so I can understand it better. Is this good enough?
https://www.youtube.com/watch?v=PLB18SppEdM
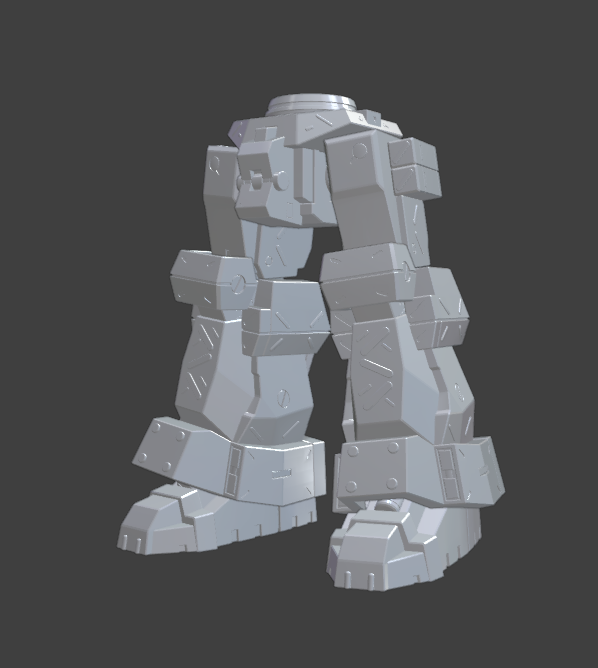
Pic related, I'm still finalizing the individual parts before putting the robots together, so the best I can show you are a pair of legs. I am 90% done with the modelling process though, so I wanted to prepare for the next step.
Anonymous
7/31/2025, 3:19:34 PM
No.1016173
[Report]
>>1016175
>>1016153
>>1016161
It's always cool seeing another AC fan on /3/. Are you planning to do the whole video in Formula Front into style?
Anonymous
7/31/2025, 5:12:20 PM
No.1016175
[Report]
>>1016229
>>1016173
Yup, there will be some thematic changes, but it'll be very identical to the formula front intro cinematic.
Anonymous
7/31/2025, 5:20:42 PM
No.1016176
[Report]
>>1016179
>>1016161
> is the entire process simply a matter of shaders?
As mentioned before you can use either shaders, image textures/texture paint, the compositor or a mix of them to achieve this effect. Personally, I would prefer using shaders only, because its more flexible, requires fewer steps and makes data handling much easier.
In the example video you posted, I can't see if the gradient is following the camera, because the movement is very subtle. In my video I have made a comparison, if you intend to use a similar shader setup as the one i posted as an example previously.
- On the left, the gradient is bound to the camera/window. That means when the camera moves, rotates etc. the gradient on your 3D model will change and follow the camera too (notice, how Suzanne becomes more white as it approaches the top of the screen). If its desired as an artistic effect - great. If not, see example on right:
- On the right the gradient is bound to an empty that is also parented to Suzanne. This way, the gradient stays consistent no matter the position or other transformations of Suzanne or the camera.
(The difference is very subtle in my example. I should have made the contrast a bit higher to make the difference better visisble. :( )
>Is this good enough?
>https://www.youtube.com/watch?v=PLB18SppEdM
Well, I am not sure how experienced you are with Blender. But judging by your model, which looks very nice already, you seem to know how to operate Blender. The tutorial you posted seems very basic, but if you are not very familiar with shaders at all, it's good for a start.
Anonymous
7/31/2025, 5:23:27 PM
No.1016177
[Report]
>>1016088
Laptops suck and I like my Ipad for sculpting in Nomad, but I've been waiting for an app that would let me do polygonal modelling.
I just hope the mockups aren't a sign that they're going to simplify the Ipad version into yet another sculpting app.
>>1016176
>I would prefer using shaders only
I think I'll go with that, I want to keep things as simple as possible.
>I am not sure how experienced you are with Blender.
Very new, I only know how to model basic things so far, move the camera a bit and do really simple animations (vid related), I've mostly done simple Ryan king tutorials before I got started on this project. Then from that, I just lurk blender general and ask for advice like I am now.
Anonymous
7/31/2025, 5:43:29 PM
No.1016180
[Report]
>>1016182
>>1016179
>simple things
anon, that thing you did looks amazing, it needs polishing, but it is surely in a nice spot already
Anonymous
7/31/2025, 5:58:12 PM
No.1016182
[Report]
>>1016188
>>1016180
Its just a blockout, with a hdrai and some emissions. I just followed Ryan's instructions word for word to make that one.
https://www.youtube.com/watch?v=FOdWi8RVvZQ&list=PLsGl9GczcgBuvF7hr9ZEuluIp0TDiLROB
Anonymous
7/31/2025, 7:36:43 PM
No.1016186
[Report]
>>1016127
I'm a screenless tablet user with a half-keyboard for brush shortcuts so I don't really understand how you sculpt and what you need
for me the main issue with sculpt mode right now is the retarded brush shelf
brush as assets is a great idea, but you can't organize them
what I had to do was duplicate every brush and add a letter in front of them to sort them alphabetically and have categories
Anonymous
7/31/2025, 8:11:27 PM
No.1016188
[Report]
>>1016189
>>1016182
the emission sure is on point
Anonymous
7/31/2025, 9:04:46 PM
No.1016189
[Report]
>>1016188
He's my favorite tutorialman (Free)
Anonymous
7/31/2025, 10:04:45 PM
No.1016195
[Report]
>>1016196
>>1016179
What the heck ... for a beginner your animation surely looks better than the stuff I have seen by average users. :D Good job.
>Ryan King
He has some good beginner friendly tutorials on procedural materials. You have probably seen a ton of it on his channel. Maybe some of them can help you get a better understanding of the possibilities with shader nodes. They are very powerful and a must-have in a designers toolbox.
Anyhow, I am not a big fan of sci-fi or mecha related stuff, but I like the style in the ACFF Intro a lot. I will probably model my own mecha-knight (or something similar) and improve the shader a bit to mimic the style of the original even closer ... and possibly post an update + node tree. Maybe someone will find it useful.
Anonymous
7/31/2025, 10:12:07 PM
No.1016196
[Report]
>>1016202
>>1016195
My entire goal for learning blender is to achieve armored core style intro cinematics. The milestone I'm working towards is the same quality as the armored core nexus intro because it seems like a nice balance of quality and production time. Armored core 4 and 5 intro videos seem like they're too close to photorealism and I dont know if I have a strong enough PC for that.
Anonymous
7/31/2025, 11:55:41 PM
No.1016202
[Report]
>>1016221
>>1016196
>armored core nexus intro because it seems like a nice balance of quality and production time
Yup, I think you are right. I just checked the intros for Armored Core 4 and 5 - looks like it would require Cycles, high render times and a ton of effort to pull it off. It's a reasonable decision to aim for AC 3 aesthetics. Eevee can handle that without any problems, I believe. Even weaker machines shouldnt have any issues.
>I dont know if I have a strong enough PC
What are your specs, if you dont mind sharing?
Anonymous
8/1/2025, 12:00:54 AM
No.1016203
[Report]
>>1016127
>that pic
anon you're taking this too far!
Anonymous
8/1/2025, 12:13:59 AM
No.1016206
[Report]
>>1016207
Hey guys, I don't know too much about blender and 3D. Can I make simple cellshade anime characters and simple animation (like the image attached, mmd alike) with a ryzen 3 2200g and 8gb ram?
Anonymous
8/1/2025, 12:16:14 AM
No.1016207
[Report]
>>1016208
Anonymous
8/1/2025, 12:31:14 AM
No.1016208
[Report]
>>1016211
>>1016207
Thank you, I just wanted to be sure because rendering some very simple objects took me some time. I don't know if I should use an older version, change some options or it's just like that.
Anonymous
8/1/2025, 1:01:56 AM
No.1016211
[Report]
>>1016212
>>1016208
Which objects did you render and which render engine did you use? Tweaking the render settings can help a lot and save render time.
If you intend to do cell shading only, you are good to go with Eevee. Also enable Vulkan in the system settings while you are at it. It should improve the performance in general. Though, I am not sure about the system requirements for Vulkan.
Anonymous
8/1/2025, 1:46:17 AM
No.1016212
[Report]
>>1016222
>>1016211
I don't remember well, it was a few weeks ago, I think I used cycles.
I was just learning the basics, following a polygon course creating an onigiri, plate and sticks like in the image but the render time was like 10 minutes and I can't use the pc on that time. I dropped it because of that but today I saw that blender was created in the 90' and I thought "Even at the 2000 my computer should be enough to blender, I can play some good games at stables and high fps with much better quality about what I want to do with the characters and animations, why couldn't I do it with my specs?"
>>1016202
>i5 13600KF 3.5 GHz, RTX 4070, 32GB ram
Maybe its also a matter of optimization, but it takes quite a while to render a video. I'm not really sure how pros do it, but is it normal for people to just run another instance of blender to keep working while one renders? I might get another PC if I it ever gets to the point where I produce a lot of stuff.
>>1016212
When creating stylized scenes like this, it would be best to switch over to Eevee, I'd say. It's less photo realistic, but much faster than Cycles generally speaking. Also Cycles default render settings aren't the best. You can reduce the sample amount and noise threshold significantly without any visible loss in quality. My first guess would be, that the mentioned settings were way higher than necessary.
If I am not mistaken, the default sample amount is 4096. You can reduce it to 1024 or even 512.
For the noise threshold the default is at 0.100(?) which is fine, but you can increase it to 0.2 or 0.3 if it really takes too long and enable the Denoiser. The Denoiser is a bit tricky tough. If you have many details in your textures, they can get eaten by the Denoiser, so some simple compositing tricks would be required to bring them back.
Am I assuming correctly, that you are on a notebook without a built-in GPU?
>>1016221
>i5 13600KF 3.5 GHz, RTX 4070, 32GB ram
That is a beast, what are you talking about? xD I dont think a new PC is necessary to be honest, unless you really want to spend 10k on the newest hardware just to reduce the render time to 1/4. It would make sense, if you are going to mass produce blockbusters. :D
Studios also delegate the rendering to render farms, but if you do short clips, local render is totally fine in my opinion. And yes, you can use multiple instances of Blender (eg. rendering on the first instance, while working on a different project on the second instance). I did that without any issues. To be fair, I didnt render processing heavy images, but still it worked out very well.
As to anon above, try tweaking the render settings to your needs and check the system settings too (see image). For RTX you want OptiX enabled. And obviously your installed graphics card.
Anonymous
8/1/2025, 12:00:52 PM
No.1016223
[Report]
>>1016222
>As to anon above, try tweaking the render settings to your needs and check the system settings too
Thanks anon, I'll tinker around. I'm still pretty much interacting only with mechanics directly relevant to whatever I'm trying to achieve at the moment.
Anonymous
8/1/2025, 12:36:29 PM
No.1016225
[Report]
>>1016231
Vague question but is Blender hard to get into? I have like 20+ hours messing around with SFM, if that's relevant.
Anonymous
8/1/2025, 4:08:34 PM
No.1016229
[Report]
>>1016230
>>1016175
That's pretty cool, I'm working on this (highly WIP) MK2. I know in the prerendered promo images and cinematics the hexagon is depicted as a circle, but I like hexagon design a bit more.
Anonymous
8/1/2025, 4:35:37 PM
No.1016230
[Report]
>>1016229
Cool, I don't have many weapons, but here's my Gen 3 Mk.1
Anonymous
8/1/2025, 6:05:34 PM
No.1016231
[Report]
>>1016225
there's a steep learning curve for 3D softwares in general and Blender is no exception
a common mistake beginners make is trying to learn everything at once and never going anywhere, so don't do that, decide what you want to use Blender for before you start learning it
for example, if you want to learn animation don't learn modeling and don't even learn how to render, focus on animation for the first 6 months
after that you can include some rendering, and after the first year you can learn some modeling
>>1016084 (OP)
I HATE Dynotopo, I hate the way it crunches up models with ugly triangles that fuck up the surface finish and cause it to act weird with certain brushes like smoothing or just straight up don't work like relax and slide. I wish there was a better voxel remesh that could correctly handle T-junctions and not fuse surfaces that are too close to each other. And it fucking kills me that they working on exactly this 4 years ago and then stopped when Pablo took over the sculpting branch and fucked up the code and then fucked off to work on a shitty ipdad app.
Anonymous
8/2/2025, 12:40:45 PM
No.1016263
[Report]
>>1016262
Then don't use it? No one uses it but you.
Just quad remesh like a normal human bean.
Anonymous
8/2/2025, 12:58:47 PM
No.1016264
[Report]
>>1016262
Are you using constant detail or manual? Either one help if you have to use dyntopo
I heard there's another remesher addon but QuadRemesher is still king
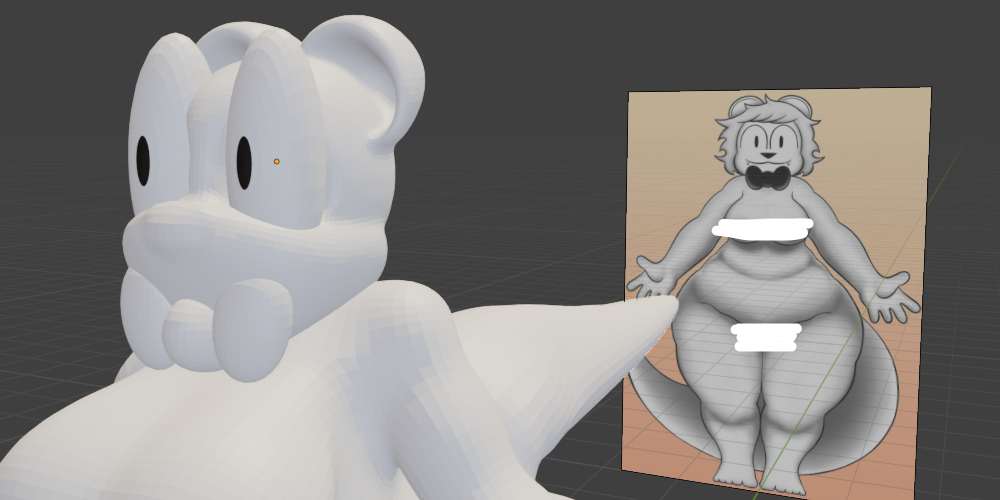
It's not goth mommy furry porn yet, but it's a good start
Anonymous
8/3/2025, 2:59:25 AM
No.1016283
[Report]
>>1016294
making cover art while i wait for my lazy stoner lyricist to finish writing the song
Gingee
8/3/2025, 5:09:07 AM
No.1016289
[Report]
Anonymous
8/3/2025, 5:23:51 AM
No.1016290
[Report]
>>1016299
>>1016281
Nice, make sure to put a lot of effort in the neck and shoulders. Those will make or break the contour that goes from the face and leads the eyes down the rest of the body.
Anonymous
8/3/2025, 11:19:39 AM
No.1016294
[Report]
>>1016316
>>1016283
Is that supposed to be based on pic related?
>>1016084 (OP)
Why the fuck won't Blender allow me to make properly branching curves?
How can I make proper crossroads without ending up with this kind of garbage?
Anonymous
8/3/2025, 11:41:41 AM
No.1016296
[Report]
>>1016298
>>1016295
I'm sure there's a way to do it with geometry nodes but I'm not that smart so I would duplicate the curves, set a different profile, and use that as booleans to clean up the intersections
Anonymous
8/3/2025, 12:07:32 PM
No.1016297
[Report]
>>1016298
Anonymous
8/3/2025, 12:30:22 PM
No.1016298
[Report]
>>1016295
Curves cant have branching paths by definition. As anon already said mentioned (
>>1016296), you can achieve the desired effect with GeoNodes, but it requires some experience.
>>1016297
quality post
Gingee
8/3/2025, 12:51:10 PM
No.1016299
[Report]
>>1016300
I'll polish it later(tail, toes, nose/eyes/mouth, hair, color etc)
>>1016290
>Nice
Thanks
>neck
She don't have one cuz cartoony logic and funny bowtie
>shoulders
Yeah, i probably should make them bigger
>>1016299
Built for straight shotas
Gingee
8/3/2025, 1:40:44 PM
No.1016302
[Report]
Gingee
8/3/2025, 2:02:19 PM
No.1016303
[Report]
>>1016300
Can I inseminate and impregnate you?
I'm not sure how i gonna make her big ass tail, let me know what you think
Anonymous
8/3/2025, 3:40:17 PM
No.1016306
[Report]
>>1016307
>>1016304
Tail adds too much visual noise. Just give her a pom pom tail.
>>1016306
I can't, that's the part of her design
Anonymous
8/3/2025, 4:00:41 PM
No.1016308
[Report]
>>1016307
3d breaks any illusions that 2d would let you get away with. When you render that design in 3 dimensions, its going to look like a dinosaur tail.
Anonymous
8/3/2025, 6:22:47 PM
No.1016316
[Report]
Anonymous
8/3/2025, 8:40:18 PM
No.1016322
[Report]
>>1016323
>>1016084 (OP)
I'm trying to do the meme donut tutorial and my icing disappears when I apply the solidify modifier.
>changing solidify modifier offset or thickness does not affect it
>normals are facing the right way
>object is set to visible in the outliner
>modifier order does not seem to affect anything (it disappears no matter the order)
>all visibility options are checked in the object properties tab and viewport display as is set to textured
The thing is after I apply it, if I go into edit mode you can actually see that it applied it correctly and the mesh is there, but it just won't show and I have no clue why. Am I fucking retarded? Donut mesh on the left is before applying solidify, and the one on the right is after application so I know the damn icing is there.
Anonymous
8/3/2025, 8:53:34 PM
No.1016323
[Report]
>>1016322
I needed to apply the shrinkwrap first.
Anonymous
8/3/2025, 9:59:23 PM
No.1016324
[Report]
>>1016325
>>1016222
I got a blender file of a character that weight 15mb and it's very similar to want I want (the image I attached at first). With eeve, even at the viewport and default settings, there's no lag at all and a simple render with the character and a point light takes like 10 seconds, thank you. I don't know if I'm doing something wrong but if I render it again after the first one that gets me a transparent render.
In games vulkan works fine (Normally I get less fps but it works) but when I use it in blender it crash when I try to render anything, so I'm stuck with opengl I guess.
Would you recommend using an older version of Blender over the latest one? (I'm using the portable 4.5.1LTS)
No, I'm in a desktop with no GPU, using entirely the APU. My country it's a mess and with my income I can't afford any upgrade. I was between studying drawing or 3d, I like bodies, scenarios and a little bit of animation and I'll only upgrade it if I'm able to get any income of it.
Anonymous
8/3/2025, 10:23:08 PM
No.1016325
[Report]
>>1016324
want to inseminate you with my BWC. I can fix that income issue of yours ~
feel your belly swell with the weight of our creation
skin pulled tight, stretched around something alive. your body reshaped and repurposed.
Anonymous
8/4/2025, 2:29:32 AM
No.1016332
[Report]
>>1016337
>>1016084 (OP)
I have vertices for a curve in the xy plane, but when viewed from the zx plane i want all of the vertices to align on a 45 degree angle between the two outermost vertices.
is there a way to accomplish this without doing math?
Anonymous
8/4/2025, 3:38:54 AM
No.1016337
[Report]
>>1016332
nvm my geniousness develops further
Anonymous
8/4/2025, 7:20:21 AM
No.1016343
[Report]
is there any possible way to get blender on my galaxy tablet
Gingee
8/4/2025, 8:25:01 AM
No.1016345
[Report]
After remashing i got pic inside, how to fix it?
Anonymous
8/4/2025, 9:54:15 AM
No.1016346
[Report]
How are the Maya Quaddraw equivalents in Blender nowadays?
Anonymous
8/4/2025, 6:54:57 PM
No.1016364
[Report]
>>1016377
I'm finishing up one of my models and I noticed that the lighting is off, shift+n doesn't work, but I can manually select the faces, shift+n them and tick the 'inside' option to reorient. Is there a way to apply the fixed orientation when I'm done doing that?
Anonymous
8/4/2025, 7:26:53 PM
No.1016367
[Report]
Anyone here into noding? 4.5 finally released the node everyone has been begging for for years. I've already found a use for it. It makes remapping SO much easier. If you have multiple groups you want to normalize, you can do it with ease now. Just use this not do find the min and max of each group. Then, grab a map range node. And plug the min and max in there. And presto! normalized groups!
>>1016304
Can't you just use a curve to make the tail? And then stick it where tails go. It will be ok disconnected from the rest of the body.
Gingee
8/4/2025, 10:08:05 PM
No.1016372
[Report]
>>1016373
>>1016368
You know nothing about 3d modeling buddy
Anonymous
8/4/2025, 10:17:14 PM
No.1016373
[Report]
>>1016376
>>1016372
well, it's a perfectly acceptable method depending on rendering solution
Gingee
8/5/2025, 12:32:11 AM
No.1016376
[Report]
>>1016379
>>1016368
>curve to make the tail
I didn't know i could do that. I was just blocking out and remesh already, but I'll try to redo it
>>1016373
Is not me above. I'll probably gonna make a screenshots/doodle as a proof that it was me
Anonymous
8/5/2025, 12:48:01 AM
No.1016377
[Report]
>>1016404
>>1016364
That sounds like there's other problems like duplicated verts. Not sure what you mean by applying the fixed orientation. You can select the bad faces, alt+n, and then flip manually.
There's also the 3D-print toolbox you can install which is useful even if you don't 3D print. The Check All can show non-manifold geometry and automatically fix some types. But it's a good habit to be merging by distance progressively just in case.
https://extensions.blender.org/add-ons/print3d-toolbox
If you're in an older version of blender, I'd recommend installing a newer one. The vulkan backend performs a lot better. Only noting this because I see your faces show blue: in newer version of blender they don't overlay a color for properly oriented faces.
Anonymous
8/5/2025, 3:31:34 AM
No.1016379
[Report]
>>1016405
>>1016376
It works better yeah
Anonymous
8/5/2025, 6:54:01 AM
No.1016381
[Report]
>>1016382
learning rigging, i fucking hate rigging, please tell me there is some tool where all this shit is done in the node editor.
i'd rather each bone just be a node, and i can quickly string them together into a proper hierarchy from there and see all connections easily.
Anonymous
8/5/2025, 8:33:58 AM
No.1016382
[Report]
>>1016381
Yeah, mantis rigging nodes
Anonymous
8/5/2025, 2:56:54 PM
No.1016404
[Report]
>>1016377
>That sounds like there's other problems like duplicated verts.
Yeah, looks like being lazy bit me in the ass, theres' part of the problem mesh that's covered up by the mesh below it. I though it would be fine to let that slide. I filled it in and the problems disappeared.
>You can select the bad faces, alt+n, and then flip manually. Not sure what you mean by applying the fixed orientation.
Initially, I just wanted to manually orient the faces then "apply" it somehow, like you would apply rotation and location so it would be the default and wouldn't revert the next time I pressed shift+n.
Anonymous
8/5/2025, 2:57:30 PM
No.1016405
[Report]
>>1016496
>>1016379
Cool. Now I assume that like with most animals, the tail doesn't stick out from the middle of their back. it stems out of their tailbone near the pelvis. Right above the butt cheeks. So make sure the root of the curve is placed where the root of the tail comes out.
Anonymous
8/5/2025, 6:33:21 PM
No.1016428
[Report]
>>1016432
Where can i find bump maps or normal maps?
I am looking for a popcorn wall bump/normal map for an exercise but google sucks.
I was teach what they do and how to apply them to give the illusion of texture to flat faces but not really how to make them or where to find them.
I suppose piracy is the way to go rather than pay for monthly subscriptions in texture sites, but where should i look?
Anonymous
8/5/2025, 7:44:35 PM
No.1016432
[Report]
>>1016433
>>1016428
I thought you wanted a literal popcorn wall, not drywall. Here's a shitty literal popcorn one, along with a spec and diffuse map. Anyway, you can just generate a normal map by placing an unwrapped plane in front of the geometry and baking normals with "selected to active" checked. You can only bake in cycles. Bump maps are just converted into normal maps in realtime, they are black and white heightmaps, not mostly blue like normal maps. If you want to make those manually, make a texture with 32bit channels (not 8bit) to avoid visible stepping. For drywall, I guess you can just subdivide a plane and displace it using a random noise texture. You'd want to make a material on the geometry that basically does a b&w heightmap in the direction of the "camera" plane.
You can also generate normal maps from bump maps in various software like gimp or photoshop, usually involving a plugin. Note that these "tileable" normal maps aren't quite like custom normal maps baked from sculpts and stuff, they produce somewhat incorrect shading because the surface tangents used for determining the direction of the distortion aren't strictly the ones used during baking. It's good enough for noisy textures where you don't care about accuracy. I think bump maps don't have this issue because they are calculated using existing tangents.
Also note that in blender, you need a "normal map" or "bump map" node depending on what it is, not plug the texture into the shader "normal" input directly.
Anonymous
8/5/2025, 7:51:20 PM
No.1016433
[Report]
>>1016432
Wait actually I'm a tard and realized that displacing and baking a heightmap is counter productive since you'd end up with the same as the input displacement texture. Derp. Sorry about that.
Anonymous
8/6/2025, 5:03:54 AM
No.1016473
[Report]
>>1016537
So I kind of fucked up by making clothes for a character in a T pose while the armature for their body mesh has a rest pose in an A pose. When I do the weight data transfer and armature modifier it snaps the clothes out of alignment between the A pose and T pose.
How do I weight transfer a posed mesh?
I tried duplicating the body mesh, applying the armature modifier, then doing a weight transfer. That didn't seem to work. I've tried a bunch of other combinations of these sorts of steps to just brute force it into working, but all I've managed to do is burn through an evening's worth of productivity.
Gingee
8/6/2025, 4:08:08 PM
No.1016496
[Report]
>>1016505
>>1016405
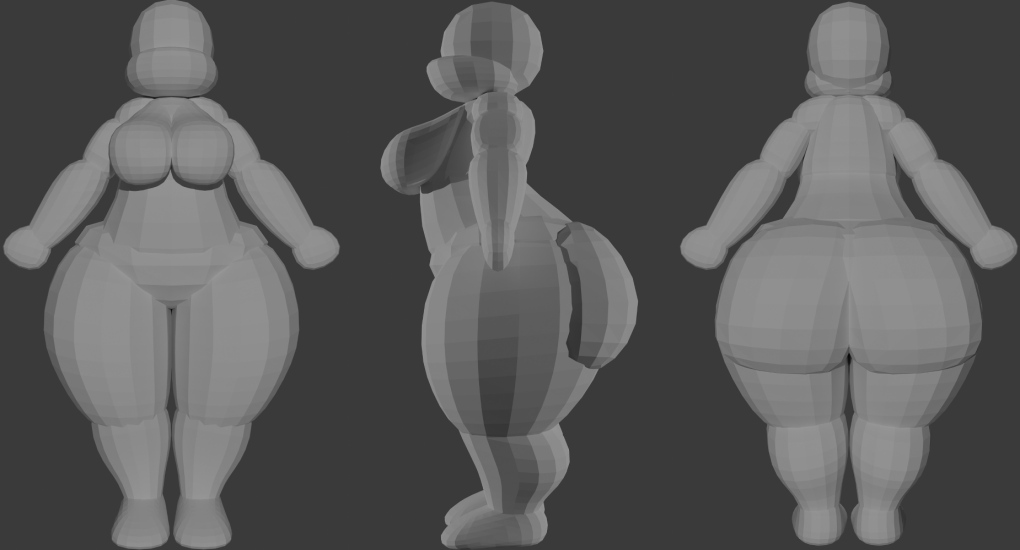
Well, it looks sorta like this. It may look wonky all cuz her "proportions"
Gingee
8/6/2025, 4:17:20 PM
No.1016498
[Report]
>>1016517
Also, there is a way how i connect pic?
(I connected her arm with hand when i started(you can saw it on 6289 above), then add remesh modified for fingers and fucked up. I dont have original file cuz i "save as" file when all her main body parts were linked as a object)
Gingee
8/6/2025, 4:18:23 PM
No.1016499
[Report]
I can connect*
Anonymous
8/6/2025, 11:03:08 PM
No.1016505
[Report]
>>1016517
>>1016496
Why did you fuse the tail with her body? That doesn't just look "wonky", it looks deformed. Do you not understand the visual language of the 2d reference?
>>1016307
The tail isn't a big round flesh tube. It appears big because it's *fluffy*. The fur gives it a large profile. While the flesh underneath is likely very thin, as is the case with most animals.
You wouldn't fuse the fur of the tail with the character's body. So it's super weird that her tail is fused with the middle of her back, and her cheeks. Delete the mesh of her tail. Model the back and butt as if the tail doesn't exist. Redo the curve. *Do not* merge the mesh of the curve with the mesh of her body. Rather, play with the profile of the curve, so that the root of the tail comes to a taper. *keep* the curve*, and place the tapered end where her tailbone connects pelvis with tail.
The curve itself can be rigged. So it's ok that it's a separate object. When it comes time to rig, just learn how to assign the points of a curve to bones.
Anonymous
8/6/2025, 11:24:54 PM
No.1016506
[Report]
>>1016507
Something most beginners don't realize is that you don't have to use a single shortcut, everything is exposed in the UI or in a menu
But it's torture to model that way
>>1016506
It pains me how they changed the default setting for the space key away from 'Search'. That's always handy for finding a function that's buried away behind menus.
Anonymous
8/6/2025, 11:56:10 PM
No.1016511
[Report]
>>1016513
>>1016507
Space is still search for me.
Anonymous
8/7/2025, 12:04:09 AM
No.1016512
[Report]
>>1016507
That is true, searching is powerful, I like that you can search modifiers now
Anonymous
8/7/2025, 12:08:17 AM
No.1016513
[Report]
>>1016511
Weird. They always default to Play on new installs, and I have to change it in the startup screen.
Gingee
8/7/2025, 1:22:56 AM
No.1016517
[Report]
>>1016520
>>1016498
I use remesh modified again and everything fine now, i don't really get it but alright. Need to make fingers thicker tho
>>1016505
>Why did you fuse the tail with her body?
To remesh it as any other part of her body. I see that you mean that was a bad idea
>2d reference
I kinda change a lot of things in the proses just to make her work on 3d
>The tail isn't a big round flesh tube
I wanted it goes from thick to thin
>It appears big because it's *fluffy*
>You wouldn't fuse the fur of the tail with the character's body
She's a otter, there is not really much of it and i don't plan to add it
>weird that her tail is fused with the middle of her back, and her cheeks
Yeah, i didn't figure out how to make other side thin too so it still looks pretty/thick
>Delete the mesh of her tail
I accidentally deleted original group so i can't separate her tail from the body
>Delete the mesh etc
I probably should just remake her from the scratch someday. I plane use current one as a reference for 2d stuff/learn 3d in general
>When it comes time to rig
I think to make short animation how she shake her butt tho
I sure make a lot of mistakes that I can learn from
Gingee
8/7/2025, 1:24:12 AM
No.1016518
[Report]
>plane
Plan*
Gingee
8/7/2025, 1:28:48 AM
No.1016519
[Report]
Process*
Anonymous
8/7/2025, 1:39:33 AM
No.1016520
[Report]
>>1016521
>>1016517
She's an otter??? Well I guess that does change things, since their tails are relatively thick at the base. And the tail would actually be fused with the body. So I kind of understand why you did that now. Still, I think you connected too much of her body to the tail. You should just reduce the connected zone down, so it's not connected to the middle of her back. And personally, I would ensure the tail is place above the cheeks of her ass. Because it's jut kind of weird having a tail connected to the cheeks. Even if it's how otters look.
There's a lot of information I would like to impart, but I can't, because I'm mostly experienced in box modelling and some minor amount of sculpting. I don't think I can help you too much while you use this remesh merging technique. You should probably learn retopology next. So you can gain the skills required to edit the mesh to specification. Rather than being limited to the automation of the remesher.
Gingee
8/7/2025, 2:13:34 AM
No.1016521
[Report]
>>1016522
>>1016520
>She's an otter???
What you think she was?
>Still, I think you connected too much of her body to the tail. You should just reduce the connected zone down, so it's not connected to the middle of her back
>reduce the connected zone down
>I would ensure the tail is place above the cheeks
Something like this?
>There's a lot of information I would like to impart, but I can't, because I'm mostly experienced in box modelling and some minor amount of sculpting
You can recommend me some tutorials, i personally watch Bran Sculpts blender playlist by now
Anonymous
8/7/2025, 2:35:21 AM
No.1016522
[Report]
>>1016524
>>1016521
Yeah, that connection looks more appropriate.
>What you think she was?
Cat
>You can recommend me some tutorials
Can't. The tutorials I watched are dated now. And half of the stuff, I figured out on my own by only watching a piece of a tutorial, and working out the rest intuitively.
I see this Bran Sculpts guy has a retopology video in his playlist. So I guess just continue to watch his videos. Retopo will give you a different view on your model. Remeshing is for quickly creating a scuptable mesh. It's often imperfect and messy, since it's all just an algorithm. And the algorithm can't predict every shape you're trying to mold.
Gingee
8/7/2025, 3:01:07 AM
No.1016524
[Report]
>>1016522
>Yeah, that connection looks more appropriate
Cool
>Cat
Yeah, i can see it
>Can't. The tutorials I watched are dated now
That's fine
>continue to watch his videos
Sure
Gingee
8/7/2025, 7:17:37 AM
No.1016531
[Report]
>>1016532
I just wanted to make the right size of her eyes/pupils bruh
Gingee
8/7/2025, 7:55:50 AM
No.1016532
[Report]
>>1016531
I think i figure it out
Anonymous
8/7/2025, 12:48:12 PM
No.1016537
[Report]
>>1016473
You need to apply the modifier but also make that new pose the armature's rest pose
I want to animate the SCP Foundation logo, but I'm rather new to Blender. What's a good way to make the outer circle morph into into that shape? The circle itself is made from a single vertex with the screw and skin modifiers. I understand that I'll need to apply one or both of them to proceed, but I don't know what to do after.
Anonymous
8/7/2025, 3:10:51 PM
No.1016541
[Report]
>>1016540
Here is the full logo, for reference.
Anonymous
8/7/2025, 3:16:22 PM
No.1016542
[Report]
>>1016540
My main problem is the skin modifier. It messes up sharp bends.
Anonymous
8/7/2025, 4:40:36 PM
No.1016546
[Report]
Never mind, I figured it out. But what is this outline in the render? How do I remove it?
Anonymous
8/7/2025, 6:16:47 PM
No.1016549
[Report]
>>1016550
Why are my renders red?
Anonymous
8/7/2025, 6:29:45 PM
No.1016550
[Report]
>>1016552
>>1016549
I figured it out. Output/Color Management was set to Override.
>>1016550
Pretty much done, might add text later.
Anonymous
8/7/2025, 9:07:22 PM
No.1016557
[Report]
>>1016090
We are never going to get NURBS modeling at this point are we
Anonymous
8/7/2025, 10:02:24 PM
No.1016558
[Report]
>>1016561
>>1016552
Now with text. I'm very happy with how this came out.
Anonymous
8/7/2025, 11:25:08 PM
No.1016561
[Report]
Gingee
8/8/2025, 1:25:22 AM
No.1016569
[Report]
Retopology is pretty fun
Gingee
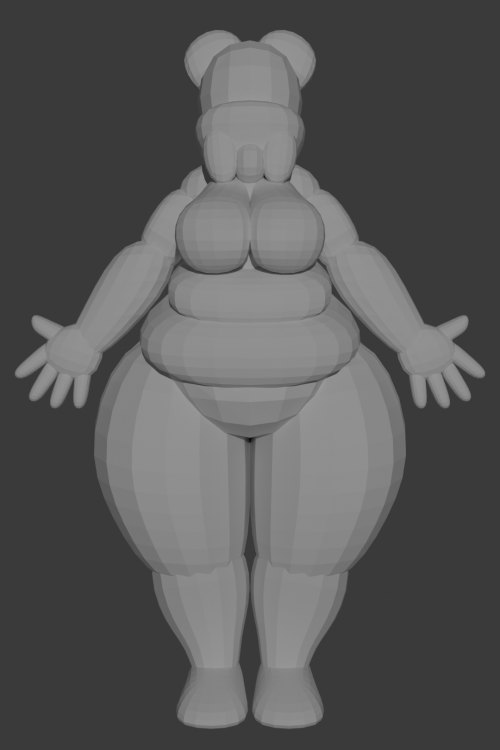
8/8/2025, 3:16:14 PM
No.1016604
[Report]
>>1016721
Almost finish her head(sure need to fix some small details and fill her ears). I think that i achieved that nice 3/4 cartoony look
Anonymous
8/8/2025, 7:12:52 PM
No.1016612
[Report]
I'm trying to apply multiple objects iwth mirror modifiers at the same time. I heard that it's just a matter of holding alt while you have all the objects selected and then just clicking on the modifier dropdown and clicking on apply.
Has that been changed?
>>1016552
that's a really cool logo anon! I made this for you
>>1016615
Thank you. I actually tweaked it yesterday because I didn't like some of the timings. Had to go on intuition because I know jack shit about animation practices. Is this just posting, or is the character model also yours?
Anonymous
8/8/2025, 9:31:18 PM
No.1016617
[Report]
>>1016616
And the version with text.
Anonymous
8/8/2025, 9:38:22 PM
No.1016618
[Report]
>>1016616
>posting
*posing
Anonymous
8/8/2025, 10:20:46 PM
No.1016619
[Report]
>>1016616
don't tweak it any further, yours looks fine. It's done, move onto your next project. In fact I made this to show you how much worse it could look.
>is the character model also yours
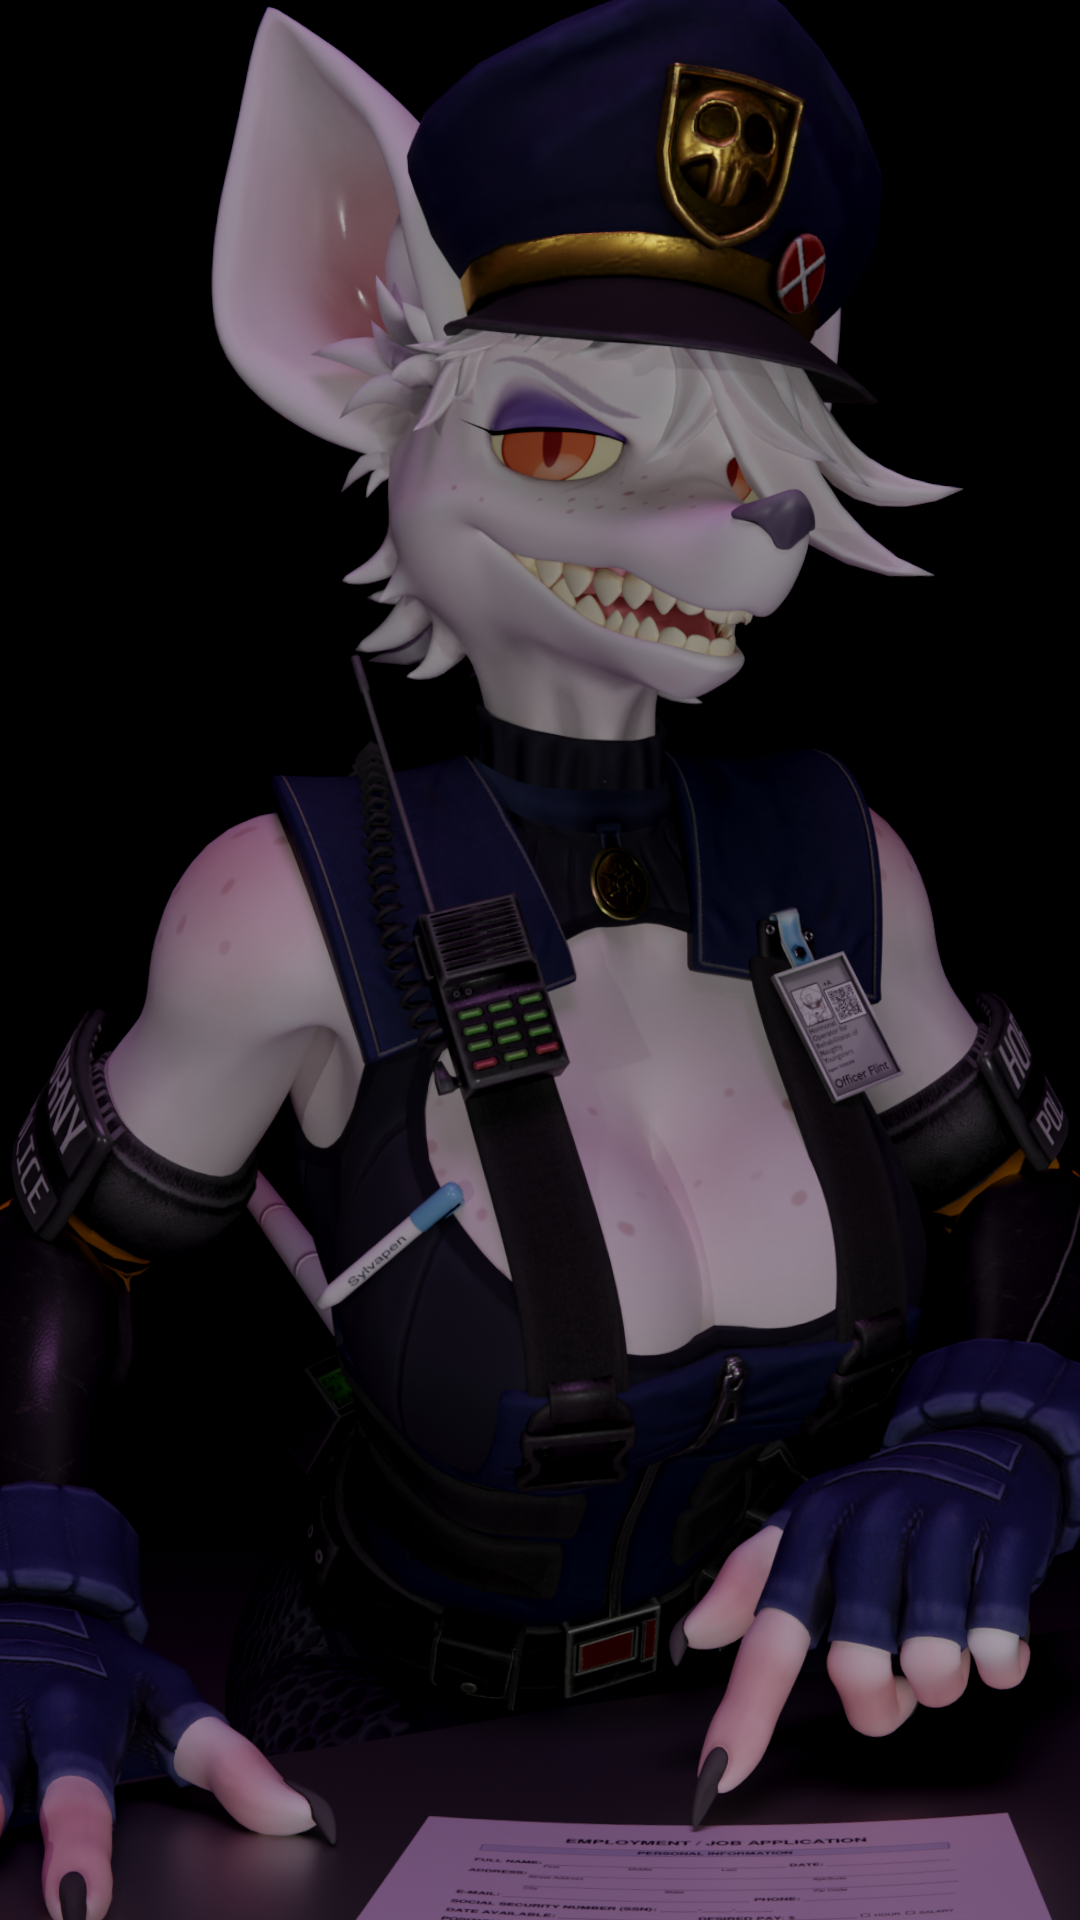
Officer Flint by warfaremachine. I wish she had higher res textures but no smutbase model is perfect
Anonymous
8/9/2025, 1:12:13 AM
No.1016623
[Report]
>>1016769
>>1016615
She looks like she bonks hornies
Anonymous
8/9/2025, 2:59:00 AM
No.1016629
[Report]
>>1016637
Anons, help me please.
>>1016624
>>1016627
I dunno why I can't move the mesh.shrinkwrap wasn't the problem byw
Anonymous
8/9/2025, 5:34:58 AM
No.1016637
[Report]
>>1016629
nvm I solved it.
any decent add-on for texturing in photoshop and having it update in real-time on the model?
Anonymous
8/10/2025, 6:53:54 PM
No.1016681
[Report]
>>1016679
Best I can think of is the Auto Reload extension, so the texture updates whenever you save/export it in Photoshop.
You'd have to draw in Blender itself to see it update in realtime, but extensions like ucupaint can add layers and correction filters for you.
Anonymous
8/10/2025, 9:07:48 PM
No.1016688
[Report]
>>1016690
>>1016679
Learn to texture paint in blender or press Alt+R in the UV window to reload the texture.
Anonymous
8/10/2025, 9:48:32 PM
No.1016690
[Report]
>>1016688
pressing Alt + R means actually saving the image though. guess it's time to learn texture painting in blender
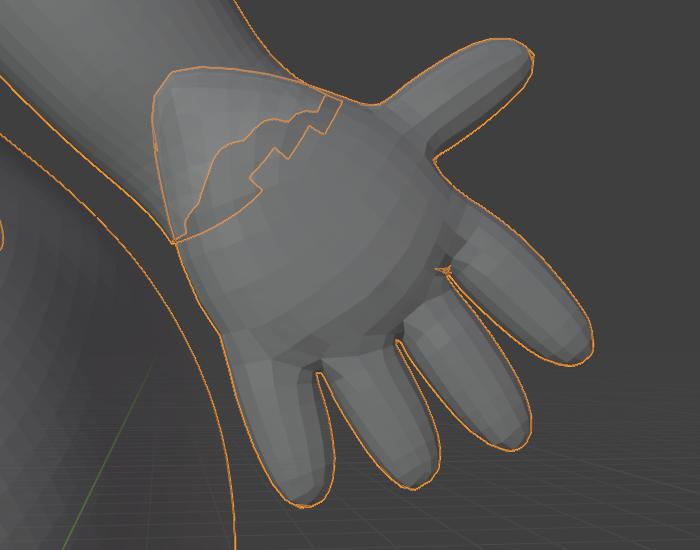
I am new to blender and kinda dumb. Anyone know how I should go about fixing this butt? I can't seem to figure it out.
>>1016714
that's not a Blender problem but an ass problem
go to /ic/ and ask for some anatomy recs
>>1016717
/ic/ doesn't know fuck all about topology.
Gingee
8/11/2025, 9:57:43 AM
No.1016721
[Report]
>>1016604
Retopology her ears from inside was the worst part so far. I see why out there is so many addons for this
>>1016718
Anon above are right, before doing something you need to know how it looks/works at first place + watch some tutorials about
Anonymous
8/11/2025, 1:04:02 PM
No.1016730
[Report]
>>1016774
>>1016718
>>1016714
The reason you can't subdivide your mesh without ruining the shape is because of what subdivision is does mathematically to determine where to place its subdivisions, and there's not enough geometry around the tighter areas like the inner thigh. You'll have to retopologize what you have for good deformations. However I'll take a different approach from the other anons and suggest studying from models that you like. Smutbase has thousands of models with different ass shapes. Find the 'tocks you like and try to build it from scratch. A lot of 3d anatomy topology tutorials (that are free) aren't very good but if you're getting a headache just pay for a well reviewed tutorial series. Those are pretty fool-proof in that they filter all the fools and depending on the series you can get no nonsense workflows that give great results.
Anonymous
8/11/2025, 8:56:51 PM
No.1016754
[Report]
>>1016756
i have developed an AI that can do everything in blender, planning on replacing all of u soon
Anonymous
8/11/2025, 9:34:57 PM
No.1016756
[Report]
>>1016754
You'd make a lot of money selling it to us. I'd love to have a machine do the grunt work, while I direct it.
Anonymous
8/12/2025, 1:17:12 AM
No.1016769
[Report]
>>1016781
>>1016623
yea I gotta bonk the horny away and keep working at it. Today I made a dress, I want to give her heels next
Anonymous
8/12/2025, 2:52:33 AM
No.1016773
[Report]
Need help from an expert.
I want my plane to be like a thin cloth veil over the chair-looking object.
So i added a cloth physics (silk preset) to the plane and a collision to the chair-looking mesh.
Why is the cloth creating a "tent" rather than stick to the chair-looking mesh?
The plane has 16,000 faces so it can't be i am lacking geometry, i tried with as high as 30k faces but it was the same.
I also changed the collision distance on both, but it changes nothing.
Anonymous
8/12/2025, 2:55:17 AM
No.1016774
[Report]
>>1016775
>>1016717
>>1016730
I ended up just taking a break and got this after 2-3 minute goofing around. I will study anatomy more but thanks for the advice.
Gingee
8/12/2025, 3:12:16 AM
No.1016775
[Report]
>>1016776
>>1016774
Really looks sorta better now, do you have some references of what exactly you want(like size/shape)?
Anonymous
8/12/2025, 3:14:49 AM
No.1016776
[Report]
>>1016775
I am trying to go for a mix between 8 and 9 but moreso 8. I am still a novice and bad...
Need help from an expert.
I want my plane to be like a thin cloth veil over the chair-looking object.
So i added a cloth physics (silk preset) to the plane and a collision to the chair-looking mesh.
Why is the cloth creating a "tent" rather than stick to the chair-looking mesh like a very thin, silky cloth?
The plane has 16,000 faces so it can't be i am lacking geometry, i tried with as high as 30k faces but it was the same.
I also changed the collision distance on both, but it changes nothing.
Anonymous
8/12/2025, 3:55:04 AM
No.1016779
[Report]
>>1016777
There's gotta be more parameters than just "collision distance", like "constraints" and forces for those constraints.
I work in Houdini so I have no clue for Blender.
>>1016769
I dont work with women because I just make them squat and do a lewd face, sometimes the hands are folded behind their head, sometimes its behind their back. Then I shoot rope, and turn blender off for the day.
Anonymous
8/12/2025, 7:12:09 AM
No.1016783
[Report]
>>1016777
I'm not an expert at all, but I imagine that it's because the amount of fabric on the outside of the chair is heavier than the fabric on the inside, so the weight is dragging it out and taut. Which is about what you would expect in real life.
Maybe you can add a mask that affects the weight distribution. Making the center of the cloth heavier than the outside.
Or, perhaps as a crude solution, you can take a square cut out that's about the size of the chair's cut-out, and while the simulation is running, you can drag the square, pushing the cloth in manually.
>>1016781
you have like zero self control. maybe the thing that needs constraints is you.
Anonymous
8/15/2025, 1:33:38 AM
No.1016924
[Report]
>>1016939
>>1016781
meditate on what you want out of the experience. Are you fine masturbating to half posed models or do you want to learn more about working with 3d models? For me I'm just not happy or satisfied with my life flashing before my eyes and it's 20 years of sitting behind a computer screen jacking off lol
>>1016913 is right, constraints can be healthy challenges. If you didn't jack off what would you do with your newfound time? what if you weren't free to jack off all day and do nothing? imagine how much more alive you would feel
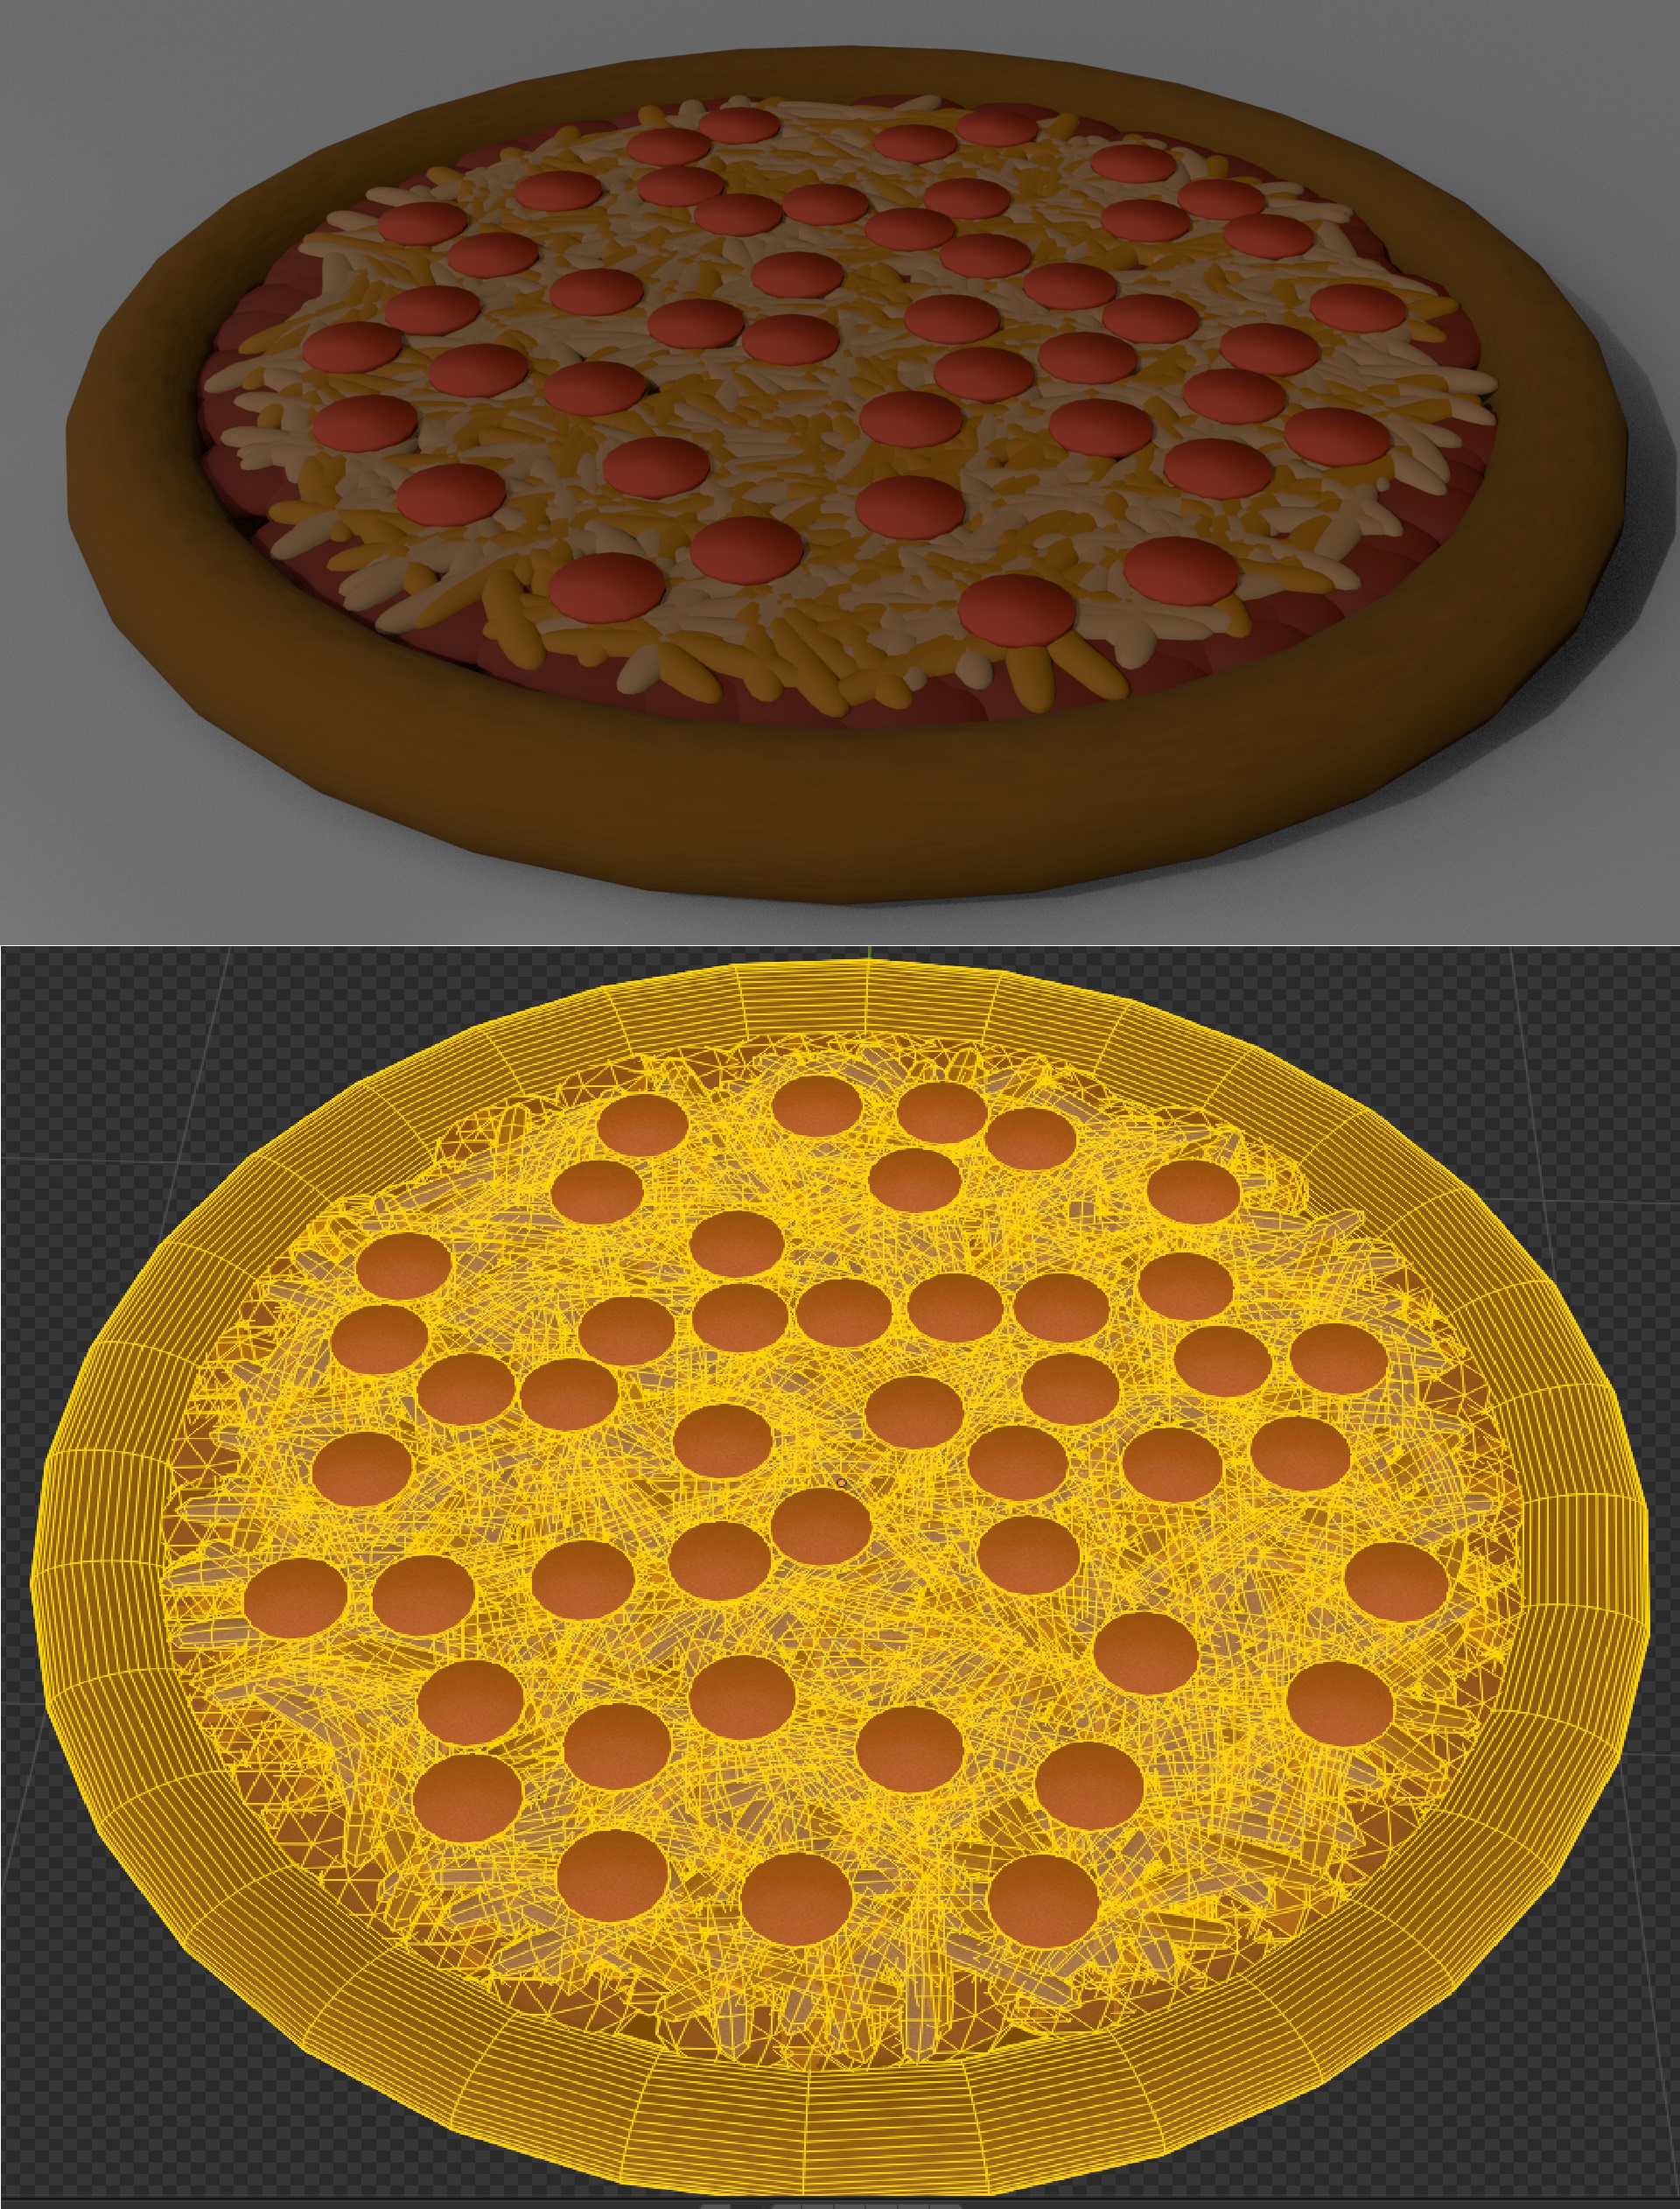
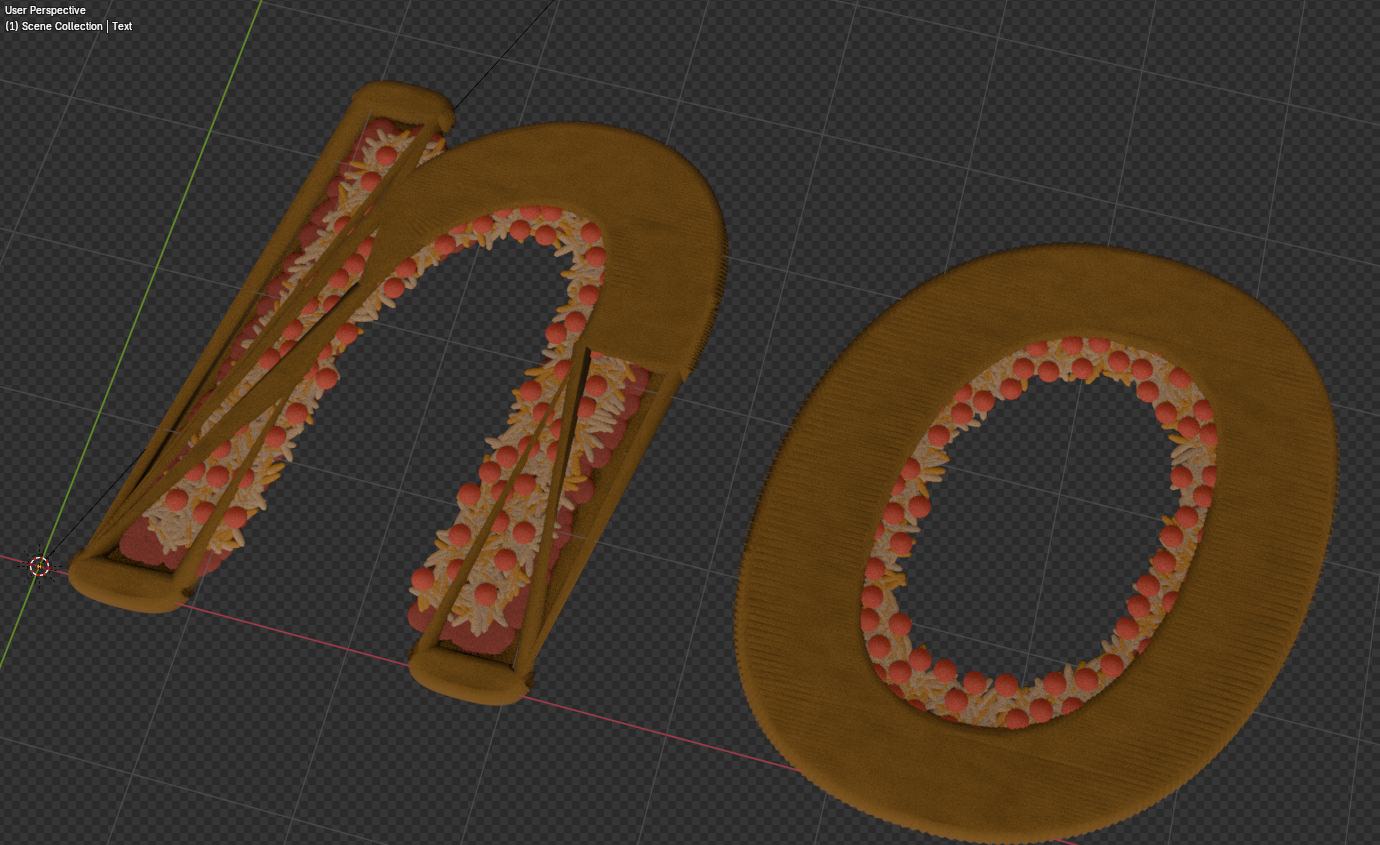
rate my geometry noderoni pizza
Anonymous
8/15/2025, 4:29:31 AM
No.1016934
[Report]
>>1016955
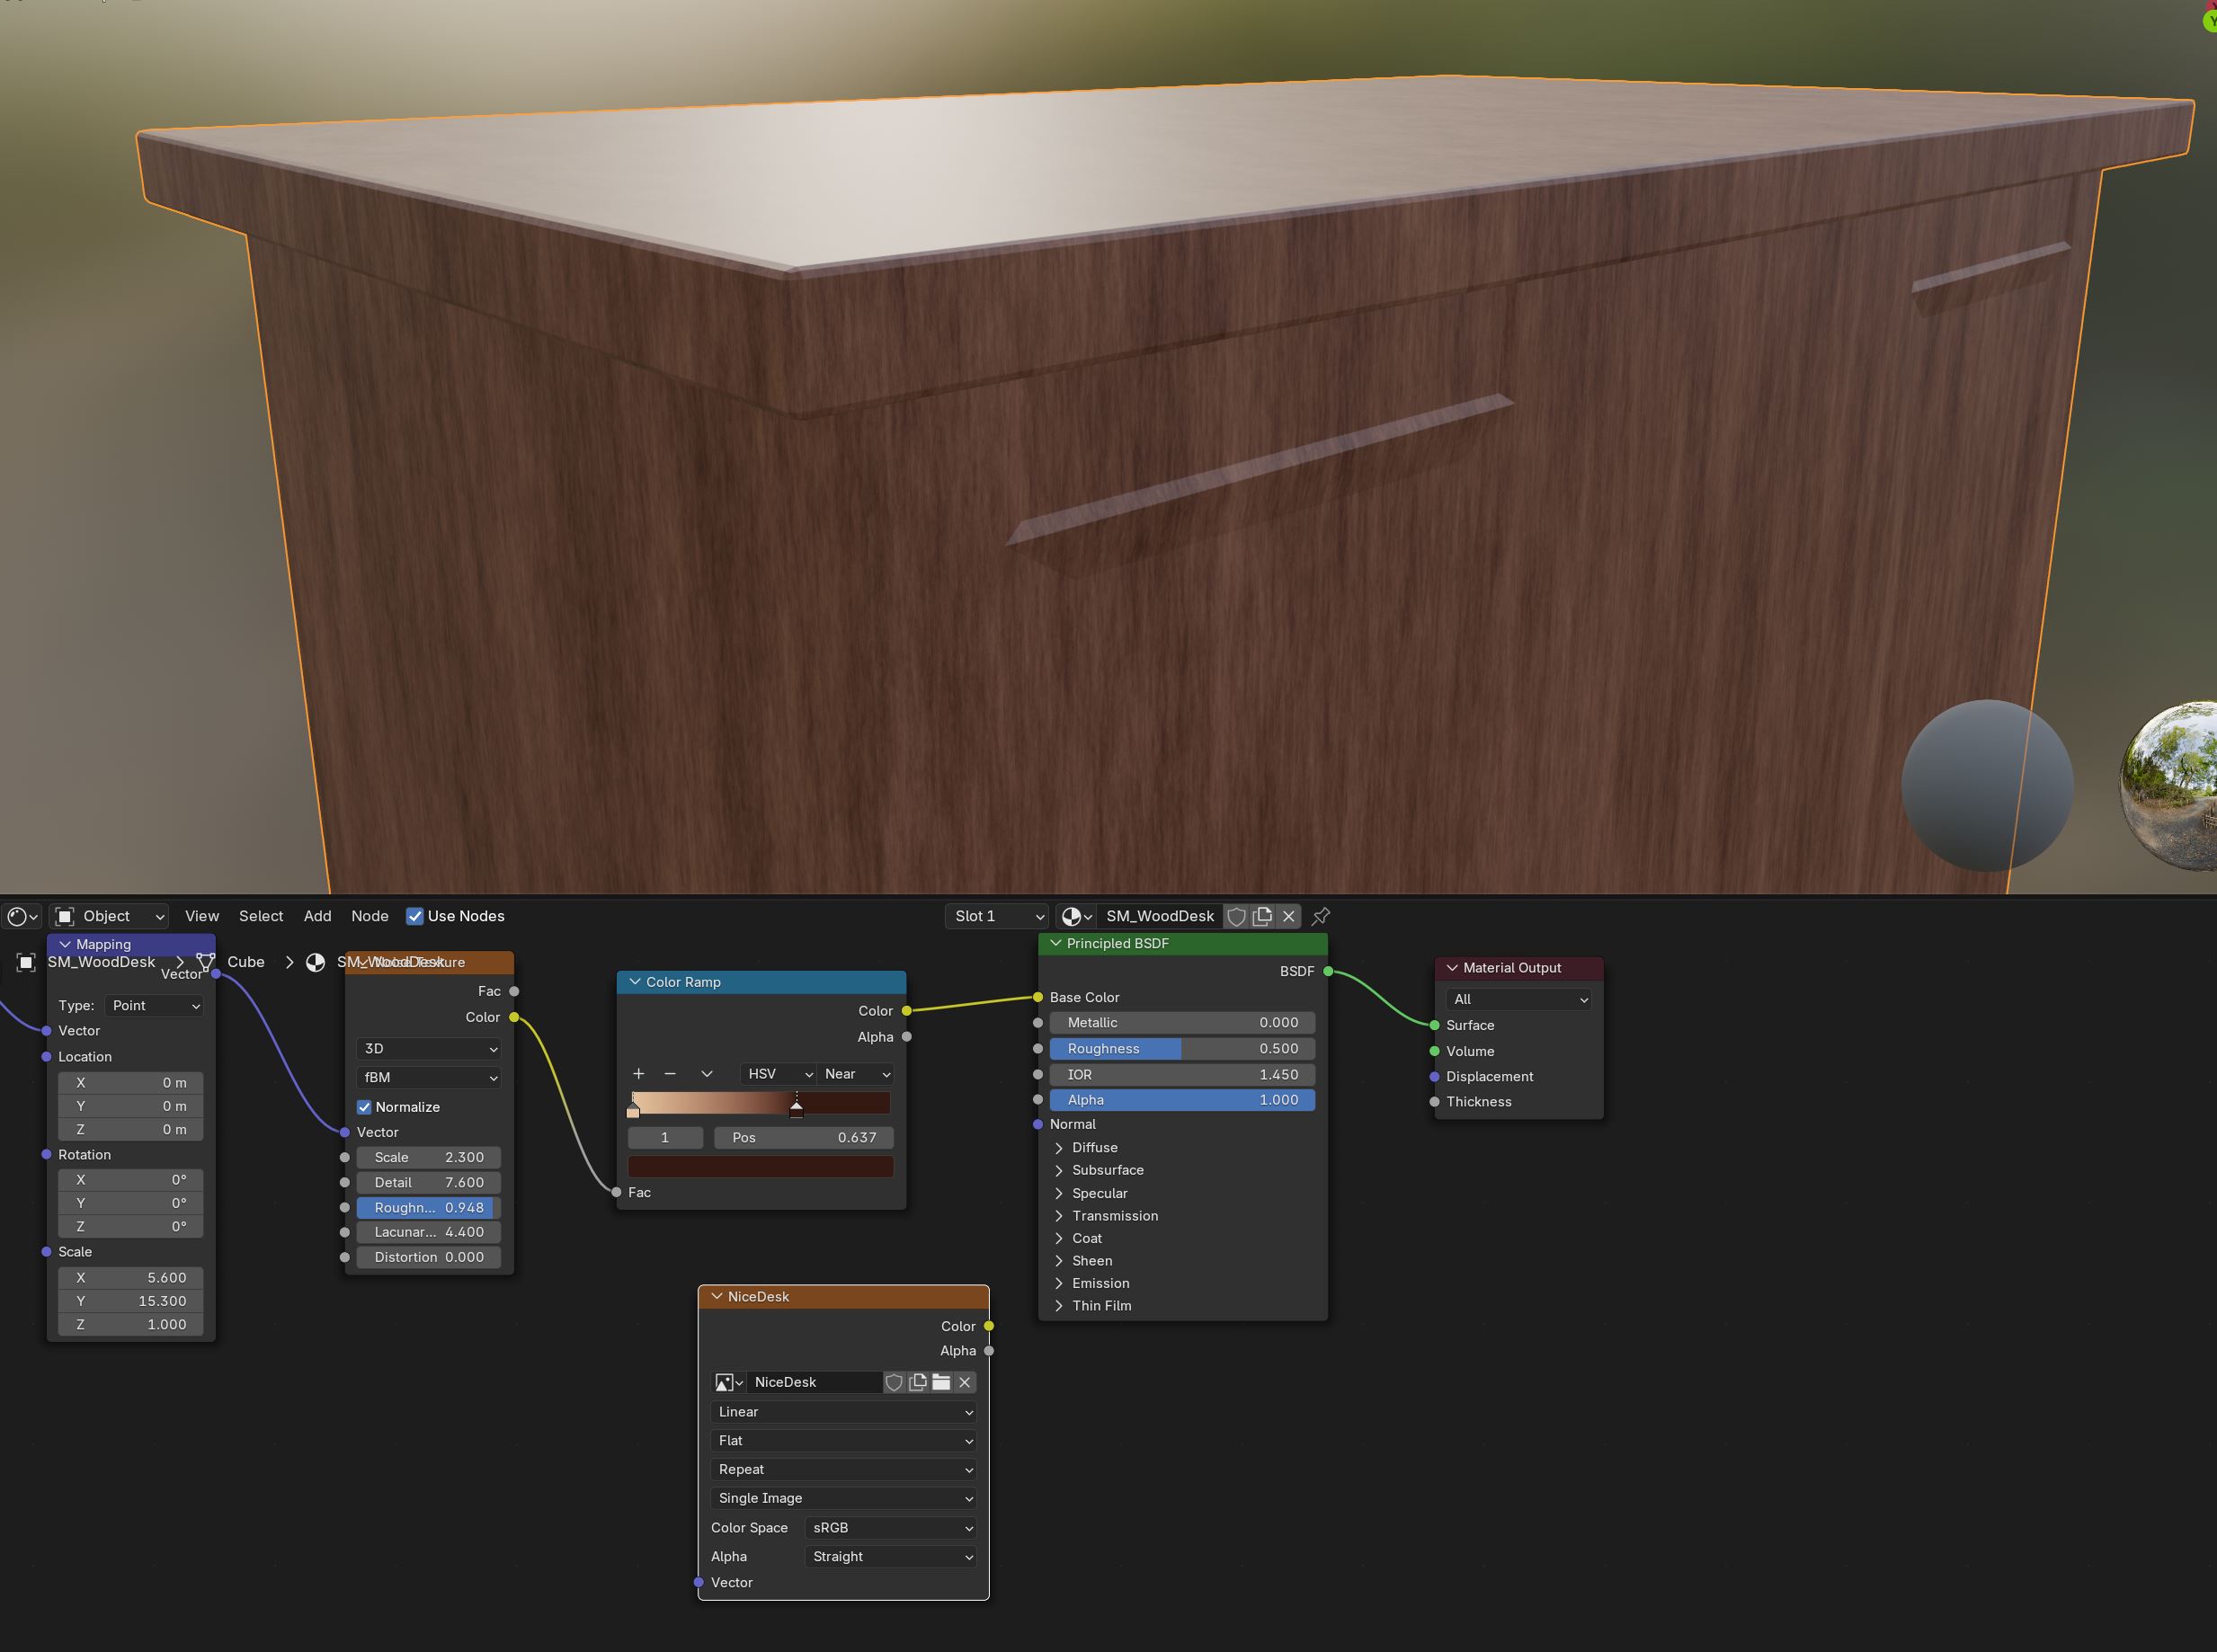
>>1016933
show how it bakes in substance
Anonymous
8/15/2025, 6:12:13 AM
No.1016939
[Report]
>>1016913
>>1016924
The next hurdle would probably be the stripper strut. I'll make a model strut to test the jiggle and shoot rope before turning off blender for at least another 48 hrs. This must be what getting married is like.
Anonymous
8/15/2025, 2:53:44 PM
No.1016955
[Report]
Gingee
8/15/2025, 3:24:52 PM
No.1016957
[Report]
>>1016969
Struggle for a bit because she don't have a neck but hope it looks fine
Anonymous
8/15/2025, 6:01:19 PM
No.1016966
[Report]
>>1016221
Havent used it for a while so it might have changed, but there was this thing free thing called Sheepit, kinda like a farmers coop for renders. You let the client run and it renders single frames of other peoples shit, which gives you points to put your project at the head of the queue. Used it a lot before I snapped and bought a monster GPU, really big time saver if you leave it running overnight to build a bank, and its kinda mesmerizing looking at the weird shit people are making in the output.
Anonymous
8/15/2025, 6:07:39 PM
No.1016967
[Report]
>>1016985
At this point I dont even think when fixing it, but does anyone know why it places objects rotated 90 degrees when you instance them as hair particles? There's gotta be a good reason for why creating a quick forest looks like the Tunguska event by default.
Anonymous
8/15/2025, 6:20:51 PM
No.1016968
[Report]
>>1016970
>>1016084 (OP)
Character for Iron age setting. Hair is a placeholder from a Skyrim mod, hands are being redone as well as redoing the rigging for the hands, feet need to be redone but aren't a priority.
I have this strange error where parts of the rig especially ones using IK will detach and then if I move anything in the rig they snap to their correct position, I'm thinking of just deleting the rig and redoing it, maybe the rig itself is bugged.
Criticism very much welcome.
>>1016090
I remember them promising a feature that would allow you to set up automatic texture compilation and then never saw any other mention of it again, it was mentioned in the Blender 3.X series as well, I actually could make good use of that feature.
>>1016118
Only if Pablo came back, he's like that guy who went on to work on Arnold, so much work done in such a short amount of time.
Anonymous
8/15/2025, 6:36:04 PM
No.1016969
[Report]
>>1016989
>>1016957
she needs enough chub in her shoulders and back to visually justify having lost neck priveleges. Are you sure you can manage a big gal like that?
Anonymous
8/15/2025, 6:43:49 PM
No.1016970
[Report]
>>1016971
>>1016968
Does the blender system console (window->toggle system console) show anything when you manipulate the rig? Sounds like a circular dependency somewhere.
Anonymous
8/15/2025, 6:54:38 PM
No.1016971
[Report]
>>1016970
Thanks for the advice, that window is showing that a dependancy cycle has been detected, now to find it.
Anonymous
8/15/2025, 7:39:01 PM
No.1016974
[Report]
>>1016933
Is there a node that melts the cheese, cups the peppas and crisps the crust?
Anonymous
8/16/2025, 12:13:58 AM
No.1016983
[Report]
>>1016933
It's alright I guess. The cheese doesn't look melted though. And it seems like an aful large waste of polygones to have all those individual pecks of cheese, when they could be a single mass. I don't really know how to solve that though. Maybe if you selected the upward facing points of the cheese, and merged by distance, then selected the downward points of the cheese and performed a second merge by distance, then you can reduce a lot of the geometry. while still keeping a overall profile of the cheese. Just a guess.
Also, if you set the vertices to have the cheesy white and gold color in geometry nodes, then when you merge the vertices, the white and gold will interpolate, blending the two colors at the merging points.
The crust of the pizza could have a better profile. The amount of cuts going around the circumference is needlessly high. You can reduce those. And the amount of cuts going radius-ways are too low. You can increase those.
Pepperonis need geometry so they can be shaped.
Anonymous
8/16/2025, 12:19:41 AM
No.1016985
[Report]
>>1017027
>>1016967
I think I may have an answer. But I'm not totally sure what you're talking about. What do you mean by instancing objects as hair particles? You're making a forest out of hair particles?
Gingee
8/16/2025, 2:13:47 AM
No.1016989
[Report]
>>1016969
I'm on my way so i think everything will be fine + she obviously gonna have a hair
Anonymous
8/16/2025, 2:36:40 AM
No.1016991
[Report]
>>1017006
what's the use of Quad Remesher in the sculpting workflow?
on a sculpt it absolutely decimates high frequency details, even if the QR retopo has twice as many tris
all I can think of is that:
>used after remeshing loose objects together and want a clean base to build on
>can bake normal maps onto lower poly QR it so it's more performant
>maybe good for creating bases for multires?
>likely makes posing sculpts easier, not sure
Anonymous
8/16/2025, 3:43:39 AM
No.1017000
[Report]
>>1017002
don't know if it's possible, but can you use keyframes to swap armature objects with? i have a couple animations i'm looking to swap between for a model and am wondering if there's an easier method than just putting a brand new model in when the first animation is finished
Anonymous
8/16/2025, 3:52:17 AM
No.1017002
[Report]
>>1017000
Animate both models on different render layers and just combine them in a post production software?
Anonymous
8/16/2025, 7:02:31 AM
No.1017006
[Report]
>>1016991
>maybe good for creating bases for multires?
>likely makes posing sculpts easier, not sure
I use it for those two reasons, you have to reproject after subdividing to keep the details
I also use it to clean up objects made with booleans when I need to add a bevel but can't be fucked to clean up manually
In my opinion quadremesher is not good enough for the final output so I don't use it to create a low poly version (if I care about quality)
Anonymous
8/16/2025, 1:48:14 PM
No.1017024
[Report]
>>1017034
I'm using inverse kinematics for legs, but I don't understand how it works with the pole. The leg points in the general direction, but I don't understand why it seems a little off.
When animating i have to move the pole a lot to get the leg working how it should, but shouldn't I be able to leave the pole in one place for most of it?
Anonymous
8/16/2025, 2:49:14 PM
No.1017027
[Report]
>>1017030
>>1016985
Default method I use to scatter tree/grass/whatever objects is make a particle system on the ground, set to hair, set render to the object, faff around with settings until it looks right. When its in path mode the hairs are aligned to normals, the object Im instancing is vertical, but then they appear 90 degrees to the normal and I've got to rotate the mesh in edit mode like this to get it right if I want the phase randomization to be rotating on the Z, no matter what orientation axis is in the particle settings. Weird little quirk Im curious about. Thinking it just assumes X+ on the object should be aligned to the normal because this isn't just a foliage tool, but sort of odd considering Blender is in the Z up camp.
Anonymous
8/16/2025, 3:24:03 PM
No.1017029
[Report]
Been using Blender for years and just learned what alt-V does. I will never know all the stuff this thing can do.
Anonymous
8/16/2025, 3:34:52 PM
No.1017030
[Report]
>>1017027
Ah, ok. I get what you mean now. That is an odd quirk.
I can't say I have the answer after all. But I have an idea. When it's instancing an object, it's probably placing the object on a path. So the object is aligned to the normal of the path. And the normal of a path is the X+ axis.
Anonymous
8/16/2025, 6:45:44 PM
No.1017034
[Report]
>>1017024
The local X axis of the first bone in the chain points to the pole target, such that the pole target bone is on a plane defined by the X and Y axes of the first bone in the IK chain.
The first bone is at the opposite end of the chain from the bone with the constraint.
Enable "show axes" from the Viewport Display section of the Armature properties panel to see bone axes.
To create a pole target that aligns with the rest position of the armature, snap the pole target to the first bone in the chain, then create a custom orientation from the first bone of the chain, and in that space, move the pole target in the X and Y axes only. If you move the first bone of the chain, you will have to do this again.
Anonymous
8/16/2025, 8:13:48 PM
No.1017035
[Report]
>>1017036
I'm trying to learn how to do this texturing thing, but I have no idea how to make the wood look better. I added some detail to this desk thing, but they are barely visible when under actual lighting. How can I fix this?
Anonymous
8/16/2025, 8:34:36 PM
No.1017036
[Report]
>>1017035
Convert the base texture to greyscale and use both as a bump map (texture -> color ramp with black and white -> bump node -> normal map input) and specularity map (same but without bump node).
Anonymous
8/17/2025, 2:09:49 AM
No.1017043
[Report]
>>1017052
Should I apply transforms before weight painting & rigging?
Anonymous
8/17/2025, 7:35:05 AM
No.1017047
[Report]
>>1017065
Does anyone have a good tutorial on how to retopo structures or buildings?
Fucking hell, like thing looks okayish until I do shade smooth then everything goes to shit.
Retopo with characters feels inuitive while simple shapes mindfuck me.
Anonymous
8/17/2025, 8:07:44 AM
No.1017049
[Report]
>>1016084 (OP)
I'm a complete shitass beginner doing a donut tutorial. What the fuck is this and how do I fix it? It might've happened after applying an effect.
Anonymous
8/17/2025, 8:12:22 AM
No.1017050
[Report]
>>1016110
none of that means it's incorrect. It means you feel uncool for agreeing with it
Anonymous
8/17/2025, 8:34:05 AM
No.1017052
[Report]
>>1017043
Scale yes, avoid applying rotation unless you have to
>algorithm senpai please notice me ill do anything
Anonymous
8/17/2025, 5:22:13 PM
No.1017064
[Report]
>>1017075
>>1017056
This is sad, I wish there was a better way
Anonymous
8/17/2025, 5:39:11 PM
No.1017065
[Report]
>>1017047
Not sure what you mean, but I'm guessing you don't have appropriate holding loops/bevels. Even if you're not using subd, you still need to model as if you're doing it otherwise the shading doesn't have enough information and ends up doing ugly things.
You can try using autosmooth and adjusting the angle but that's a last resort for me and not something to rely on if you're going out of blender.
Anonymous
8/17/2025, 10:33:27 PM
No.1017075
[Report]
>>1017064
screenshotting his own shitty videos and posting them to 4chan attracts a little clickbait attention but surely there's a better way
Anonymous
8/17/2025, 10:52:33 PM
No.1017079
[Report]
>>1017056
>who is this balding blue-haired basedboy?
>open image
oh...
Anonymous
8/18/2025, 9:35:44 AM
No.1017099
[Report]
>>1017100
>>1017056
I just outright started muting channels with video titles like that. If you're not telling me what the video is about in the title or thumbnail, I don't give a fuck.
Anonymous
8/18/2025, 10:19:37 AM
No.1017100
[Report]
>>1017101
>>1017099
I'll mute your mouth with my BWC as you slurp up the precum and vibrate my cock with your moans
Anonymous
8/18/2025, 11:04:50 AM
No.1017101
[Report]
So like, how do I create, use and share assets?
And when did I become a boomer?
>4.5 says i'm using 300mb of vram with a large scene open
>completely hard crashes every so often
so vulkan integration is going well huh
Anonymous
8/18/2025, 4:25:34 PM
No.1017120
[Report]
>>1017122
>>1017116
Yeah I can also integrate my BWC into your little hole
Anonymous
8/18/2025, 5:34:56 PM
No.1017122
[Report]
>>1017126
Anonymous
8/18/2025, 6:16:19 PM
No.1017124
[Report]
>>1017116
It's going pretty well for me but I heard some hardware configs don't like it, what are you running?
Anonymous
8/18/2025, 6:30:01 PM
No.1017126
[Report]
>>1017122
The sound you make when I go balls deep up your tail and spurt my huge load into that booty of yours
Anonymous
8/19/2025, 1:46:49 AM
No.1017147
[Report]
Anonymous
8/19/2025, 1:52:52 AM
No.1017148
[Report]
>>1017111
Polyhaven is actually not a site for sexual degenerates, its got a lot of good shit
I'm enjoying creating stuff in blender, but fuck me is the UI of this thing brutally unintuitive. It's like the software actively wants you to piss off. I've never seen anything else like it. Take pic related as an example. For the modifiers you have a cursor for a drop-down menu on the left, and an X on the right, but for the physics panel they removed the X from the right side and placed it above on the related physics button. Fucking why? This is just one small example, but these types of annoyances pile up, and they apply not only to the UI but everything across the board.
>>1017149
The design there makes sense and doesn't bother me since they're different kinds of menus. You don't have a physics stack like the modifiers. The X is on the left for physics because it's easier to access and you can only have one physics setting selected at a time I think. It wouldn't make any sense to have the modifiers be a global dropdown
>>1017155
It's a blatantly retarded design and your standards are shit for not being bothered by it. Put the fucking X on the same side so I don have to search for how to close something that looks almost identical to another menu I was just in.
Anonymous
8/19/2025, 7:01:13 AM
No.1017159
[Report]
>>1017270
>>1017157
>Put the fucking X on the same side
new anon jumping in... I don't think the problem is which side the X is on, it's that there shouldn't be an X at all. The physics button is a toggle and should have a state representation other than an X. So I really agree here, the X could/should be on the menu itself and the button state change should be something like the icon changing color/value or the button having some kind of highlight effect. That said, I think the Blender UI is pretty good and a big improvement over the <2.8 series, plus and I don't think the X is terribly unclear, though maybe they could have used the eye icon instead? How do you think it could be improved? I'm curious because I went to school for UI/UX and it's always interesting to see how people experience software.
Anonymous
8/19/2025, 11:17:12 PM
No.1017192
[Report]
>>1017149
I learned Blender first out of all the 3D shit I use and after a few years I can fly around it like a youtube person showing off with that input display addon. When I go into anything else it feels like I just came home from vacation and somebody moved all my furniture five inches to the right when I was away and I bang my toes on everything.
Anonymous
8/20/2025, 1:00:18 AM
No.1017197
[Report]
>>1017270
>>1017157
you have autism
Anonymous
8/21/2025, 2:23:57 AM
No.1017270
[Report]
>>1017271
>>1017197
>>1017155
He's correct about the X location. If you were going to put it anywhere, put it on the upper right hand side, as is standard. Breaking that convention by placing the X on the left, is plain retarded.
>>1017159
You're right that it's a toggle, and that's another problem. The X doesn't even do anything, when the whole button itself is toggle-able. They should remove the X icon, because it's confusing. Rather, they could make the button highlight when it's toggled on.
But also, I find it incredibly annoying how it toggles off. When I click the button, it's because I want to seem my options. Not because I want to turn it off. I can't tell you how many times I went looking for my physics options, clicked the toggle, and lost all my physics options. What a super shitty way to fuck the user over.
So I lied. I think they should keep the X. Clicking the body of the button should turn it on. And then clicking the X *on the right side* should turn it off. A highlight should indicate that it's on at a glance. Clicking the body of the button a second time should be inert. Simple do nothing. I'll take feeling like a retard for clicking an inert button, over losing the physics.
Anonymous
8/21/2025, 2:57:03 AM
No.1017271
[Report]
>>1017270
>clicked the toggle, and lost all my physics options
That's terrible. Yes, the whole panel is janky. I looked at the Blender suggestions and feature requests and there enough that I think this panel will eventually be rewritten in the future, but not any time soon.
Anonymous
8/21/2025, 4:12:59 AM
No.1017274
[Report]
>>1017280
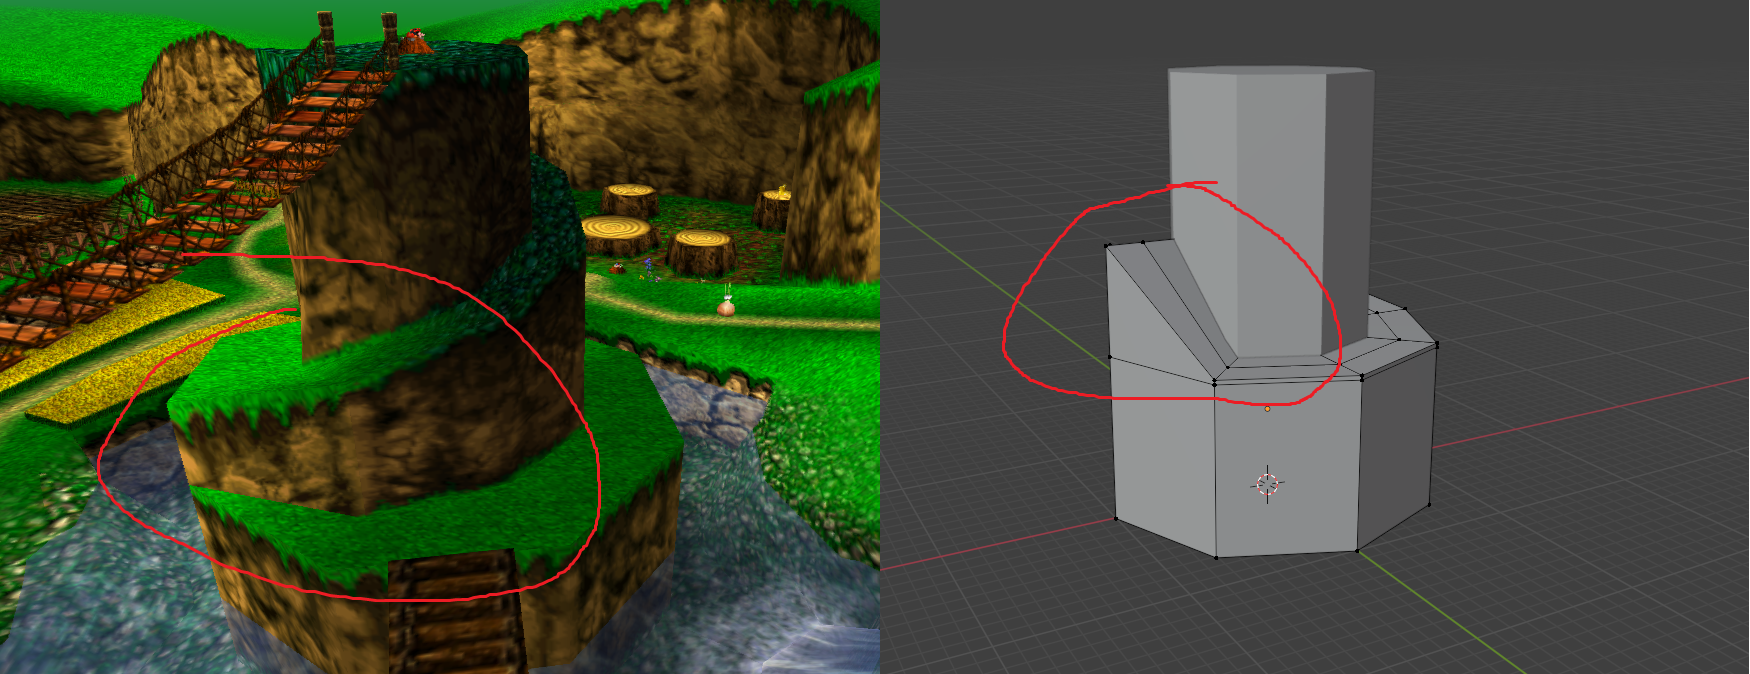
Hello newbie blender user here, I dont know how to get the face to drop straight down and cut inwards on the spiral mountain and it just makes a big ramp.
Anonymous
8/21/2025, 6:29:09 AM
No.1017280
[Report]
>>1017284
>>1017274
Slightly more experienced newb here. I can't perfectly explain what I did but I started with an 8-sided cylinder (triangle fan end) then used the knife tool to cut a spiral on top. Then I extruded > deselected > extruded > deselected until I had something to work with. After that I manually moved edges into a ramp shape, merged vertices when needed and dissolved any unneeded edges to make quads (there necessarily needs to be some triangles). There is probably a super cleam fast way to do this but I don't know it. I'm not a serious modeler.
Anonymous
8/21/2025, 7:41:25 AM
No.1017284
[Report]
>>1017280
That's one valid way to do it. The one that came to mind for me was the inset tool and then doing the dissolving/knife cutting with extruding.
Screw modifier could be used but I think they all require hand manipulation of the edges to get the Banjo look
Anonymous
8/21/2025, 10:23:53 AM
No.1017290
[Report]
>>1017294
>>1017725
>AnimeNyan's channel got nuked
Smutbros....
Anonymous
8/21/2025, 11:35:13 AM
No.1017292
[Report]
I need something called Diffeomorphic and MHX Rig 4.4+. Is it these 3 links on the website?
https://diffeomorphic.blogspot.com/
Anonymous
8/21/2025, 12:07:14 PM
No.1017294
[Report]
>>1017725
>>1017290
W
one less shit blender channel
Anonymous
8/21/2025, 12:17:38 PM
No.1017295
[Report]
Are there good resources for getting good at using curves? Youtube is flooded with beginner level videos that don't go further than array on curve and curve deform
This is the best I could find but it's mostly 2D bezier
https://www.youtube.com/watch?v=f53GvpTIO2w
I've been using Blender for at least 3 years and I still can't create splines in 3D that look the way I want them to
Anonymous
8/21/2025, 12:32:51 PM
No.1017296
[Report]
>>1017343
is there a driver? for bones that would apply scale with an inverse effect based on the positive/negative sides on its local axis? like if it scales up on X+, it scales down on X-? it would be useful compared to the solution now which is just to split into 2 bones with separate constraints
>Render piece, about 3h total
>Comes out blank, transparent despite looking exactly as it should during the render process
>Try it again, assume Blender is just being petty
>Same thing happens
okay what am I doing wrong? Mid-render it looks fine, but when it really finalizes it just came out as a blank, empty page.
Anonymous
8/22/2025, 9:03:59 AM
No.1017343
[Report]
>>1017346
Anonymous
8/22/2025, 9:05:29 AM
No.1017344
[Report]
>>1017342
because blender is shit compared to mayachads who don't need endless threads to help them fix their shit software LOL!
Anonymous
8/22/2025, 10:56:02 AM
No.1017346
[Report]
>>1017343
thats unfortunate, jank methods will have to do then
Anonymous
8/22/2025, 10:02:33 PM
No.1017366
[Report]
>>1017342
That happened to me once and it was because I hadn't connected anything to the fucking output node in the compositor, just the viewer.
>>1016084 (OP)
Hey guys
Decided that its finally time to learn how to use 3D software like Blender but have no idea what im doing and the UI looks really complicated.
I just want to dive head first into posing 3D models for simple pin up images, so whats a good crash course you guys recommend where I can skip all the uneccessary stuff and get what im looking for
Anonymous
8/23/2025, 9:27:52 AM
No.1017385
[Report]
>>1017390
>>1017384
>t. braindead "vibing" short attentionspan zoomer
Anonymous
8/23/2025, 9:51:58 AM
No.1017388
[Report]
>>1017342
you're doing something retarded in your compositor nodes
Anonymous
8/23/2025, 9:54:42 AM
No.1017389
[Report]
>>1017390
>>1017384
>the UI looks really complicated
>where I can skip all the uneccessary stuff
unnecessary like how to use the ui???
you will never make anything worth looking at if you don't know how to use the program
Anonymous
8/23/2025, 10:20:02 AM
No.1017390
[Report]
>>1017385
>>1017389
This is why Blender must be killed. It was a mistake poisoning the world with it. I wish we could go back to the early 2000s max/maya times and stay there.
Anonymous
8/23/2025, 11:00:32 AM
No.1017392
[Report]
>>1017394
>>1017397
Any post could be bait made by the blender schizo, what a sad state of affairs
Anonymous
8/23/2025, 1:20:19 PM
No.1017393
[Report]
>>1017384
Just do whatever you want to do and ask chatgpt if you don't know something. Courses are something you shouldn't do until you really want and really understand why you want it.
Anonymous
8/23/2025, 1:38:26 PM
No.1017394
[Report]
>>1017392
>being this buckbroken
Anonymous
8/23/2025, 2:27:36 PM
No.1017397
[Report]
>>1017392
The worst part is he genuinely believes every word of his own bait.
Anonymous
8/23/2025, 3:12:22 PM
No.1017400
[Report]
>>1017384
I'd just jump in and try to do what you want, and when you cant figure something out look it up. Force yourself to use the hotkeys, it helps a lot later. Once you're actually making some hot garbage you can start learning weird new stuff you didn't know was possible and actually be able to follow along at a decent speed. This guy called CGMatter/Default Cube has a big back catalog of cool and useful things to learn once you have the basics down.
Gingee
8/24/2025, 12:36:57 AM
No.1017421
[Report]
>>1017422
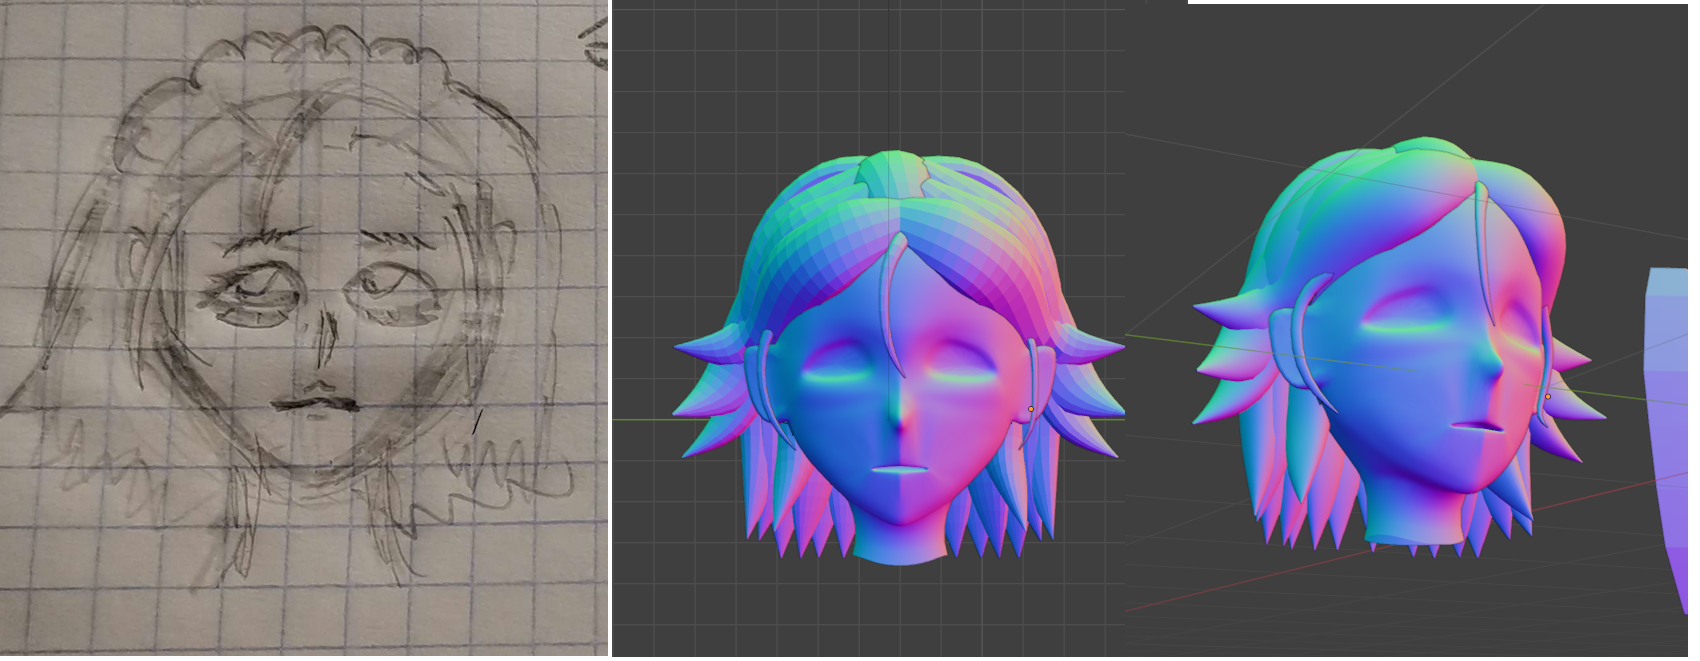
Update, i'm sure should make her more like tpose. What are those lines on her back, belly and arms? Also does there Is a easier way for retopology of round subsurfaces?
Anonymous
8/24/2025, 1:00:38 AM
No.1017422
[Report]
>>1017423
>>1017421
my guess is the normals are flipped the wrong way. If you're in edit mode you can select all and hit alt+N shift+N which will open the normals menu then recalculate outside. Pic related if you're ever curious if your normals are facing the right way amd the statistics button in there is useful too. As for retopology there's a million ways to do it yourself and that paid quad remesh addon is the easiest "make my geometry better" button available. It's not perfect though and for character modelling you'll probably always need to do a bit of topology cleanup for animation ready deform capability
Gingee
8/24/2025, 1:50:28 AM
No.1017423
[Report]
>>1017422
>alt+N shift+N which will open the normals menu then recalculate outside
Yeah, that worked. Thanks
Anonymous
8/25/2025, 11:28:23 PM
No.1017545
[Report]
I could really use a curve brush like they have in Zbrush
Anonymous
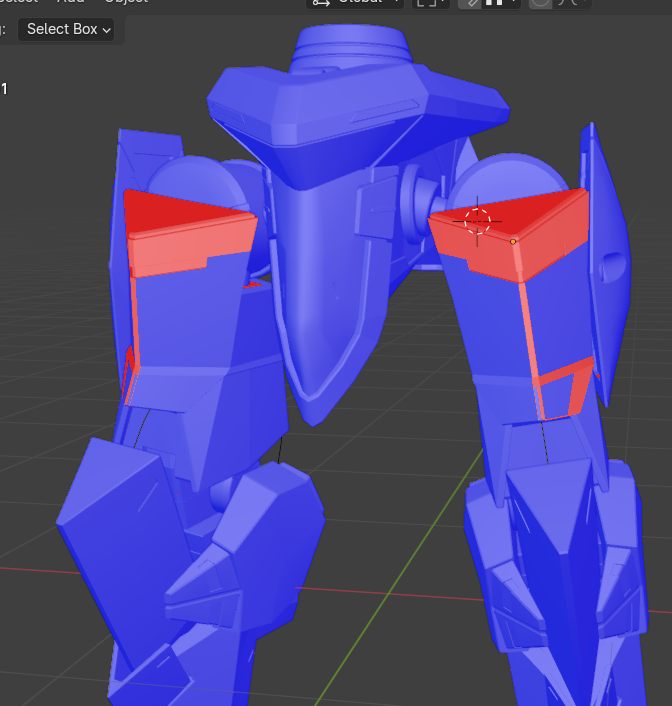
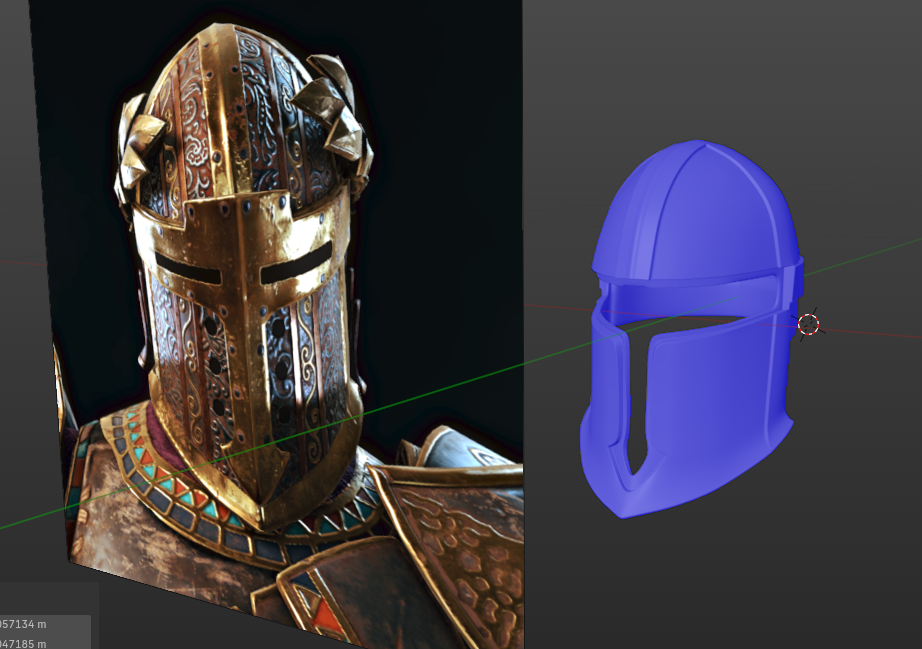
8/25/2025, 11:35:13 PM
No.1017546
[Report]
>>1017547
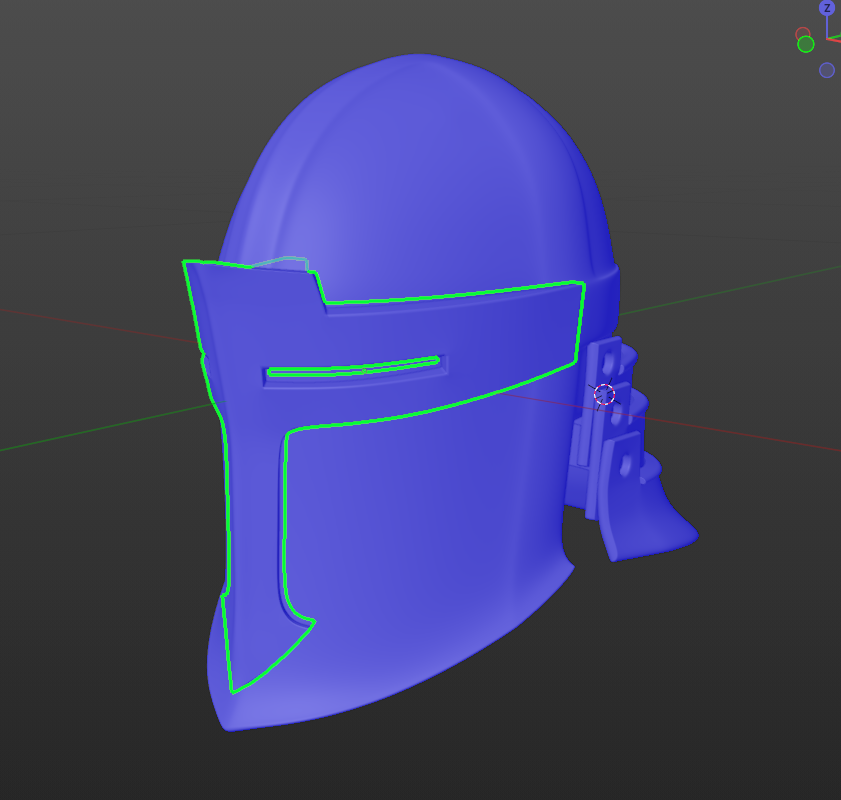
>>1017900
How would go about making an imprint of the selected part into the helmet?
I want to 3D print this so I have to make a pocket for the visor to fit.
the meshes of course dont fit and I really dont want to fit together every single edge by hand
a boolean is just so messy
Anonymous
8/26/2025, 12:10:31 AM
No.1017547
[Report]
>>1017566
>>1017546
I would use a boolean with the visor duplicated, solidify modifier 0.1mm or 0.2mm (depending on your printer) 1 offset rim only
The new manifold solver should work well
What are some good "exercises" I can do for sculpting and animating? I was planning on doing a head i day if i can, but i struggle to find guides on animation like i do hard surface/sculpting.
Anonymous
8/26/2025, 4:57:53 AM
No.1017558
[Report]
>>1017557
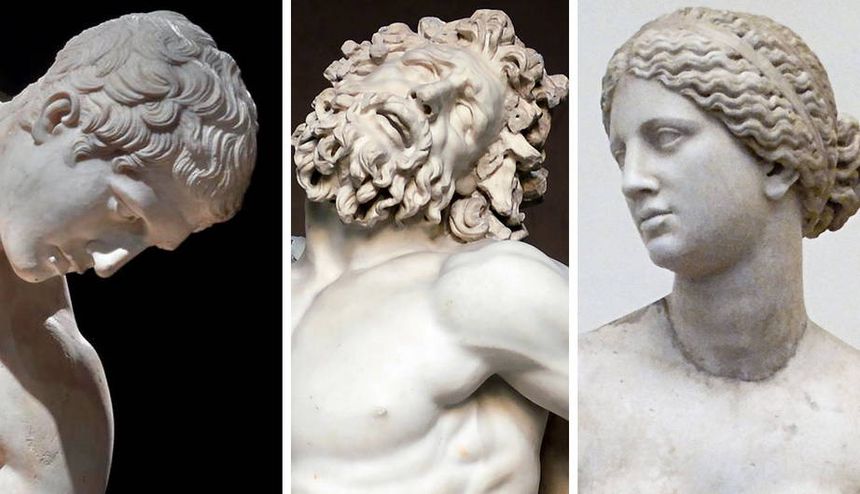
Mindset.
Imagine you're carving stone instead of endlessly and instantly pliable shapes of magic, imaginative matter.
Greek sculptures could take up to a year to make.
The technology distorts your sense of time and achievement.
Anonymous
8/26/2025, 5:30:19 AM
No.1017560
[Report]
>>1017707
>>1017557
figure drawing, gesture drawing
it's all drawing
Anonymous
8/26/2025, 8:19:47 AM
No.1017566
[Report]
>>1017569
>>1017547
will the mesh on the helmet part be fucked? I still have to add a bunch of detail afterwards
Anonymous
8/26/2025, 9:29:36 AM
No.1017569
[Report]
>>1017572
>>1017566
The topology will be fucked and you won't have good edge, so you will want to do that at the end before exporting
Anonymous
8/26/2025, 10:03:11 AM
No.1017572
[Report]
>>1017573
>>1017569
one of my ideas was to just do the entire helmet, then use a boolean and remesh and hope for the best
the problem with that was that to get a good looking model out of that, you need to subdivide it so much the file ends up being so large it fucks with the slicer
Anonymous
8/26/2025, 10:10:26 AM
No.1017573
[Report]
>>1017578
>>1017572
Is your shading set to flat? You never want to shade smooth for 3D printing, your model could be bad looking right now and you wouldn't know it
The output of Boolean operations is fine for 3D printing as long as it's manifold and the edges are not paperthin
You shouldn't have to remesh something this simple unless you're a fuckup and your helmet is non-manifold already
Anonymous
8/26/2025, 11:11:28 AM
No.1017578
[Report]
>>1017582
>>1017573
I never shade smooth no.
I did a couple of helmets already but never did an inset like this
Anonymous
8/26/2025, 3:05:32 PM
No.1017582
[Report]
>>1017578
Then I'll shade smooth your little bussy with my BWC until it's sore and aching from the stretch
ok, somehow made it work, it was a really roundabout way but we got it done
Anonymous
8/26/2025, 7:15:18 PM
No.1017594
[Report]
Making my first human model. Fucked up the topology but it's gonna be cellshaded so its okay-ish
Help me out guys. I'm nearing the end of my first project and I'm getting ready to release it on my youtube channel (probably still going to take at least a week). Its going to be pretty primitive, but I think this is a good staging point to go from just being a gameplay youtube guy to signaling my intent to trickle in 3d cg content.
I've never been into the whole art thing, let alone social media presence. So I'm not sure how to go about this. Is it worth creating a twitter so I can post things like renders taken from my existing content, and maybe upload some simple videos of workbench renders to show my raws? Do people add tagged signatures for simple things like this?
Anonymous
8/26/2025, 9:42:07 PM
No.1017605
[Report]
>>1017607
>>1017601
>Is it worth creating a twitter so I can post things like renders taken from my existing content,
I personally am planning to do that eventually. If you have some eye-catching frames that don't spoil much no damage in posting it in advance. Though I wouldn't add signatures to that, it would seem like you're trying to push your "brand" way too hard when your artist name is already on top of the xitter post.
Anonymous
8/26/2025, 9:57:11 PM
No.1017606
[Report]
>>1017607
>>1017601
I just use twitter as my personal blog, I think it's a waste of time trying to play the social media game when you have no followers
Unironically post on reddit, some anons are pretty well received there, like
>>1014066
Anonymous
8/26/2025, 10:19:16 PM
No.1017607
[Report]
>>1017605
>Though I wouldn't add signatures to that, it would seem like you're trying to push your "brand" way too hard when your artist name is already on top of the xitter post.
Actually less work for me so that sounds good. I just want to do this right so I dont look like a moron.
>>1017606
I'm never socially available, even on my youtube. I think its really bad to do casual chatter outside of game relevant questions. I'll probably treat my twitter as a way for my viewers to see my gallery kind of like they would a deviantart page (not that I ever had one).
Anonymous
8/27/2025, 12:09:39 AM
No.1017609
[Report]
>>1017632
Trying to make a procedural branching path, like tree roots on a plane, but Im not really sure how to go about that because I want to animate a glow coming out smoothly from the center. Feel like this might be textbook geo nodes but I don't know how to use that shit at all.
Anonymous
8/27/2025, 12:53:39 AM
No.1017612
[Report]
Found a way to scan images with AI and stitch then in blender to do retopology over it.
Also can I post loli here?
Anonymous
8/27/2025, 1:55:16 PM
No.1017632
[Report]
>>1017609
How to approach such a task with geometry nodes, depends largely on how exactly you you want the paths to appear.
Say for example: it the root-like path follows the edges of the topology, then you might want to try the shortest path node. There's a node that automatically transforms paths to to curves.(I forget what it's called) And with the curves, you can transform them into meshes. using the path to mesh node, and plugging in a circle curve as the profile curve.
Anonymous
8/27/2025, 2:19:06 PM
No.1017634
[Report]
>>1017645
why does eevee next suck so bad at transparent materials? glass looks like shit
Anonymous
8/27/2025, 6:29:47 PM
No.1017645
[Report]
>>1017646
>>1017634
Real time renderer
Anonymous
8/27/2025, 6:38:51 PM
No.1017646
[Report]
>>1017649
>>1017645
yeah but old eevee looks better. eevee next fucking sucks
Anonymous
8/27/2025, 6:51:03 PM
No.1017649
[Report]
>>1017646
That's copium, old eevee glass still looked like shit
Anonymous
8/28/2025, 12:21:15 PM
No.1017694
[Report]
>>1017697
something neat you can do are procedural displacement maps with vertex colors mask and therefore texture blending
unfortunately I'm too much of a brainlet to make interesting procedural textures
Anonymous
8/28/2025, 1:31:11 PM
No.1017697
[Report]
>>1017700
>>1017694
I'm confused. Why would you do this in geometry nodes and not shader nodes?
Anonymous
8/28/2025, 1:45:51 PM
No.1017700
[Report]
>>1017697
Sculpting, actual geometry
Anonymous
8/28/2025, 5:43:43 PM
No.1017707
[Report]
>>1017724
>>1017560
Ive been spending an hour or so at the end of every night to practice my 2D art skills, in hopes that I could translate it to a character sheet or something to sculpt some day. Its quite hard, but ive been seeing improvement. Im glad to know it has a applicable use to sculpting i wasnt sure if I was wasting time.
Anonymous
8/29/2025, 7:26:16 AM
No.1017724
[Report]
>>1017707
I think that other anon is exaggerating but I also do think that drawing is the best way to study objects before sculpting them
Anonymous
8/29/2025, 7:55:40 AM
No.1017725
[Report]
>>1017290
>>1017294
honestly, I checked out his channel and all of the NSFW learning content he had and none of the end products in the video tutorials looked impressive. people are either using other resources or figured it out on their own (by people I'm referring to the porn nigs out there who deliver decent animations and renders)
I rigged a car, that has like 400 objects and dozens of collections in one file, and I have a track with lots of objects and collections as well. How the FUCK do I move the car to the track file, without losing my collections organization?? Copy and paste and append don't retain collections
Anonymous
8/29/2025, 3:29:46 PM
No.1017740
[Report]
>>1017745
>>1017737
append does retain collections, are you appending whatever your top most collection is?
Anonymous
8/29/2025, 3:48:41 PM
No.1017745
[Report]
>>1017740
You're correct, my bad, I thought appending collections didn't append the objects and other collections inside but it does work
Anonymous
8/31/2025, 7:27:03 PM
No.1017866
[Report]
>>1017897
I'm so tired I accidentally instanced objects on faces using the old fashioned way
Like them or not, you can't deny that geometry nodes make a lot more sense than the old systems
Anonymous
9/1/2025, 3:19:24 AM
No.1017894
[Report]
Best resource to learn how the shader editor works?
Anonymous
9/1/2025, 5:37:49 AM
No.1017897
[Report]
>>1017916
>>1017866
truth
i wish they'd hurry up and make vertex groups into attributes
Anonymous
9/1/2025, 7:52:19 AM
No.1017900
[Report]
>>1017906
>>1017593
>>1017546
its starting to look good
Anonymous
9/1/2025, 11:02:09 AM
No.1017906
[Report]
>>1017907
>>1017900
that's a weird combination of patterns but I don't know much about helmets, looking good
do you enjoy your front faces being blue? if not you can change that in your preferences by setting the alpha to 0
Anonymous
9/1/2025, 11:44:43 AM
No.1017907
[Report]
>>1017906
im going off a reference
>>1017593
I couldnt be bothered to make the pattern by hand, so I just ran a screenshot of it trough inkscape to get the vectors and used that. shit will get sanded primed and painted anyways so it should look alright when its printed.
Never had an issue with the faces being blue honestly
Anonymous
9/1/2025, 12:51:33 PM
No.1017908
[Report]
>>1017737
Organize your collections so that there is a topmost collection that contains all the necessary coloections and objects, then append or link that
Anonymous
9/1/2025, 1:05:10 PM
No.1017911
[Report]
Sculpting performance is pretty great in current version, I can't complain
My project has 125 million triangles, I usually have 75 millions visible when working and the heaviest object is 35 millions
Yup, not much lag when sculpting, no crash unless I make a mistake, life is good
(Linux/RTX 4070 Super/i5-14400F)
Anonymous
9/1/2025, 4:57:46 PM
No.1017916
[Report]
>>1017940
Anonymous
9/2/2025, 2:15:02 AM
No.1017930
[Report]
>>1017931
I have this ring i am trying to fix up, i need to to increase the width and thickness of the back of the ring band without affecting or altering the ring crown, i tried bisecting and then just scaling the bissected part before reattaching but its kind of shitty.
Please blender anons im retarded.
Anonymous
9/2/2025, 2:23:52 AM
No.1017931
[Report]
>>1017932
>>1017930
Do you have a non decimated version of this?
Anonymous
9/2/2025, 2:28:31 AM
No.1017932
[Report]
>>1017933
>>1017931
no, i used a reference image made by an AI, fed that image to the gay nigger meshy website, then downloaded the model i liked the most.
it 3d prints out perfectly though.
Anonymous
9/2/2025, 2:31:22 AM
No.1017933
[Report]
>>1017934
>>1017932
actually maybe i could just use a cylinder and then make it wonky to perfectly match the inside of the band and then combine them into one mesh? and then i can scale up and down however i want and just boolean cut the ring hole size i want whenever.
Anonymous
9/2/2025, 2:52:37 AM
No.1017934
[Report]
>>1017936
>>1017933
PROBLEM LOOKS TO BE SELF SOLVED BOYS GG NO RE EZPZ.
Anonymous
9/2/2025, 3:16:42 AM
No.1017936
[Report]
>>1017934
that shit worked perfectly now i can scale the ring up and down and still cut the perfect ring size. I might have to do some sculpting or whatever on the edge but meh.
Anonymous
9/2/2025, 6:27:46 AM
No.1017940
[Report]
Anonymous
9/2/2025, 4:00:29 PM
No.1017950
[Report]
i like cycles. i think it's decent renderer.
but there's something very wrong with the subsurface scattering. for most things this isn't a big deal, but for photoreal skin it just feels broken.
i can take a vface head into most other renderers and get reasonable results. with cycles you think you've fixed it under a certain lighting condition and and then you move the lights or use a different hdri and it looks completely wrong.
Anonymous
9/2/2025, 4:06:49 PM
No.1017951
[Report]
>>1018031
How do I texture scroll an eye so it can point in different directions?
Anonymous
9/4/2025, 9:12:49 AM
No.1018026
[Report]
Does anyone use V-Ray for Blender? Is it any good?
I want to try it but can't find the specs requirement. I think my 1060 and Ryzen 5 5600 are too old for it.
Anonymous
9/4/2025, 10:19:19 AM
No.1018027
[Report]
>>1018030
I hate that no one ever gets any replies here
Anonymous
9/4/2025, 11:08:43 AM
No.1018030
[Report]
>>1018027
I think no answer is better than no answer
>I haven't rendered a scene in 3 years, and even back then I never touched the subsurface settings
>I don't feel like explaining UV animations, especially when I'm no expert
>the fuck is V-Ray
I think that if you're serious about needing help you should try the subreddits or the discord, half of the users don't know what they're talking about but at least they're active
The forums are probably the best place, but I'm under 40
Anonymous
9/4/2025, 11:31:04 AM
No.1018031
[Report]
>>1017951
Make a vertex group per eye, then use the UV warp modifier, one for each eye, set to the eye group and uv layer. Then you can drive the modifier's parameters with drivers from a bone for max comfort
Anonymous
9/4/2025, 11:34:59 AM
No.1018032
[Report]
>>1018035
any tips on doing effects like this? the guy said something about proximity modifiers in blender but how do you use that to generate loops for things like whirlpools?
https://x.com/chiba_akihito/status/1438473810756313090
>>1018032
i'm mostly a houdinifag and there's a lot of different stuff going on in that video but:
the looping stuff is mostly unrelated to the proximity
some of the things happening there are just looping shader shenanigans like:
https://bsky.app/profile/cmzw.bsky.social/post/3lx5sdzyxfk23
game vfx people tend to do stuff like this all the time
some volume meshing stuff going on i think, but yeah there's like 20 different things happening here.
re: the proximity, blender has a nice geo proximity node that'll give you a distance value - what's going on here is that distance value (probably remapped into a 0 to 1 range for control) is driving parameters on the rest of the set up
here's a basic mography example of how you can use distance to drive things:
https://www.youtube.com/watch?v=XytiZObyYAA
Anonymous
9/4/2025, 12:16:51 PM
No.1018036
[Report]
>>1018035
damn that's a nice overview, i appreciate it.
Anonymous
9/4/2025, 12:42:29 PM
No.1018037
[Report]
>>1018035
>https://www.youtube.com/watch?v=XytiZObyYAA
it's pretty corpo-looking but that guy's videos are a good tool for understanding geo node logic, it helped me the last time I tried learning geo nodes
Anonymous
9/4/2025, 1:07:36 PM
No.1018040
[Report]
I need help joining two things in blender so that I can print them as one
What I've done so far is maneuver one of the objects so that it is connected to the other object like so and then pressed ctrl-j
One object is the hand and the other object ends at the sleeve
What do I need to do now to ensure that it will print together?
I'm kinda blown away by how fast Lumen (UE5) is compared to Cycles, like even with Path Tracing on it's insanely fast and basically looks just as good
Are there any Blender>UE workflows where I can do all my animation/cinematics in Blender then just port to Unreal for rendering?
It's a game engine so I suppose bake anim > apply all modifiers > export scene as fbx?
Anonymous
9/5/2025, 12:46:45 PM
No.1018096
[Report]
>>1018086
You could try looking into the USD format, it's a scene format and I believe both Blender and Unreal support it
Anonymous
9/5/2025, 9:24:59 PM
No.1018139
[Report]
>>1018086
>It's a game engine so I suppose bake anim > apply all modifiers > export scene as fbx?
this should work yeah, i've been tempted to try it myself
Anonymous
9/11/2025, 9:13:03 AM
No.1018439
[Report]
>>1018464
>proper aces 2.0 support
Finally the agx meme will be dead
Random dipshit completely btfo by academy
Should've stuck with aces the whole time instead of supporting these meme transforms
Anonymous
9/11/2025, 3:23:53 PM
No.1018451
[Report]
>>1018452
>>1016084 (OP)
trying to get a mike mignola type simple color/black shadow shader but preserving some of the metallic/roughness properties, is there a way to isolate those without having to plug the entire bsdf into mix shader?
Anonymous
9/11/2025, 3:40:30 PM
No.1018452
[Report]
>>1018453
>>1018451
Use the diffuse bsdf and glossy bsdf nodes
Anonymous
9/11/2025, 3:52:56 PM
No.1018453
[Report]
>>1018452
Exactly what I have been looking for, thank you!
Anonymous
9/11/2025, 8:08:55 PM
No.1018464
[Report]
>>1018474
>>1018439
Linear color picker is a nice addition
>Finally the agx meme will be dead
Agx isn't going away. It used Rec.709 as the scene referred color space before and now you'll get better results by using ACEScg in the Working Space. It still has an appealing look when used as View Transform.
Anonymous
9/11/2025, 11:53:04 PM
No.1018474
[Report]
>>1018480
>>1018464
No reason to choose it over the aces 2.0 srgb/rec709 odts. It continues to be under saturated and under contrasty despite the switch to a wider rendering space.
Aces should be the default. USD should be fully adopted. Open PBR should be fully supported. Enough of this special snowflake shit, it's time to realise that the industry is embracing open standards and the professionals who set those standards know what they're doing.
Anonymous
9/12/2025, 1:23:16 AM
No.1018477
[Report]
>>1018492
is there anything wrong with using dyntopo all the way through a sculpt, using the constant detail setting? I find it more intuitive than the remesh workflow
also any idea what might cause this kind of error on a sculpt? it's on shade smooth, tried the dyntopo detail flood fill, smoothing brush obviously, slide relax, rebuild BVH, nothing worked. the wireframe itself doesn't look weird and the face orientation is correct
Anonymous
9/12/2025, 2:22:19 AM
No.1018480
[Report]
>>1018497
>>1018474
ACES as a display is a meme the industry doesn't like either but is required for box-checking. It's used as an interchange format while colorists and compositors uses other things in the pipelines. There's countless threads online of people fighting against it.
The guy here lists some corrections of a talk he gave, he was corrected into acknowledging that colorists and compositors AREN'T using ACES. They use their own methods, Agx and even Filmic will still have their place.
https://chrisbrejon.com/articles/ocio-display-transforms-and-misconceptions/ - ACES Looking Better
https://community.acescentral.com/t/display-transform-based-on-jzazbz-lms/4008
There's an ACES look that is not always desirable and can't be compensated for. When overexposed, the colors shift: blue to magenta, red to orange, green to yellow.
Anonymous
9/12/2025, 10:49:37 AM
No.1018492
[Report]
>>1018477
I don't know what would cause this error but turn off smooth shading when sculpting, it gives you the wrong impression of what your mesh looks like
Your computer might not handle dyntopo at a higher polycount, it hasn't been optimized along the years
Dyntopo artefacts are noticeable
You're more likely to create a non-manifold mesh, it doesn't automatically combine objects when you join them
Keep experimenting, but I gave up on dyntopo, I don't really need it
Anonymous
9/12/2025, 1:24:16 PM
No.1018497
[Report]
>>1018519
>>1018480
color shift issue has been largely fixed in 2.0 without the retarded compromises that AGX made. it was mostly a non-issue by 1.3 which added parametric gamut compression controls.
you're linking to years old discussions. that brejob guide was written when aces was 1.0 iirc.
sorry, but it turns out you can just rely on dozens of professional doing a better job than jumping on someone's hobby project.
Anonymous
9/12/2025, 10:04:08 PM
No.1018519
[Report]
>>1018497
They tried reworking things in drafts multiple times but 2 still doesn't fix all the issues
Anonymous
9/12/2025, 11:24:20 PM
No.1018526
[Report]
>>1018532
>>1018537
Requesting someone backport this to v2.92
https://files.catbox.moe/ytm4li.blend
Anonymous
9/13/2025, 3:58:31 AM
No.1018532
[Report]
>>1018533
>>1018526
Upgrade windows
Anonymous
9/13/2025, 4:21:25 AM
No.1018533
[Report]
>>1018538
>>1018532
I guarantee you the moment I upgrade to Windows 10/11 my screen tablet is going to be reduced to a slightly wider monitor
Anonymous
9/13/2025, 7:31:06 AM
No.1018537
[Report]
>>1018526
>v2.92
stop living in the past.
Anonymous
9/13/2025, 8:12:22 AM
No.1018538
[Report]
>>1018554
>>1018533
if it's really about windows there's builds up to 4.3.0 at
https://github.com/nalexandru/BlenderCompat
Anonymous
9/13/2025, 5:26:40 PM
No.1018554
[Report]
Anonymous
9/13/2025, 8:50:56 PM
No.1018569
[Report]
A bit off topic but!
>ripping stuff from an old ass game
>trying to mod said ripped goodies into another old ass game
>ripped assets have a similar polycount to the vanilla assets
>export.png
>file size is like 25% bigger than it should be
>can't get my shit into the game due to size constraints
>fuck
What's happening here? What exactly determines a 3D model file size if not number of vertices, edges, tris and faces?
What can be done?
Anonymous
9/14/2025, 12:59:43 AM
No.1018581
[Report]
>>1018597
>>1016084 (OP)
How long would it take to learn Blender's basics and be decent at motion graphics and vfx as someone coming from Maya? I also learn fast thoughtbeit
Anonymous
9/14/2025, 5:41:14 AM
No.1018587
[Report]
>>1018592
I want to pose and animate some characters. However, when I tried to open a model I downloaded from SmutBase, my computer almost crashed. It was probably too much for my poor PC. For this reason, I decided to download an SFM model and import it into Blender using an add-on. Everything looked fine except for the armature. From what I've read online, I need to remove the existing armature and create a new one with Rigify. I've been following a tutorial on the subject, but I must admit that it's quite complicated, especially when positioning the face bones. I have to do this with every model I download.
Is this truly the only solution, or am I unaware of another way to solve this problem?
Anonymous
9/14/2025, 9:36:02 AM
No.1018592
[Report]
>>1018602
>>1018587
you probably don't have enough vram for the blender model you downloaded. you could try resizing all the textures before opening the file or, if you can get it to open in solid shading mode (i.e. the materials aren't loaded into vram yet) you could turn on simplify in the render properties and limit the texture size and subdivisions
converting sfm models to blender and making a new rig every time would be annoying as fuck
Gingee
9/14/2025, 1:00:43 PM
No.1018596
[Report]
>>1018605
I gonna remake my girl from scratch
Anonymous
9/14/2025, 1:27:44 PM
No.1018597
[Report]
>>1018581
If you already know how to do motion graphics and vfx then 6 months, I'd say
Anonymous
9/14/2025, 2:33:50 PM
No.1018602
[Report]
>>1018604
>>1018592
Now that you mention it, I did give up as soon as I saw that the model was too much for my PC. I'll try to find a way to open those files without causing my computer to explode. If I can't find a solution, then I'll have to learn how to properly use Rigify.
Thank you, anon.
Anonymous
9/14/2025, 2:50:06 PM
No.1018604
[Report]
>>1018602
try other models too. some people make extremely unoptimized models which run like shit and eat up vram like crazy
Gingee
9/14/2025, 3:04:04 PM
No.1018605
[Report]
Anonymous
9/14/2025, 4:17:12 PM
No.1018608
[Report]
>>1018612
any idea where or how I can get zbrush's matcaps in blender?
this guy is using one that looks like BasicMaterial2 or BumpViewerMat in zbrush
I'd have thought this would've been done already somewhere but it doesn't look like it
Anonymous
9/14/2025, 5:17:51 PM
No.1018612
[Report]
>>1018621
>>1018608
Armored Colony has some matcaps as part of his toolkit
https://github.com/ArmoredColony/ARMORED-Toolkit
you can also make your own matcaps by modifying the default ones, they're in appdata roaming for blender, /datafiles/studiolights/matcap
but zbrush uses a proprietary format for their matcaps so you can't just use them
how do i get good at posing
Anonymous
9/14/2025, 7:31:19 PM
No.1018618
[Report]
>>1018615
Pose every day, if you don't know what poses to do go to the reference thread on /ic/, a lot of the packs have the same poses from different angles >>>/ic/7725026
I also look at anime figure retailers for poses
Anonymous
9/14/2025, 9:15:23 PM
No.1018620
[Report]
What plug-in or tool do I use to make bones move according to the angle of the camera relative to the armature?
Anonymous
9/14/2025, 9:37:55 PM
No.1018621
[Report]
>>1018612
I figured it out in the end. got zbrush on the high seas and extracted the matcaps as tiff files, then saved as png and autistically made sure that they matched how they look in zbrush by comparing the raw tiff, the saved png, the tiff opened in blender and the preview of the matcap in zbrush. the only one it didn't work with is Blinn
not sure if it's wise to sculpt with these darker ones though, likely not
first pic is the default blender grey
Anonymous
9/14/2025, 9:40:37 PM
No.1018623
[Report]
>>1018651
>>1017111
Sell on Blender Market or CGTrader
Anonymous
9/15/2025, 7:31:31 AM
No.1018642
[Report]
>>1018615
use a reference photo
if you're doing hand or arm stuff use your own hands and arms and see if the position is comfortable
Anonymous
9/15/2025, 2:37:00 PM
No.1018649
[Report]
>>1019673
Anonymous
9/15/2025, 2:54:00 PM
No.1018651
[Report]
>>1018623
I'm not looking to sell, I want to make my stuff easier to reuse and share it for free
Things used to be free, now everyone is grown up and trying to make some bucks
Anonymous
9/15/2025, 4:44:26 PM
No.1018655
[Report]
>>1018658
why is there no option for soft clip? who the hell wants their objects to pop in instantly
Anonymous
9/15/2025, 6:36:14 PM
No.1018657
[Report]
>>1018658
Anonymous
9/15/2025, 7:02:11 PM
No.1018658
[Report]
>>1018659
>>1018655
that's a good question, and it never shocked me before
probably because good renders use volumetrics to create distance
>>1018657
>2024
Anonymous
9/15/2025, 7:14:01 PM
No.1018659
[Report]
>>1018660
Anonymous
9/15/2025, 7:25:41 PM
No.1018660
[Report]
>>1018659
I know, it's not your fault.
Anonymous
9/16/2025, 12:17:37 AM
No.1018673
[Report]
>>1018679
>using godot
>want to generate a mesh from the vertices that are on the silhouette of the mesh when viewed through an orthogonal camera
>"surely this will be easy"
>twelve hours later, forced to conclude it's impossible
>"okay but maybe I can bake the outline in blender and import it"
>twelve hours later
>get close, but fundamental issues with normal calculation in blender geometry nodes make it impossible
I hate open source software
Why is it that every time I have a use case and I think it's relatively simple, it is completely impossible to do that thing? I just want to make an outline. I don't care if it's expensive, let me worry about that, just let me fucking do it.
Anonymous
9/16/2025, 2:11:57 AM
No.1018679
[Report]
Gingee
9/16/2025, 3:13:32 AM
No.1018682
[Report]
Retopology time
I wish there is a way to mark selected face loops to not be subdivided by the subdivision modifier
Anonymous
9/16/2025, 4:26:39 PM
No.1018709
[Report]
>>1018718
bros i think i'm doing it..
Anonymous
9/16/2025, 7:28:54 PM
No.1018718
[Report]
>>1018709
He's starting to believe
Anonymous
9/17/2025, 12:51:50 AM
No.1018726
[Report]
>>1018730
>>1018733
How can I keep the exact shape of this model but have more vertices for vertex color?
Anonymous
9/17/2025, 1:34:43 AM
No.1018730
[Report]
>>1018734
>>1018726
uhh...chop it up with the knife? idk that's some interesting topology
Anonymous
9/17/2025, 1:58:17 AM
No.1018733
[Report]
>>1018734
>>1018726
Subdivide simple? How many more vertices do you need?
Anonymous
9/17/2025, 2:03:50 AM
No.1018734
[Report]
>>1018736
>>1018730
>>1018733
Uhh i dont even fucking know im retarded. I think im just going to not use vertex colors.
Anonymous
9/17/2025, 2:46:23 AM
No.1018736
[Report]
>>1018734
Just learn to texture. Don't try to shortcut it with vertex color. Vertex colors merely *enhance* the color/lighting of a model.
You can try and make you r model dense with vertices, and paint it that way. But then you defeat the entire advantage of the low poly style, which is the high performance. Plus, you can never have enough vertices to get fine detail. Like it appears you're making a centaur. You'll never be able to pack in enough vertices to paint the fur of the horse body. You have to texture it anyway.
Vertex colors is good for things like faking ambient occlusion. Or faking lighting effects.
Anonymous
9/17/2025, 9:54:11 AM
No.1018760
[Report]
Pray for me Anons, I'm about to spend another sleepless night.
Anonymous
9/17/2025, 5:16:45 PM
No.1018771
[Report]
>>1018781
I want to try animating
Where do people go to get blender models?
Like in general, I know of Smutbase, and some people sell stuff on Itch and Gumroad, but I dont know how to actually search for them unless I know the artist beforehand
But where would I go to get a solid made model to learn with?
what exactly is the use case for multires?
I'm going through the sculpting course on CG Boost and afaik you create a base mesh using dyntopo and/or the voxel remesher, then use something like Quad Remesher to create a base to apply the multires on so that you can polish and add in high frequency details
thing is, with multires it lags to fuck and sometimes the brushes don't behave as expected, like draw sharp being all jittery and seemingly having a mind of its own
I'm using the sculpt base mesh option and made sure the scale and everything is applied beforehand
the only thing it seems to do is make the mesh very smooth and clean since it's all quad-based, but the lag is unbearable
Anonymous
9/17/2025, 9:08:18 PM
No.1018781
[Report]
>>1018782
>>1018771
You can try using the blender studio's models to learn, they're not spicy but they have good rigs
https://studio.blender.org/characters/
>>1018774
That's weird, multires is supposed to be less laggy, what version are you using?
The main advantage of multires is that you can sculpt the mesh in a very high poly state or in a low/medium poly state depending on the level of details you're working for
You can also use an armature on an object with multires, since it has a lower poly base mesh
Anonymous
9/17/2025, 9:12:35 PM
No.1018782
[Report]
>>1018783
>>1018781
4.4. yeah it's odd because I can go to 3 million tris without it shitting itself when doing regular sculpting, but multires is fucked
I can try to sculpt the high detail at the lower sculpt levels, but that seems counterintuitive
Anonymous
9/17/2025, 9:19:31 PM
No.1018783
[Report]
>>1018782
Something's wrong and I don't know what, I've heard that multires can be laggy if the base mesh is too low poly but I don't think it's that
Anonymous
9/17/2025, 10:17:39 PM
No.1018786
[Report]
>>1018812
Anonymous
9/17/2025, 10:45:40 PM
No.1018793
[Report]
>>1018847
>>1018774
This is the best explanation I've seen of it. Separable detail layers so you can adjust high, medium, and low detail without completely trashing the mesh for subsequent changes.
https://youtu.be/hjIVKNyU-R8?t=178
I think it's partly an older workaround for sculpting before all the various performance improvements were added.
It has some niche use cases but I think most people would recommend remesh today. Dyntopo has the advantage over remesh mainly for adding new geometry.
A common workflow is dyntopo with constant detail (and bump up the resolution) to block in the form, then swap to remesh workflow to add in the detail. I don't see multires recommended as the primary way to sculpt anymore.
Anonymous
9/18/2025, 2:08:24 AM
No.1018810
[Report]
>>1018774
I'm not entirely sure. But I think multires is used for people who have a mesh that they're happy with. They don't want to remesh, they want to keep their lower level mesh, while being able to work on detail that requires a higher density.
I haven't played with multires much myself. Just a few times to test it out. But I'm pretty sure it has more utility after you've settled on a base mesh, and you don't plan on changing it. So after retopology is complete.
Anonymous
9/18/2025, 3:18:52 AM
No.1018812
[Report]
>>1018786
Refactorfags like Pablo must be celebrating the fuck right now.
Anonymous
9/18/2025, 5:13:30 AM
No.1018818
[Report]
>>1018685
crease will prevent edges from looking subdivided, but the subdivision is still calculated
there were some "local subdivision" geometry node setups on stackexchange last time i looked, which was a couple of versions ago
Anonymous
9/18/2025, 7:32:15 AM
No.1018824
[Report]
>>1018685
You can mark crease as 1.0 for those loops, apply the subd modifier, then clear the crease. I use this when I need to add detail but maintain the shape, usually only 1 or 2 subdivision levels as I'm modeling.
Anonymous
9/18/2025, 2:20:54 PM
No.1018847
[Report]
>>1018869
>>1018793
>It has some niche use cases but I think most people would recommend remesh today
Uh, no, multires is the de facto sculpting workflow in most sculpting softwares, the blender implementation isn't good enough yet but it will catch up eventually
Anonymous
9/18/2025, 11:25:22 PM
No.1018869
[Report]
>>1018886
>>1018847
This is a blender thread. I was talking about blender
Anonymous
9/19/2025, 4:08:44 AM
No.1018877
[Report]
now that rosenthal is retiring from blender foundation will blender continue to be good or will it be taken over by the non-profit professional class like what happened to mozilla?
Anonymous
9/19/2025, 7:13:51 AM
No.1018886
[Report]
>>1018869
Sculpting is sculpting
Anonymous
9/19/2025, 11:25:32 AM
No.1018894
[Report]
>>1018896
>>1018897
Well so I have a very heavy detailed model I had to use remesh on and my laptop stopped working. How can I pose it now to make a mesh for a printable miniature?
Anonymous
9/19/2025, 12:05:01 PM
No.1018896
[Report]
>>1018894
just pirate zbrush
Anonymous
9/19/2025, 12:23:19 PM
No.1018897
[Report]
>>1018894
You want to copy it, decimate it, use quadremesher (or retopo if you got time for that), add a multires modifier, shrinkwrap to the original, add subdivision levels, apply shrinkwrap
After that you can add an armature modifer before the multires modifier or use the pose brush on a low subdivision level if the pose is simple enough
Anonymous
9/19/2025, 2:02:09 PM
No.1018900
[Report]
i hate dynamics i hate dynamics AAAAAAAAAHH
Anonymous
9/19/2025, 8:23:16 PM
No.1018917
[Report]
>when you're following a tutorial along and the guy gives an unusual amount of focus to perfecting the armpit
I can't prove it, but I know what I'm seeing. [spoiler]Although to be fair, I appreciate him also being a boob guy: "Here's how to get that sweet, slight overhang from big titties to convey just a hint of sag."[/spoiler]
https://coloso.global/en/products/2d3dartist-raultrevino-us
Anonymous
9/22/2025, 11:05:48 PM
No.1019091
[Report]
>>1019099
>>1019145
I haven't blended in years, I think they just swapped to the new UI was when I last used it. before I slowly start getting back into things, are there any must-have addons or settings that I need to have a better experience? I'm not talking about user preferences, I'm talking about things that factually make working easier/better
also why the are people talking about workflows, sure it matters to follow a certain path but you'll never follow the same route twice so ''following a workflow'' doesn't matter
Anonymous
9/23/2025, 2:01:21 AM
No.1019099
[Report]
>>1019133
>>1019091
I stopped around then too then picked it up recently.
looptools is still goated for circle, space, and relax. Curve is inanely useful and all of this guy's tuts are worth watching
https://youtu.be/goJ4LVHXkC4?t=75
Set Flow is the only other one I really use
short version -
https://youtu.be/nY4xTj_divk?t=6
longer -
https://youtu.be/rtWuvkbLFDw?t=9
>workflows
That's probably cris and he's a troll. There's also an anti-blender troll who shits up every thread mentioning wings3d, maya, or "industry standard" tools.
Anonymous
9/23/2025, 10:42:09 PM
No.1019133
[Report]
>>1019099
that's a neat plugin thanks, I meant more things like performance upgrades or some other wizardry magic. dunno how the system works now but back then there was a mandatory plugin for almost everything. maybe they've integrated a lot of (what should be) basic functionality
I really wonder what gets people to troll threads like these, how many mental illnesses must they have???
Anonymous
9/24/2025, 11:13:37 AM
No.1019145
[Report]
>>1019091
>are there any must-have addons or settings that I need to have a better experience?
There are a couple that are built-in but not enabled by default, let me go down the list of what I use
>Auto Mirror
>Bool Tool
>Copy Attributes Menu
>Extra Curve Objects
>Extra Mesh Objects
>F2
>Node Wrangler (might be enabled by default nowadays)
The ones above are a must-have regardless what you do, then there are a couple that can be useful depending on what you do
>3D Print Toolbox
>Curve Tools
>Grease Pencil Tools
3rd Party
>Mio3 UV
>Quad Remesher
I'm using a 3D into 2D sprite workflow
as far as I can tell, matcaps give me better results in less time compared to real-time lighting. left is rendered, right is matcap
the only catch is that I can only use one matcap at a time, so if something has metal armor for example, I can't have my regular matcap and metal simultaneously
is there a way around this?
the only way I can think of is doing two sets of renders, one for color and the other for metal, then manually overlaying the metal sections, like so, but this would be time consuming when making entire sprite sheets
Anonymous
9/29/2025, 1:06:03 PM
No.1019331
[Report]
>>1019369
>>1019309
I'm sure you can setup different matcaps materials, you just need to look up how to create a matcap with shader nodes
Anonymous
9/29/2025, 6:34:07 PM
No.1019342
[Report]
>>1019347
I could've swore ambientCG or CG Axis had some sort of blender add-on for built-in texturing and the like, so you can just drag and drop materials from the site without first having to download 12k PBR materials
does something like this exist? I swear I saw it not too long ago
even Bryce had this kinda shit
Anonymous
9/29/2025, 7:25:46 PM
No.1019347
[Report]
>>1019342
nvm found it, poly haven
Anonymous
9/29/2025, 11:13:35 PM
No.1019358
[Report]
Is there a realtime renderer like EEVEE that uses MSAA instead of TAA?
Anonymous
9/30/2025, 1:31:21 AM
No.1019369
[Report]
>>1019309
>>1019331
fuck it I think I figured it out, just a matter of learning how to actually set up lights
I'm pretty sure HDRI and a 3-point lighting setup is how most people render their stuff
Anonymous
10/1/2025, 4:01:26 AM
No.1019434
[Report]
>>1019439
is there no way to adjust the intensity / blur of shadows of HDRIs in Cycles?
I can easily do it in Eeevee by just tweaking the 'sun' angle in the World properties and it behaves exactly as I'd expect it to, but in Cycles I'm often left with these cartoony stencil shadows
even the actual HDRI image doesn't have shadows that harsh, yet their material preview image is harsh as fuck
Anonymous
10/1/2025, 7:53:31 AM
No.1019439
[Report]
>>1019434
you could blur the hdri image to soften the light source
you could also use a plane in the path of the light or a sphere over the whole scene with a translucency shader to make the light diffuse but i don't think there's a way to modify the strength of that in a nice falloff type way
Anonymous
10/3/2025, 1:04:10 PM
No.1019541
[Report]
>>1019542
Anything interesting?
https://developer.blender.org/docs/release_notes/5.0/
>There are six new Geometry Nodes based modifiers.
New array modifier, I did not expect that. Probably going to take a while to learn the parameters from those modifiers, but at least I don't have to make them myself.
>Radial symmetry settings are now stored on the mesh instead of as part of the scene,
About time.
Anonymous
10/3/2025, 1:12:30 PM
No.1019542
[Report]
Anonymous
10/4/2025, 12:52:11 PM
No.1019599
[Report]
>>1019601
>>1019659
>>1016084 (OP)
I have various animations for 1 character.
I need to give the same exact animations to several other characters.
How should I proceed?
Anonymous
10/4/2025, 1:41:32 PM
No.1019601
[Report]
>>1019607
>>1019599
first question: is this for blender or is it for a video game engine?
Anonymous
10/4/2025, 3:25:28 PM
No.1019607
[Report]
>>1019622
>>1019601
The idea was to make it in Blender, then export it to Godot
Anonymous
10/4/2025, 7:23:12 PM
No.1019622
[Report]
>>1019607
I don't know much about godot but usually you can reuse animations if they share the same armature type
just make sure you look up godot related tutorials, a lot of rig features don't export outside of blender and you usually need to bake the keyframes
Anonymous
10/5/2025, 9:09:35 AM
No.1019659
[Report]
Anonymous
10/5/2025, 12:35:33 PM
No.1019673
[Report]
>>1019681
Anonymous
10/5/2025, 3:19:16 PM
No.1019681
[Report]
>>1019673
That's nice, how did you do it before? Base color?
Anonymous
10/8/2025, 8:38:58 AM
No.1019818
[Report]
>>1019822
I figured out how to do a toon shader in UE but I'm having issues in Blender
The way it works in UE is that faces under a specific "light" value have their texture replaced with a "shadow" texture I made.. It gives me a lot more control over the model colors.
I haven't figured out how to setup the shader nodes in Blender to do that, if anyone has any examples I'd appreciate it
Anonymous
10/8/2025, 10:31:05 AM
No.1019822
[Report]
>>1019818
Okay so I used
PBDF > Shader to RGB > Seperate RGB > Red to > Math (Greater than x) > (factor of) Mix Color (2 textures) > EmissionBSDF > MatOutput
produced a decent 2-tone color but needed a lot of Subdivision to get it smooth. idk if this is the best setup. My first attempt was using ColorRamp node but it didn't work very well
Now I need to figure out a nice setup to add a terminator line and I'm golden
Anonymous
10/10/2025, 8:06:17 AM
No.1019920
[Report]
I just had a terrific idea for a geo node modifier, but then I remembered that multires doesn't support color attributes
Anonymous
10/10/2025, 6:31:12 PM
No.1019937
[Report]
Does anyone have any good UV/Texturing Blender tutorials they can recommend? I'm decent at animation, ok at hard surface modeling, but I wanna learn how to apply textures to shit instead of simply materials.
Anonymous
10/13/2025, 1:17:16 AM
No.1020051
[Report]
>>1020077
I'm upgrading from Blender 2.8, should I stick with 4.0? I tried 4.5, but for some reason my materials are all borked and it runs kind of weird.
Anonymous
10/13/2025, 2:00:30 AM
No.1020055
[Report]
when I go into camera view, it restricts my vision / render to what's inside the camera, but I want to capture the entire viewport
the obvious suggestion is View > Viewport Render Image, but that only renders whatever's inside the camera, and you can't do that in Cycles anyway
I want to render it as if Render passerpartout is turned off
basically, how do I make my camera exactly the same as what my extended viewport sees when in camera mode?
Ctrl + Alt + 0 isn't working in this case either, and I can't just leave camera mode and do it manually since the focal length and stuff isn't the same, so I just clip into the environment in free view
Anonymous
10/13/2025, 3:22:03 PM
No.1020077
[Report]
>>1020051
4.2 updated Eevee (Eevee Next), that's probably what's breaking your materials
I would tough it out and update to 4.5, stop living in the past
Anonymous
10/18/2025, 9:19:00 PM
No.1020445
[Report]
>>1020545
Hey, stupid question, but I'm trying to get the ends of this plane here to completely fade out. I don't want to see the square ends of the mesh. Any help?
Anonymous
10/20/2025, 2:51:36 AM
No.1020528
[Report]
>>1020550
is sculpting realistic stuff somehow easier than cartoony stylized stuff?
I feel like if I have anatomy to actually reference and have a clear right way to do then it'd help, because this feels like pissing in the wind
also feels like I need to really understand appeal and regular 2D artist stuff, which I strongly lack
Anonymous
10/20/2025, 6:28:54 AM
No.1020543
[Report]
I need some advice Anons, I want to continue focusing on modeling and animation tutorials, but I'd like to rip assets from Mechwarrior 5 so I can borrow some backgrounds. Is UE viewer the simplest tool for this? Its the first thing that I found when I looked up UE4 ripping on youtube.
Anonymous
10/20/2025, 7:02:50 AM
No.1020545
[Report]
>>1020445
off the top of my head, use a color ramp as the factor in a mix shader node, mixing a diffuse shader and a transparent shader
Anonymous
10/20/2025, 11:30:40 AM
No.1020550
[Report]
Blender 2025 Survey
https://www.blender.org/news/blender-survey-2025/
Wouldn't it be nice if you could paint vertex color on multires objects? That way you could bake diffuse from high to low, this feels like an intended use of multires
>>1020528
Let's face it, you probably can't sculpt realistic either
Anonymous
10/22/2025, 4:08:46 AM
No.1020671
[Report]
>>1020673
>>1020676
ok trying to model u shape pipe
>bridge edge loop doesn't work
>edge of pipe doesn't match when i use 3d cursor - spin method
Anonymous
10/22/2025, 4:22:32 AM
No.1020673
[Report]
Anonymous
10/22/2025, 4:29:23 AM
No.1020674
[Report]
Anonymous
10/22/2025, 6:43:16 AM
No.1020676
[Report]
>>1020671
I would add a torus, delete half, merge by distance